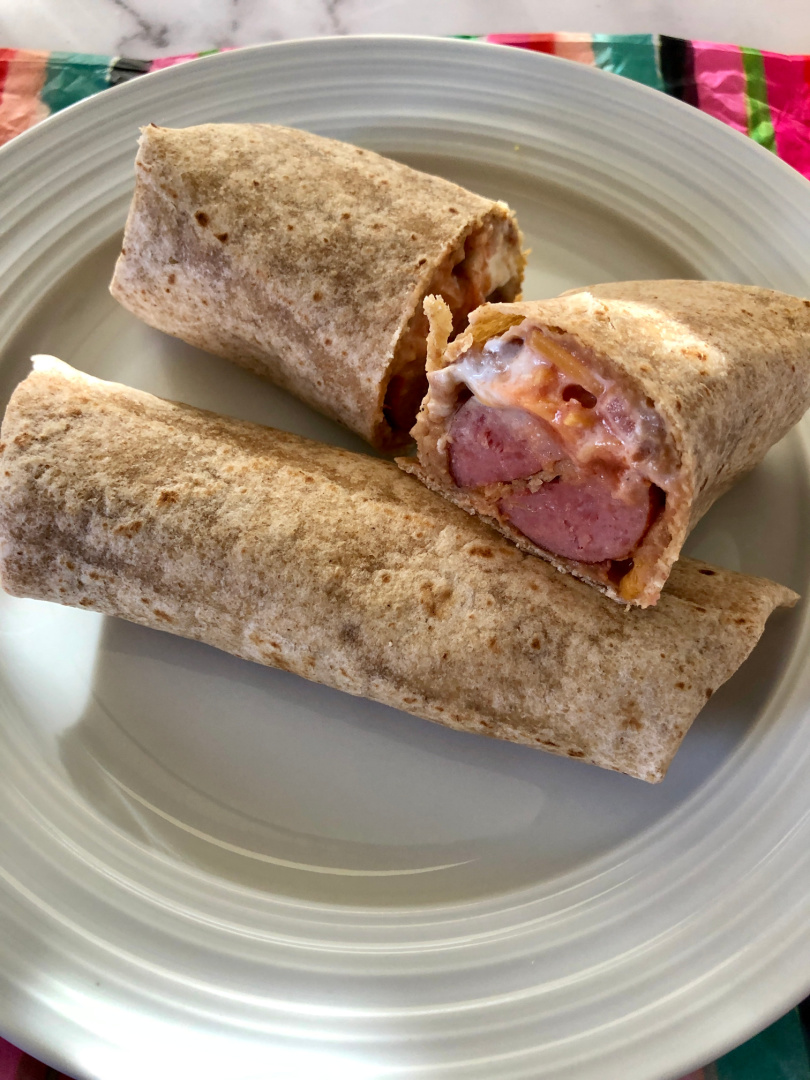
Author: Roscoe

  • How to Cook Rice in a Crock Pot

    Rice is one of those foods that seem deceptively easy to make. The concept appears simple; just put some water and rice together and let them simmer for a while.

    However, adding too much water or letting the rice simmer just a little too long results in a watery mess or blackened rice heat-fused to the inside of your pan. Learn how to cook rice in a crock pot!

    Some resort to getting a rice cooker to avoid such disasters, but they’re unnecessary. Instead, get out your crockpot. The long, slow cooking times and low heat cook rice perfectly every time.

    How to Cook Rice in a Crock Pot

    You Will Need:

        Butter or margarine
        Crockpot
        Rice
        Chicken or beef stock

    Scoop up some butter or margarine on your fingers and grease the inside of the crockpot thoroughly. Press your fingers into the edges and creases of the crockpot, covering the entire surface.

    The butter or margarine adds some flavor and keeps the rice from sticking to the sides of the pot as it cooks.

    Add about half as much raw rice as you want to end up with at the end of the cooking process. If you want to make 4 cups of cooked rice, you only need 2 cups of raw rice. The rice will fluff up and expand a lot while it cooks.

    Pour in 2 cups of chicken or beef stock for each cup of rice you’re cooking. For 2 cups of raw rice, you need 4 cups, or 2 pints, of stock.

    Vegetarians may use vegetable stock or water. If you choose to use water, add about a tablespoon of salt to the rice, as well.

    Stir the rice and liquid light. Place the lid on the crockpot and turn it on low.

    Check on the rice about every 30 minutes.

    White rice should take about 2 hours to cook, while brown rice may take 3 or 4 hours.

    Recipe Options

    If cooking plain old rice by itself doesn’t seem very exciting, add a few other things to it.

    Chili and Rice

    Pre-cooked sausages, shrimp, tomatoes, and chili peppers stewed with the rice make delicious paella. A can of black beans and some tomato sauce creates a simple and filling chili recipe.

    Rice Pudding

    Create rice pudding by substituting the stock or water for milk. Add 1/4 cup to a full cup of sugar or sweetener and a handful of each of raisins and chopped dates.

    When the pudding is finished, top it with some slivered almonds or toasted walnuts.

  • Tips for Cooking With Wine

    Do you want to try new flavors with your recipes? Cook with wine! Read my tips for cooking with wine. Plus, you’ll see a Baked Ham Pontalba recipe at the end of this post to try!

    Tips for Cooking With Wine

    There are few meat or fish dishes that are not enhanced by a few dollops from your favorite wine bottle while they are simmering on the stove.

    It isn’t a question of spiking the food since alcohol evaporates as soon as it reaches the boiling point. Like thyme or any other seasoning, wine is used to round out the flavor.

    This does not mean that you should buy the cheapest wine available in the mistaken belief that, since it is boiled, it doesn’t matter. Bear in mind the fact that a wine that is too sweet or too sour for your drinking taste will hardly improve the entree.

    As a matter of fact, once it cooks down, the taste of wine becomes considerably more pronounced.

    Shop Wines:

    Tips for Cooking With Wine

    In short, never pour into the pot a wine you wouldn’t pour into your glass.

    The old adage of white wine with white meat and red with red is pretty silly whether you are going to drink it with your meal or cook with it. With the exception of fish which is generally better cooked with white wine, both red and white, or rose for that matter, go equally well with chicken, veal or beef.

    Generally speaking, it is preferable to use a full-bodied wine that is on the dry side but not too tart, whether it be red or white. Reasonably priced red wines obtainable in this country include Pinot Noir and many of the Chiantis.

    White wines are a little more tricky if you’re looking for bargains, and it is often safer to cook with dry white vermouth.

    If the meat you are cooking tends to toughness, it is wise to marinate it overnight in wine, keeping it in the refrigerator.

    Sherry is popular in seafood dishes, but the sherry should be dry. Since sherry has a pronounced flavor, use it sparingly.

    Sweet dessert wines like Marsala give a lift to fruit compotes or custards like Zabaglione, that toothsome Italian concoction of sugar and egg yolks.

    Wine cookery became popular in America during the 18th and 19th centuries with the influx of thousands of emigres from the countries of Europe. Many of the finest dishes were developed in the kitchens of Louisiana’s Creoles, those descendants of French and Spanish settlers.

    Tips for Cooking With Wine

    Who but the Creoles could have conceived such a delectable dish as Ham Pontalba with its tongue-tingling stuffing of onion and truffles bathed in Madeira wine?

    Baked Ham Pontalba

        14 pound ham baked
        4 cups shelled pecans ground
        3 onions chopped fine
        1 small can truffles cut in pieces
        6 bay leaves
        2 sprigs (½ teaspoon dried) thyme
        3 teaspoons dried sage
        3 teaspoons ground cloves
        ¼ teaspoon cayenne
        ½ cup Madeira wine
        1 apple
        1 cup cane syrup
        Brown sugar
        Fine dry bread crumbs

    Have your butcher at your local supermarket or meat market bone the ham.

    If a dry, smoked ham is used, the ham must be soaked in cold water for 12 hours. When a modern, cured ham is used, you do not have to soak the ham.

    Prepare the Stuffing

    Cut out about ½ lb. ham to make a cavity. Work the ham through a food grinder.

    Blend mixture with pecans, one chopped onion, truffles, two crumbled bay leaves, thyme, one teaspoon sage, one teaspoon ground cloves, cayenne, and Madeira.

    Pack the stuffing into ham cavity, sewing or skewering it securely.

    Add these seasonings on the ham: one chopped onion, two bay leaves, one teaspoon sage, one teaspoon cloves. Sew a cloth securely around the ham and place it in a large kettle.

    Add enough water to the kettle to cover. Add the remaining chopped onion, bay leaves, sage, cloves, whole unpared apple, and the syrup. Bring to a boil, cover, reduce heat and simmer for about six hours or until tender.

    Allow the ham to cool in the liquid. Once cooled, remove the rind, pat ham with a mixture of brown sugar and crumbs.

    Bake in a preheated 375-degree oven until the surface is well-browned and the ham is hot!

    You can also purchase cooking wine if interested!

  • Tips for Cooking With Olive Oil

    You will always find a bottle of olive oil in my kitchen! Here are my best tips for cooking with olive oil.

    tips for cooking with olive oil

    Savor the delicate aromas and earthy flavors, and you’ll understand why olive oil is the cornerstone of wholesome cooking. The popular Mediterranean Diet, Weight Watchers, and other plans herald olive oil as a healthy source of fat. Even the FDA has suggested replacing sources of saturated fats with extra virgin olive oil for its positive health effects, such as balancing cholesterol.

    Which Oil Is Best to Use When Cooking?

    Olive oil is versatile and easy to use, whether for dipping with a generous chunk of artisan bread, as a base for salad dressing, or to saute vegetables. Like good wine, some olive oils pair better with certain foods. Some brands can taste more bitter than others or have a pungent fragrance. Taste several brands of extra virgin olive oil to determine which fall into your range of preference.  

    The highest grade of olive oil is extra virgin, often called EVOO by celebrity chefs Rachel Ray and Mario Batali. Properties vary within grades by taste, color, shelf life, smoke point, and anti-oxidant levels, so it can be difficult to tell by the label or color exactly what you are buying.  Using EVOO ensures the best results for most cooking purposes. 

    Tips for Cooking With Olive Oil

    Condiment

    Select a lighter oil for salad dressings, top a baked potato, drizzle over tomatoes, or brush onto bread. Unheated olive oil is at its finest for health benefits and mild flavor. Use more robust extra virgin oils for mixing with intense flavors such as garlic, or pepper for marinades or sauces, like pesto or tomato. 

    Marinade

    Extra virgin olive oil is an ideal base for marinades to add flavor and tenderize meats prior to cooking. To 1/4 cup olive oil, add an equal amount of an acid source, such as vinegar, wine, or even papaya or pineapple. Mix in desired seasonings, such as rosemary, garlic, onion, or herb blend. Cover the meat, fish, or other food to be marinated and refrigerate. Seafood only needs to be marinated 20 minutes to an hour—chicken, beef, or other meat an hour or more.

    Browning or sauteing

    Try a more robust flavored oil to brush onto the pizza crust or in cooked sauces. Heating to a high temperature evaporates the alcohols inherent in olive oil, dampen flavors, and can even become bitter. More expensive extra virgin products are not needed here. To add a buttery flavor without the total cholesterol load, try mixing equal parts EVOO with butter. 

    Frying

    EVOO has the highest smoke point of all the grades of olive oil but is still lower than some other cooking oils, such as canola or soy. If deep fat frying, olive oil must be watched closely, so it doesn’t burn. 

    Infusion

    EVOO readily picks up the flavors of herbs and spices that are placed in it, and infusions make a lovely gift. Fill an attractive bottle with olive oil and add a sprig of rosemary or garlic clove for a lovely gift. However, be very careful. Do not place anything in the olive oil that can contain water or moisture. Oil does not promote bacterial growth, but water from the fresh lemon peel or recently washed herbs can. Use only dried herbs, or preserve the garlic cloves or peels in a strong brine before introducing it to the olive oil.

    Storage

    Olive oil quickly begins to oxidize when exposed to light, heat, and air. Take care to seal a bottle quickly after use and store it in a darkened pantry or cabinet away from heat sources. The ideal temperature in which to store olive oil is about 50*F, and if stored at temperatures below this, the oil can become cloudy and form crystals or clumps that sink to the bottom. Note that this does not ruin the oil, and it will return to normal appearance at room temperature. Properly stored, olive oil can keep for up to a year.

    Olive oil can easily be substituted for butter or margarine in most uses where a liquid shortening is appropriate. The standard conversion formula is 1 unit of butter or shortening to .75 units of olive oil. For uses where the product must stay firm at room temperature, such as frosting, olive oil is not a good choice.

    With a little practice and experimentation, olive oil can become your “go-to” basis for healthy, great cuisine.

  • Homemade BBQ Sauce for Pork Ribs

    Are you smoking or grilling spare ribs or baby back ribs this weekend? Learn how to make homemade BBQ sauce for pork ribs!

    Homemade BBQ Sauce for Pork Ribs

    This recipe works for either spare ribs or baby back ribs. After cooking these ribs, stand back and listen to the compliments. Food, glorious food.

    Food is good, and it’s good for you; just think where you would be without it. Cooking can be almost as much fun as eating, especially when the cooking is done outdoors in a BBQ pit. One of America’s all-time favorite BBQ foods is pork ribs. This recipe will produce ribs that will rival any of a BBQ restaurant.

    Try my Smoked Rib recipe! This recipe uses a different sauce as another option for you!

    Homemade BBQ Sauce

    This sweet, smoky sauce works well on ribs and other cuts of pork:

     2 cups ketchup
     1 cup molasses
     1/2 cup white vinegar
     1 tablespoon paprika
     1 tablespoon garlic powder
     1 teaspoon onion powder
     1/2 teaspoon cinnamon
     1/2 teaspoon allspice
     1/2 teaspoon black pepper

    Combine all of the above in a non-stick saucepan and simmer until all ingredients are dissolved. The product may be stored in a clean, plastic ketchup bottle in the refrigerator.

    Dry Rub

    While that is simmering, make this dry rub. It works well with pork ribs and shoulder, but might not be as good on beef:

     1/2 cup table salt
     1/2 cup white sugar
     1/4 cup brown sugar
     1 tablespoon garlic powder
     1 1/2 tablespoons onion powder
     1 1/2 tablespoons paprika
     3 tablespoons chili powder
     1 1/2 tablespoons black pepper
     1 tablespoon cayenne pepper
     1 tablespoon thyme
     1 tablespoon cumin
     1 tablespoon nutmeg

    Combine all of the above and store in a plastic soda pop bottle with a lid.

    Here’s another great recipe for rib rub to try! The best part about making your own rib rub is that you can get creative with the ingredients and try different spices.

    Cooking BBQ Pork Spare Ribs

    1. Preheat smoker to 225 degrees. Walnut, cherry, or other nut-bearing woods work well for pork, but other hardwoods may be used. While the smoker is warming, remove the paper-thin membrane from the bone side of the ribs. To do this, ‘scratch’ your fingernail against a rib bone till the membrane starts to peel off. When partially removed, grab the membrane with your fingers and pull off as much as you can. Place slabs on the cooking grate with the bones down. Close the lid and keep it closed. Monitor smoker temperature and add wood as needed. Every hour, rotate slabs. Move the slab from the hottest side of the smoker to the opposite side and slide all other slabs over a notch.
    2. Total smoking time will be 4 hours. After three hours and 20 minutes, slather each slab with sauce (use a food-safe brush or knife) and sprinkle a liberal amount of rub. Repeat this 20 minutes later. Remember, whenever you open the smoker lid, some of the heat will escape. Be sure to monitor the smoker’s temperature carefully during this final hour.

    Shop Best Smokers

    One Recipe for Two Types of Pork Ribs

    There are differences between the baby’s back and spare ribs, but this recipe will work for either. After making this recipe a time or two, the diner’s tastes might dictate more or less sauce/rub, but avoid putting the sauce on the slabs until the final hour of cooking. The sugar in the sauce and rub can burn if applied earlier. Enjoy!

    If you don’t have time to create your own homemade sauce or rib rub, you can always save time and purchase these to help!

  • How to Cook Scallops

    Are you interested in learning how to prepare and cook scallops? Here are my tips for How to Cook Scallops!

    how to cook scallops

    When cooking scallops – as with any form of shellfish – there are two inherent dangers. Firstly, and most importantly, we must make sure that they are fresh and have not “turned.”

    How to Cook Scallops

    Eating shellfish, which has gone bad, can make us very seriously ill or worse. Fresh seafood should smell faintly of the sea, not of what we would associate as fish. Buying from a reputable supplier and eating the scallops on the same day as the purchase is probably the best way in which to tackle this potential problem.

    Tips for Buying Seafood

    The second thing we have to be aware of is that if we overcook the scallops to the slightest extent, they will assume a texture similar to that of rubber and be quite unpalatable. Most of us are familiar with the unpleasant sensation of chewing upon a piece of overly tough steak; with shellfish, the experience is even more unpleasant.

    Bearing the second point particularly in mind, I would recommend that any novice cook – or even anyone cooking scallops for the first time – prepare them in a fashion where the cooking time is definable.

    By that, I mean by a method where there is no discretionary judgment required as to when they are ready. A specific occurrence should tell us when the cooking time is over.

    The way in which I cook them within the above parameters is by poaching them in milk. Simply put the scallops into a pan and add enough cold milk to ensure they are all covered. Put the pan on to the stove or hob, over medium heat. As soon as the milk reaches a gentle simmer, the scallops are cooked and may be drained and served.

    Try using a little of the warm milk to make creamy mashed potatoes as a subtly flavored bed upon which to serve the shellfish. It is also, of course, an option to add some fresh herbs to the milk in which you will poach the scallops but be very careful not to add anything which will overpower the extremely delicate, sweet flavor of your main ingredient! Try instead adding a little dill to the mash only.

    If we are considering searing scallops, the best way to do this is on a smoking hot griddle pan. Gently place the scallops onto the pan and cook for twenty to thirty seconds before turning them over to cook on the other side for a similar period of time.

    This method gives them an attractive, almost rustic appearance but also naturally carries a far greater risk of cooking them for too long. Fresh scallops are expensive enough without wasting any in preparation. Try serving them on a bed of fresh green salad leaves, perhaps with a very little and subtle herb and extra virgin olive oil dressing.

    In conclusion, there is always a difference of opinion as to whether the coral should be eaten as part of the scallop or discarded. The “coral” is basically the orange “tail” attached to the circular main body of the shellfish.

    I do eat it, as although it is not quite so flavorsome as the scallop itself, it is far from unpleasant and offers a little bit of variety in the overall eating experience.

    How to Cook Oysters

    How to Cook Clams

    How to Cook Mussels

    Easiest Way to Open Oysters

    How to Butterfly A Lobster Tail