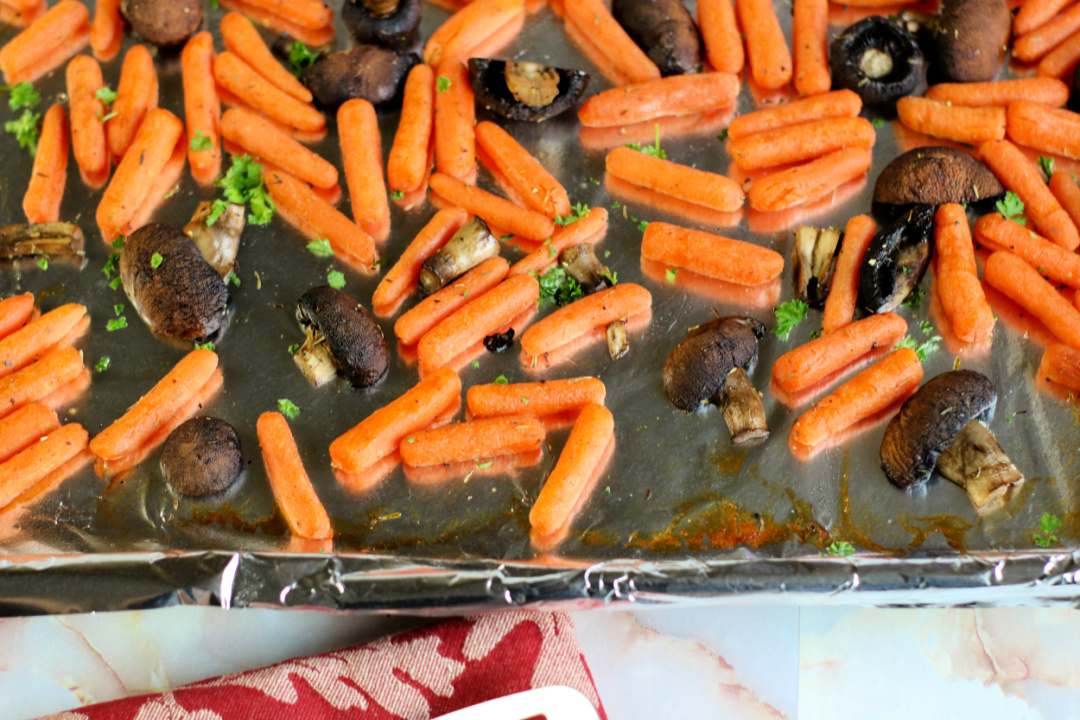
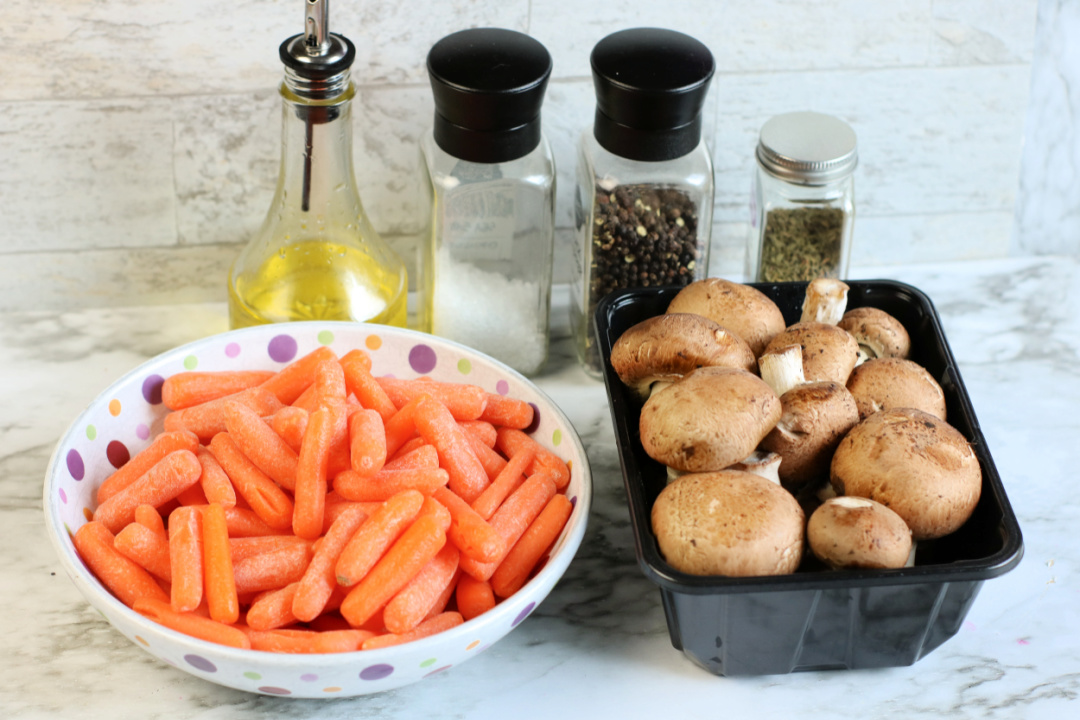
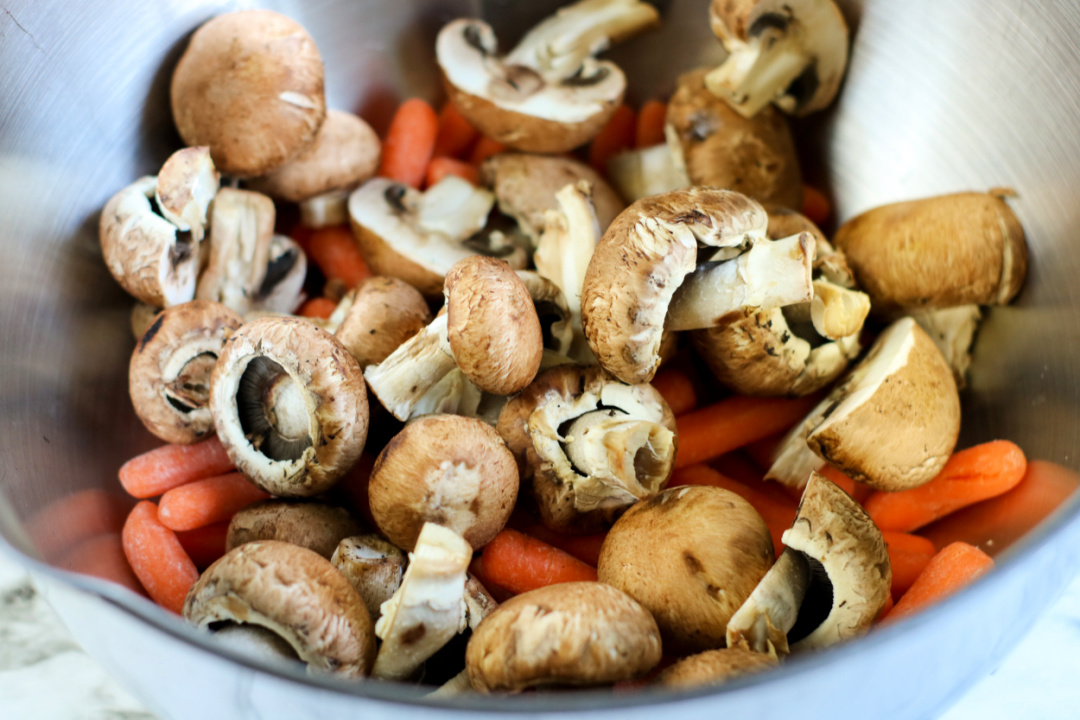
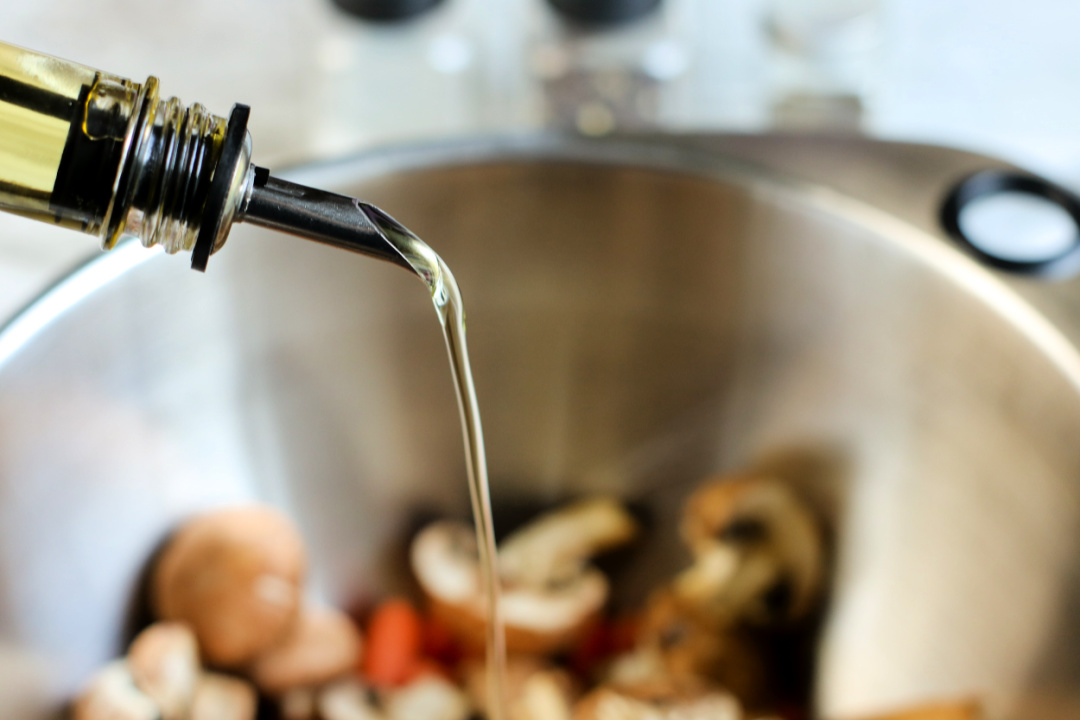
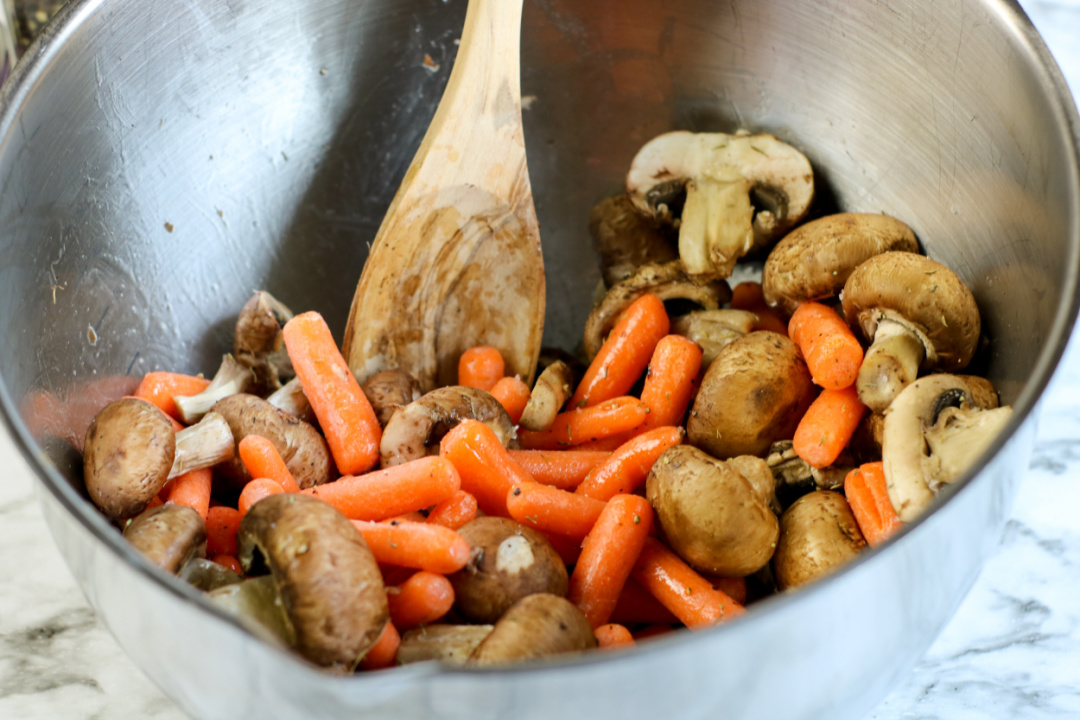
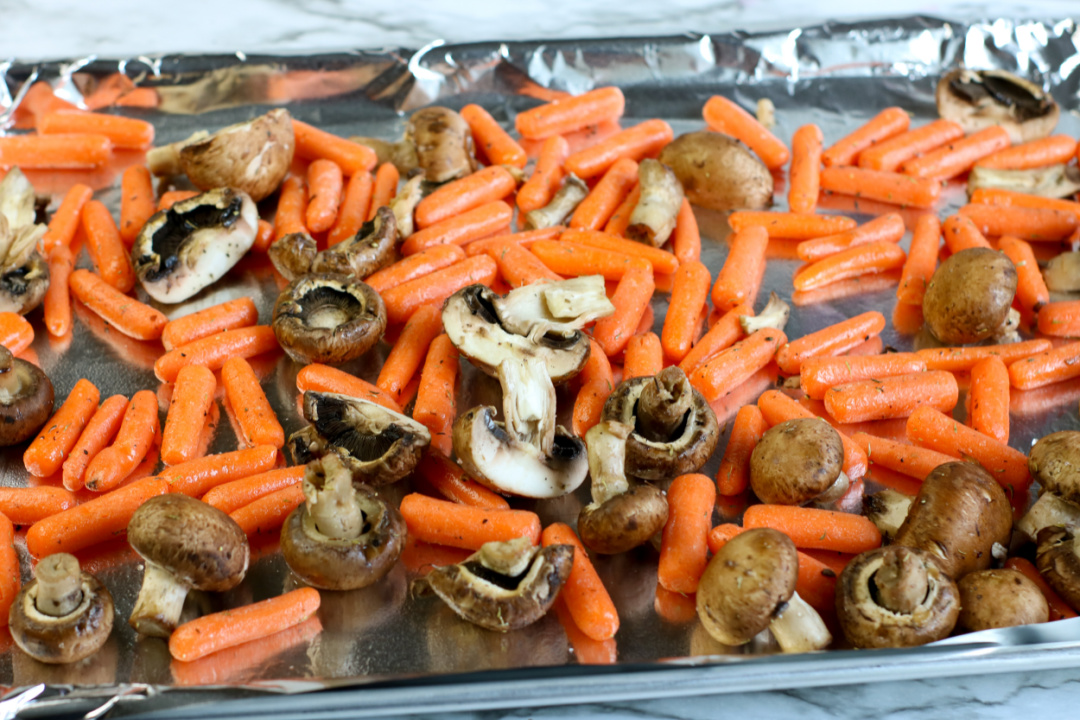
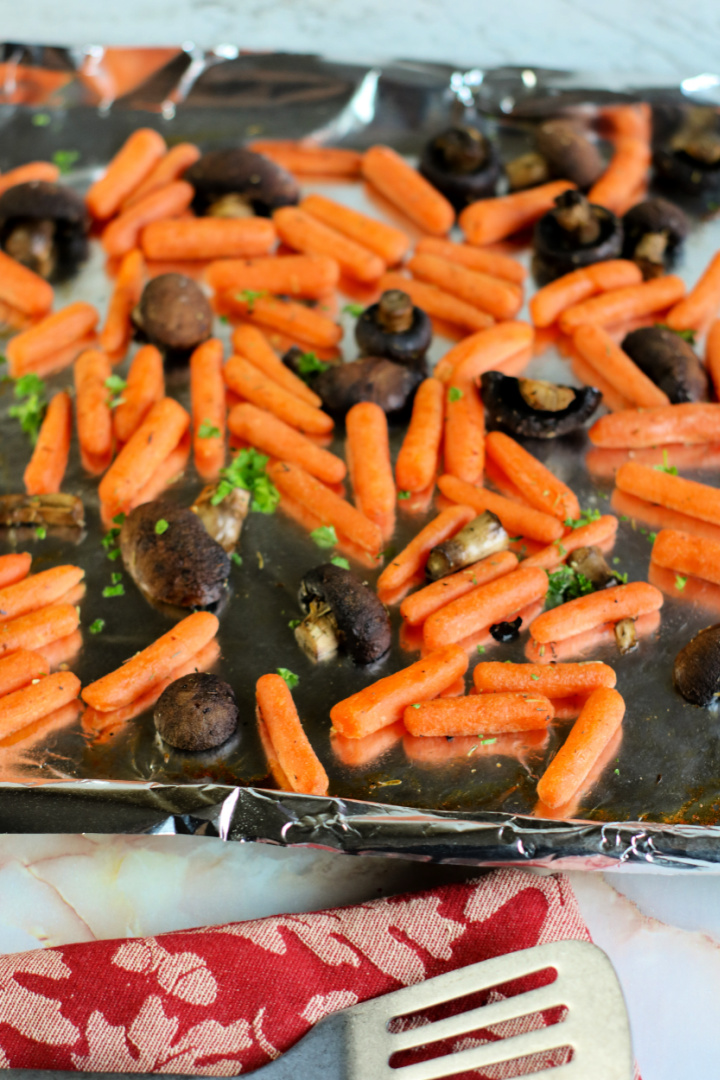
This Roasted Carrots and Mushrooms recipe is a great side dish to serve with your favorite main course this week!
Tired of eating plain carrots? Are you a fan of mushrooms? Try roasting carrots with olive oil and thyme. Pair mushrooms with the roasted carrots for a delicious side dish!
These roasted carrots and mushrooms are great paired with beef or pork roast.
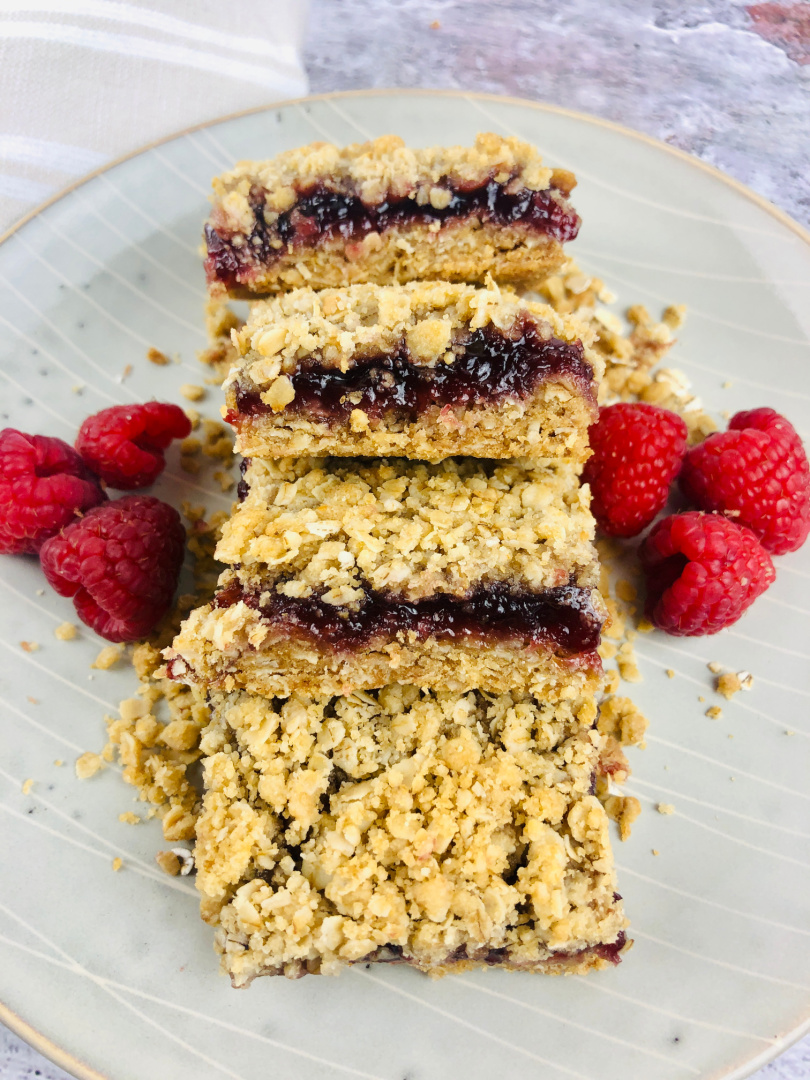
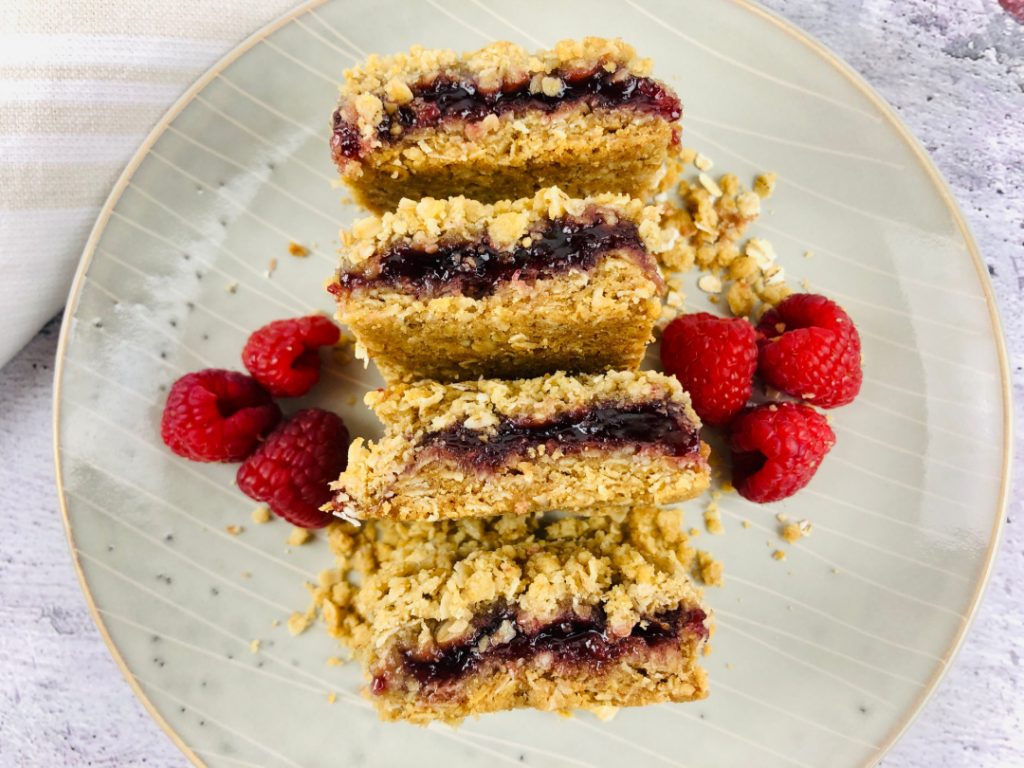
These tasty Raspberry Oatmeal Bars can be enjoyed for breakfast, snack, or dessert! Pair with fresh raspberries and a glass of milk or coffee.
This bar recipe is perfect to serve for your family or guests! Oatmeal bars are easy to make and require a few basic ingredients.
The raspberry filling paired with the oatmeal and brown sugar make these a popular choice for breakfast! Or, save them as a dessert to enjoy after your favorite meal.
There are a variety of oatmeal bar flavors to try. Make sure you try the following recipes below, too!
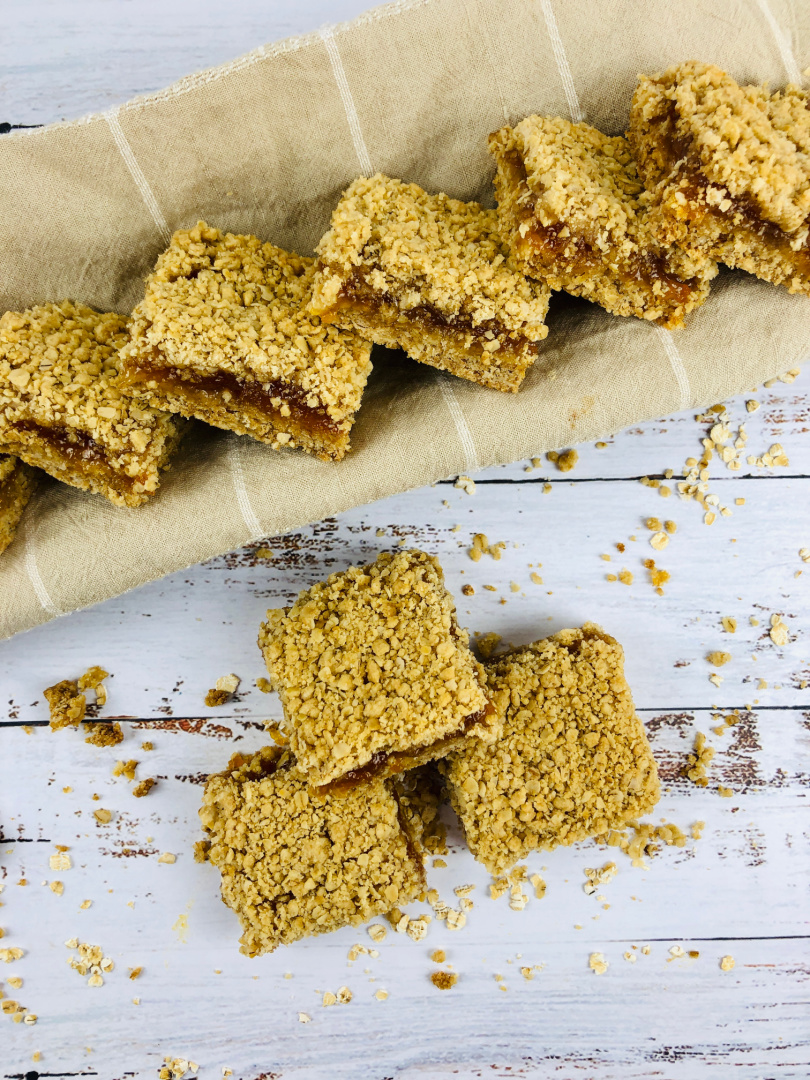
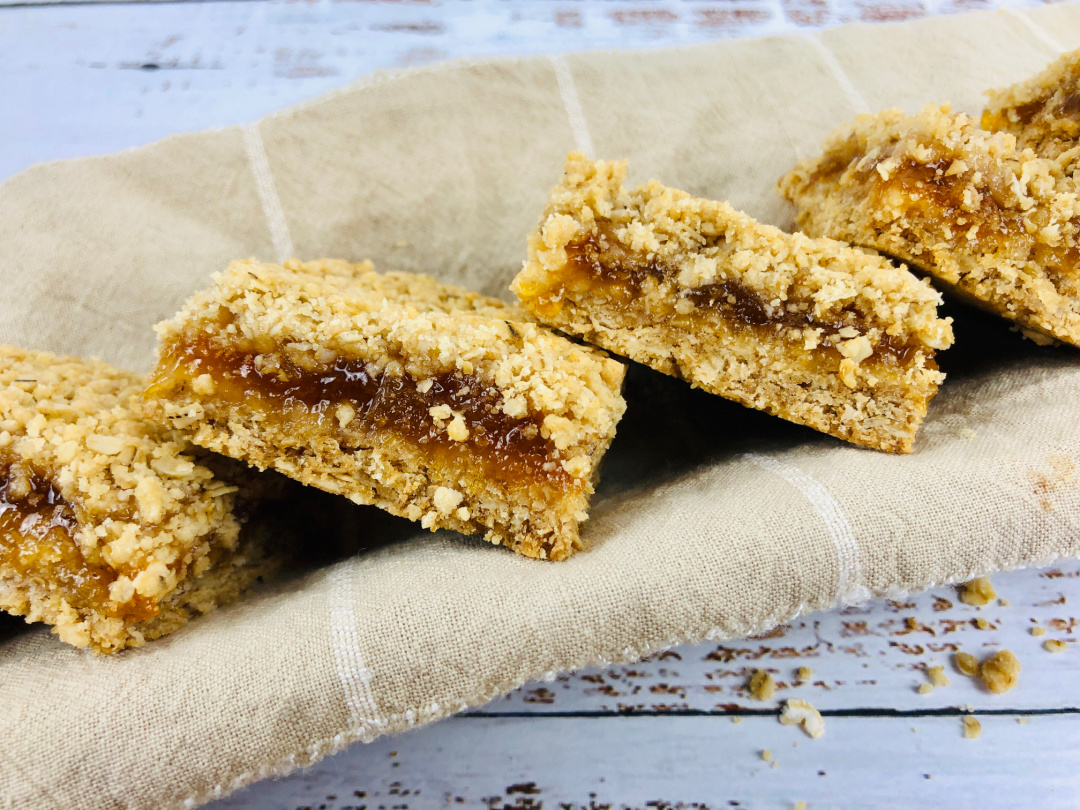
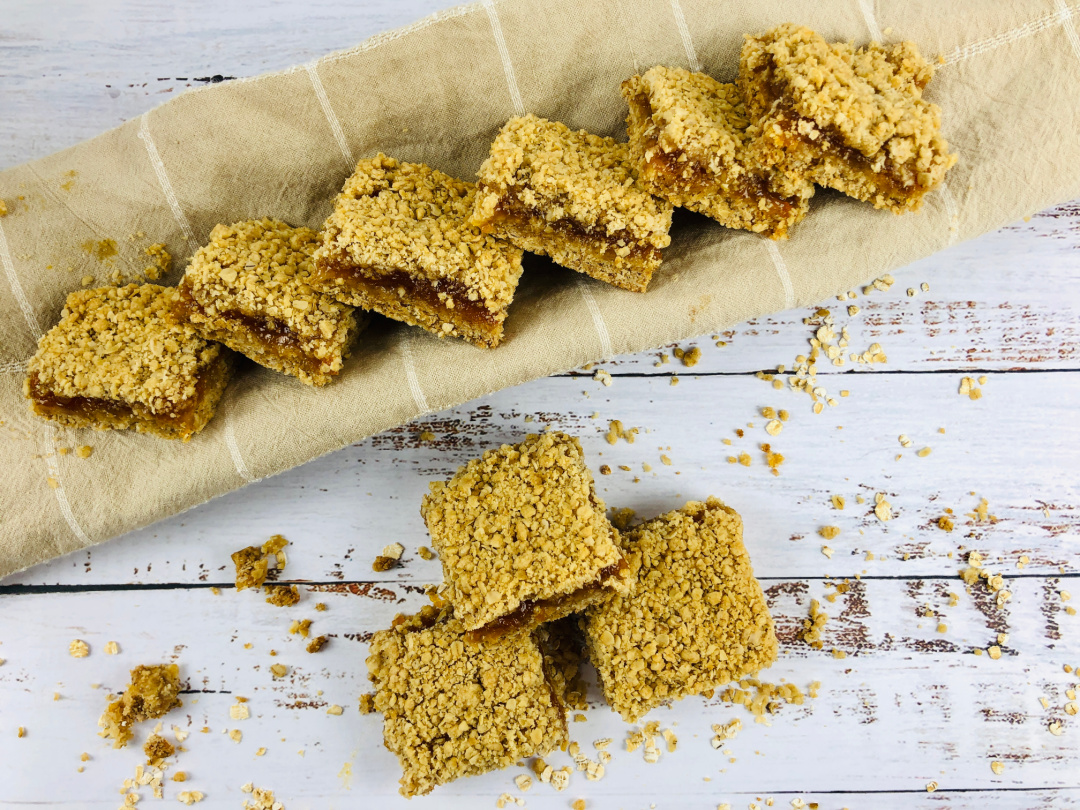
Serve these delicious Apricot Oatmeal Bars at your next gathering! These bars are an excellent choice for breakfast, snack, or dessert any time of year.
Apricot Oatmeal Bars: A Simple Treat with Southern Charm
If you’re looking for a simple homemade dessert that brings comfort, flavor, and a little old-fashioned charm to the table, these apricot oatmeal bars are the answer.
Whether you’re feeding a crowd at a church potluck, packing a sweet treat in the kids’ lunchboxes, or just want something to enjoy with your morning coffee, this is one of those easy fruit bar recipes with oats that checks all the boxes.
These apricot jam bars remind me of something you’d find cooling on grandma’s kitchen counter.
There’s something about the mix of buttery oat crumble and sweet, tangy jam that just feels like home.
They’re not overly fancy or fussy—just a solid, dependable recipe you’ll come back to again and again.
These easy apricot oatmeal bars are perfect for busy folks who want to throw together a quick dessert without pulling out every mixing bowl in the kitchen.
They’re great for parents who want a not-too-sugary snack for the kids, or anyone looking for a bake sale hit that stands out from the usual cookies and brownies.
They also work well for folks who like to make ahead and freeze their baked goods—these bars freeze like a charm.
When to Make Them
These old fashioned jam bar desserts are perfect any time of year, but they really shine in the spring and summer when lighter fruit-based desserts are more popular.
They’re also great during the holidays when you need something sweet on the dessert table that isn’t pie or cake.
Basically, if you need a make-ahead treat for a picnic, potluck, or Sunday supper, you’re in the right place.
What They’re Good For
These bars aren’t just tasty—they’re versatile. This is the kind of recipe that pulls double duty.
Serve them as a sweet afternoon snack with a cold glass of milk, or slice them into smaller squares and add them to a dessert tray alongside cookies and candies.
They’re also one of the best oatmeal jam bars for lunchboxes since they hold up well and aren’t overly messy.
Where to Serve ‘Em
Take a pan of these easy apricot oatmeal bars for potluck gatherings, school events, or family reunions.
They don’t need refrigeration, which makes them a great option when you’re baking ahead and traveling.
Set out a platter at a backyard BBQ or wrap a few up for a neighbor—this is one of those desserts that just makes folks feel welcome.
How to Get Creative with This Recipe
Here’s the fun part—this recipe can be changed up in all kinds of ways depending on what you’ve got in the pantry.
Try using raspberry, fig, or peach preserves if apricot isn’t your thing. Want to make these bars more breakfast-friendly?
Swap out half the flour for whole wheat and toss in a handful of chopped nuts.
Looking for a gluten-free dessert bar recipe? Just use a good gluten-free flour blend and certified gluten-free oats.
You can also cut them into small bites and drizzle with a glaze or powdered sugar for more of a “tea time” feel.
Or serve them warm with a scoop of vanilla ice cream for a down-home dessert that feels a little more special.
Whether you’re hosting a crowd or just need a quick and easy dessert to keep on hand, these apricot oatmeal bars are a dependable go-to.
They’re the kind of treat that doesn’t need to shout to be good—and that’s exactly what makes them a classic.
Let me know in the comments if you try a different jam combo or make them gluten-free—I love seeing how y’all make these recipes your own!
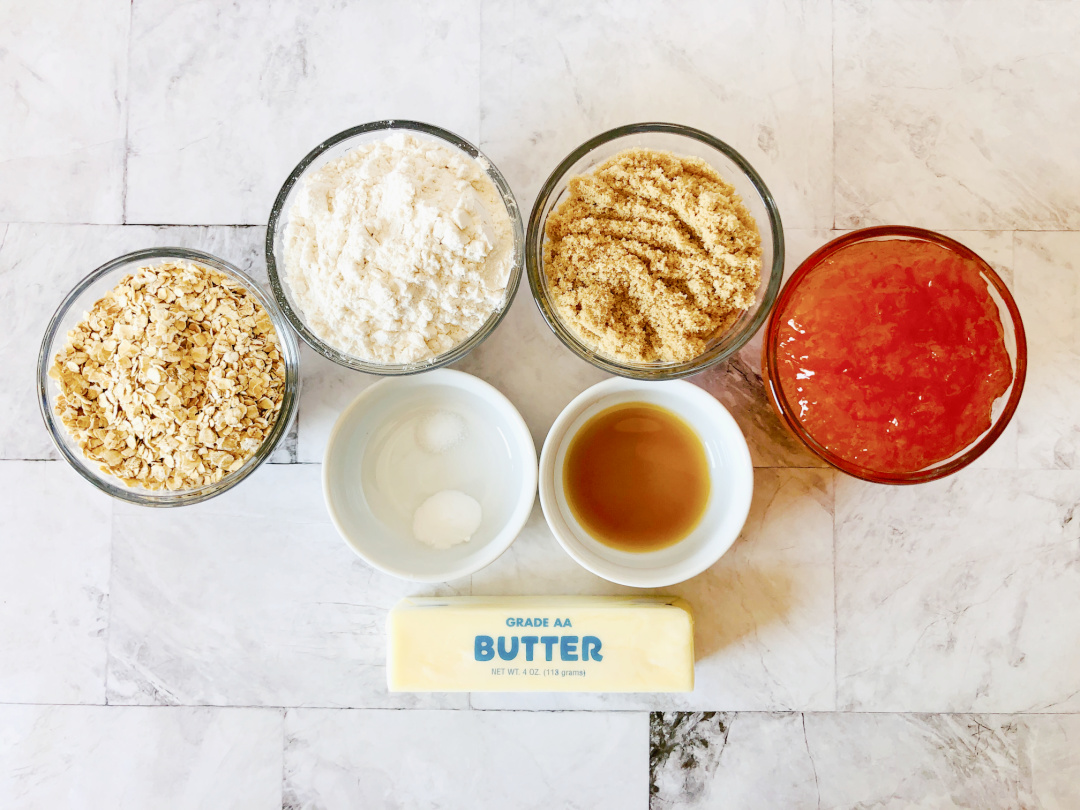
Apricot Oatmeal Bars
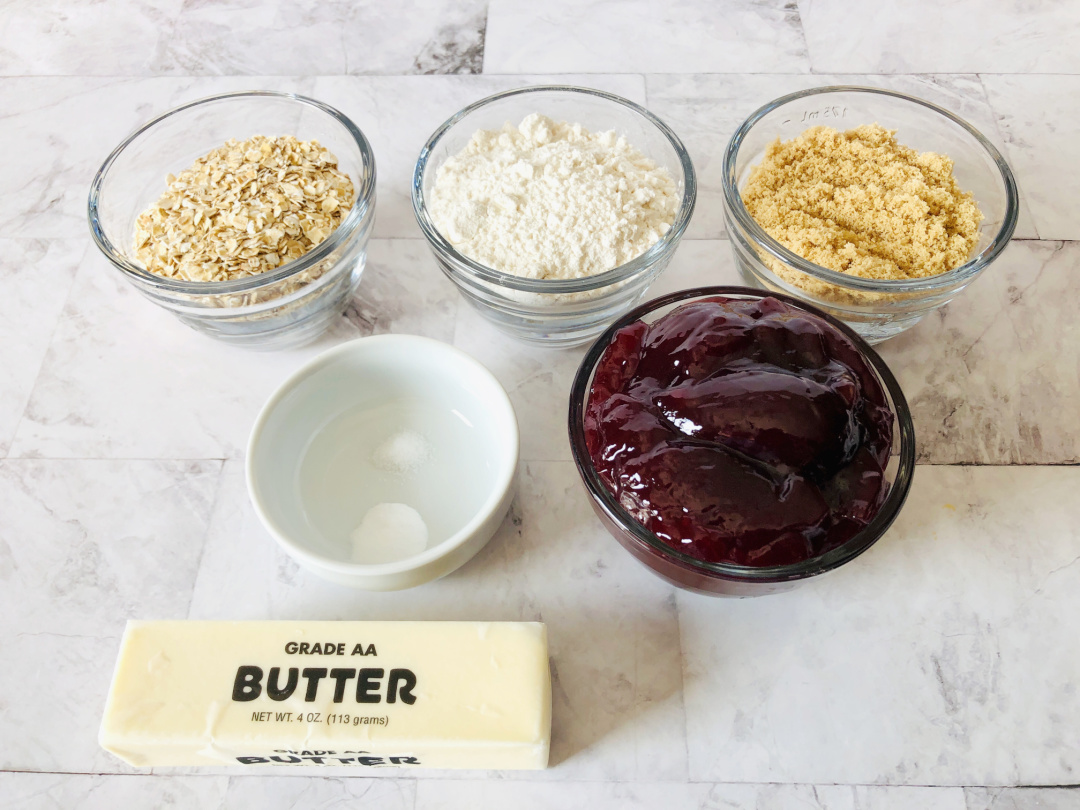
Ingredients:
½ cup light brown sugar or coconut sugar
1 cup flour or gluten free flour
¼ teaspoon baking soda
⅛ teaspoon salt
1 cup rolled oats
½ teaspoon vanilla extract
½ cup butter, softened
¾ cup apricot jam
Directions:
Preheat oven to 350 and line 8×8 square baking dish with parchment paper.
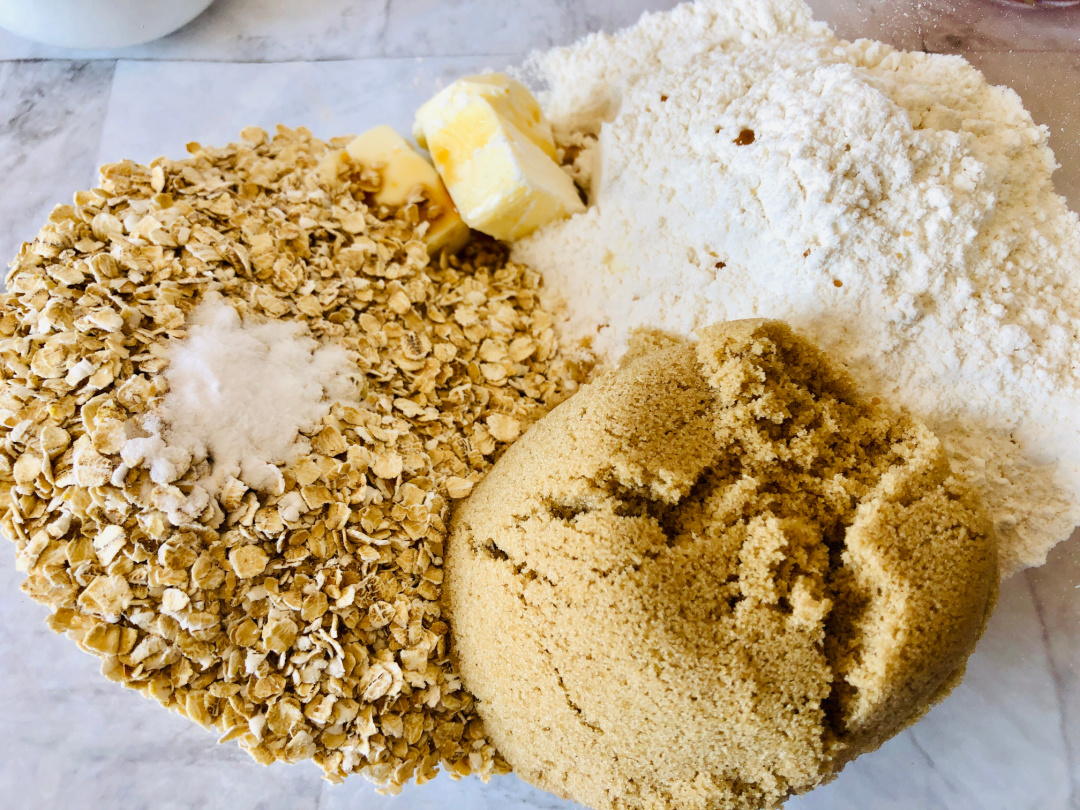
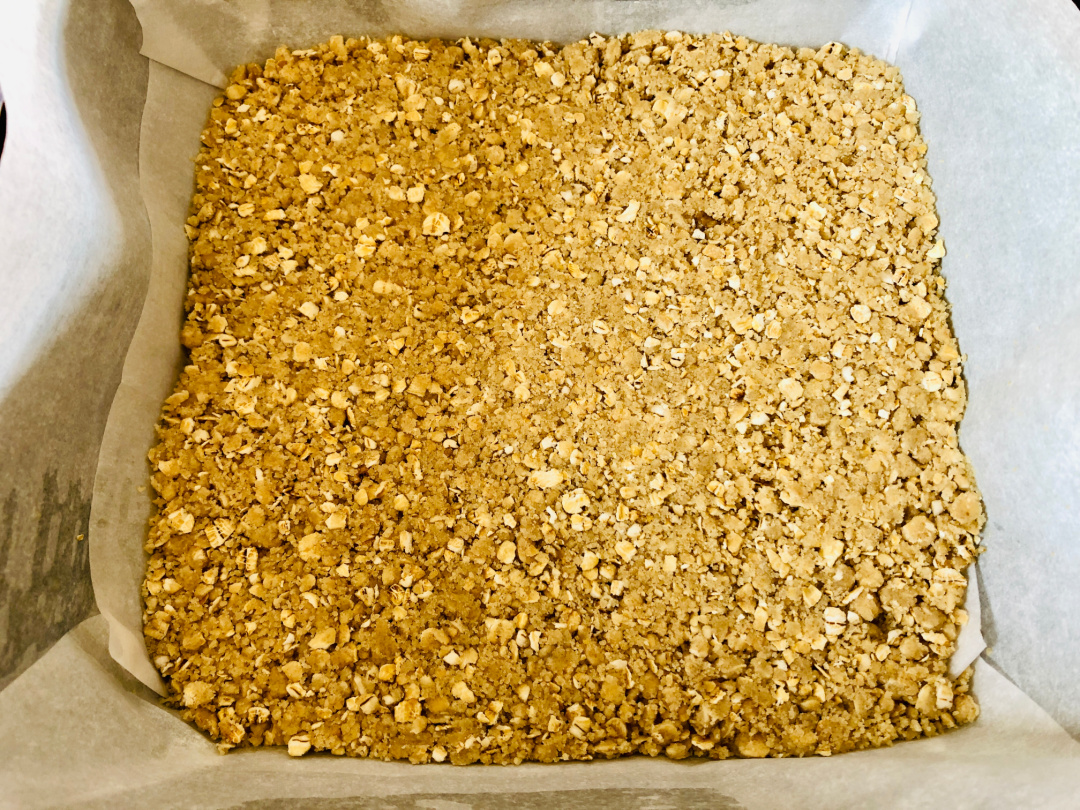
Combine brown sugar, flour, baking soda, salt, and oats.
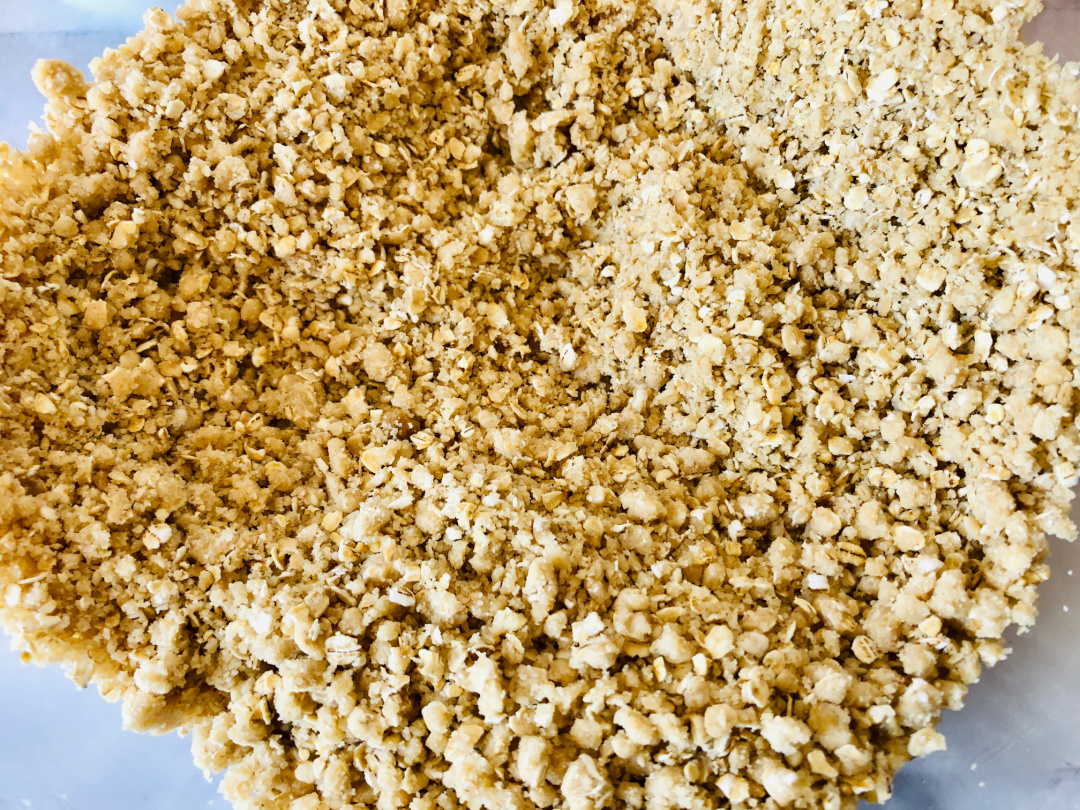
Stir or use hands to incorporate butter until the mixture is crumbly.
Press 2 cups into bottom of baking dish.
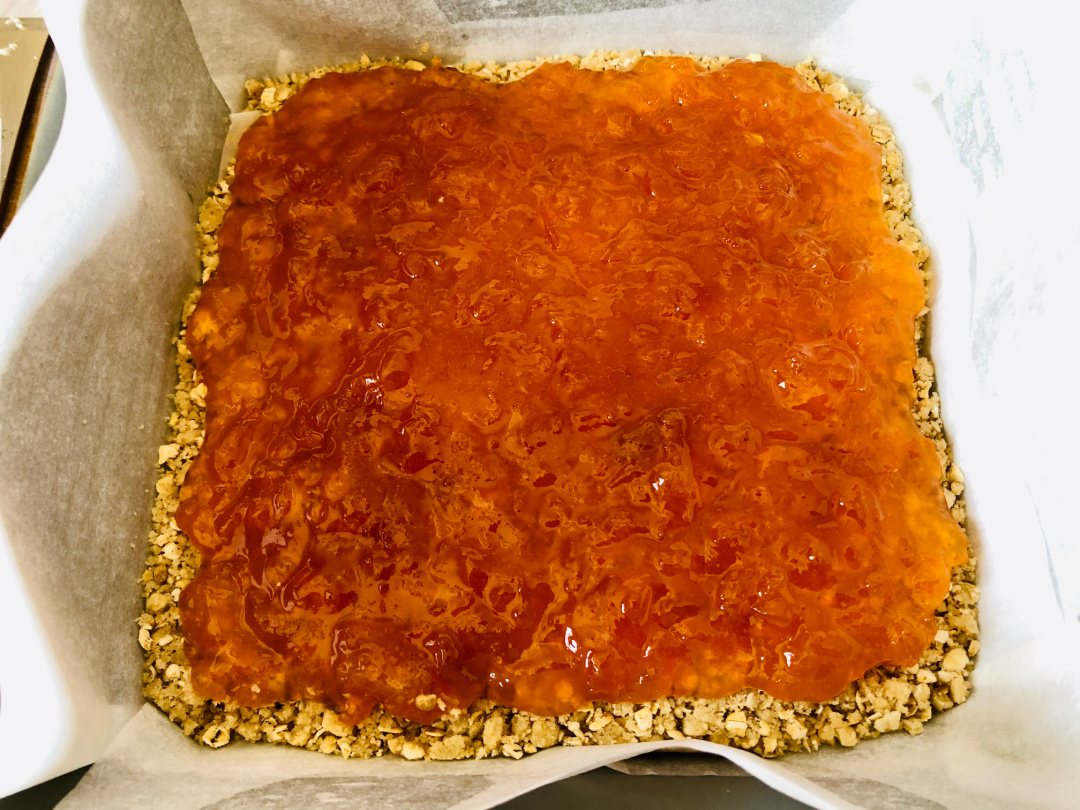
Next, evenly spread jam to ¼ inch from edge.
Sprinkle on remaining crumb mixture and lightly press into jam.
Bake 30-40 minutes until light brown.
Cool, cut into bars and serve.
Apricot Oatmeal Bars
Ingredients
½ cup light brown sugar or coconut sugar
1 cup flour or gluten free flour
¼ teaspoon baking soda
⅛ teaspoon salt
1 cup rolled oats
½ teaspoon vanilla extract
½ cup butter, softened
¾ cup apricot jam
Instructions
Preheat oven to 350 and line 8×8 square baking dish with parchment paper.
Combine brown sugar, flour, baking soda, salt, and oats.
Stir or use hands to incorporate butter until the mixture is crumbly.
Press 2 cups into bottom of baking dish.
Next, evenly spread jam to ¼ inch from edge.
Sprinkle on remaining crumb mixture and lightly press into jam.
Bake 30-40 minutes until light brown.
Cool, cut into bars and serve.
Frequently Asked Questions – Apricot Oatmeal Bars
1. Can I use a different kind of jam? Yes! While apricot jam gives these bars a sweet and slightly tart flavor, you can substitute it with peach, raspberry, strawberry, or even fig jam depending on your preference.
2. Can I make these bars gluten-free? Absolutely. Just use a gluten-free all-purpose flour and make sure your oats are certified gluten-free.
3. Do I have to use light brown sugar? No, you can substitute coconut sugar or even white granulated sugar. Brown sugar gives a richer, deeper flavor, but other sugars will still work.
4. What kind of oats should I use? Rolled oats are best for this recipe. Avoid instant or steel-cut oats, as they won’t provide the same texture.
5. Can I make these bars dairy-free? Yes, you can replace the butter with a dairy-free alternative like vegan butter or coconut oil (use refined if you want to avoid a coconut flavor).
6. How do I store these bars? Store them in an airtight container at room temperature for up to 3 days, or refrigerate them for up to a week. You can also freeze them for up to 3 months.
7. Can I double the recipe? Yes! Just bake it in a 9×13-inch pan and watch the baking time—it may need a few extra minutes in the oven.
8. The topping didn’t get very brown. What should I do? Oven temperatures vary. Try baking for an extra 5 minutes, or you can briefly broil the top (watch it closely!) for 1–2 minutes to add a golden finish.
9. Do these bars need to be refrigerated? They don’t need to be, but refrigerating them helps them hold their shape better, especially in warmer climates.
10. Can I use quick oats instead of rolled oats? Quick oats will work in a pinch, but the texture may be softer and less crumbly than with rolled oats.
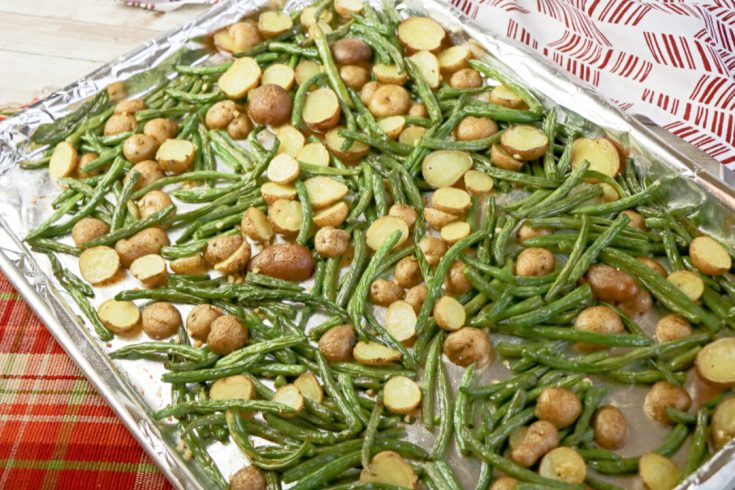
This sheet pan recipe is sure to become a staple in your household!
Serve it alongside your favorite protein or enjoy it as is – either way, you’re guaranteed a delicious dinner that’s ready in no time.
So go ahead and give this sheet pan garlic potatoes and green beans a try – you won’t regret it! Enjoy!
A sheet pan that’s filling and full of flavor? This is it! Try this sheet pan recipe soon.
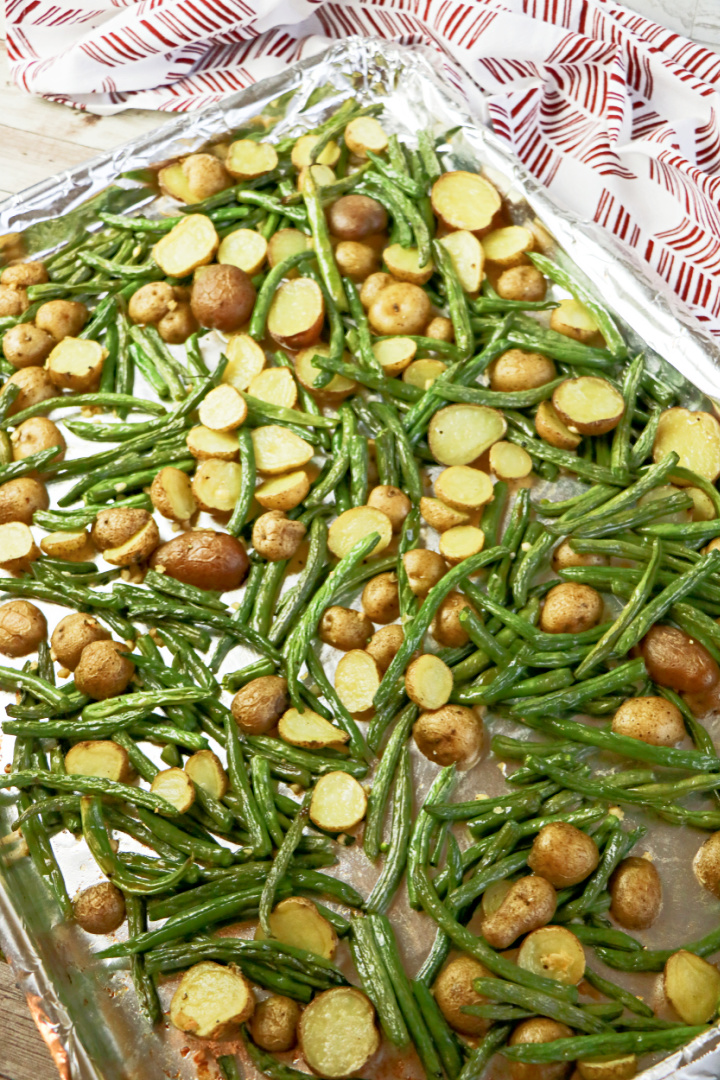
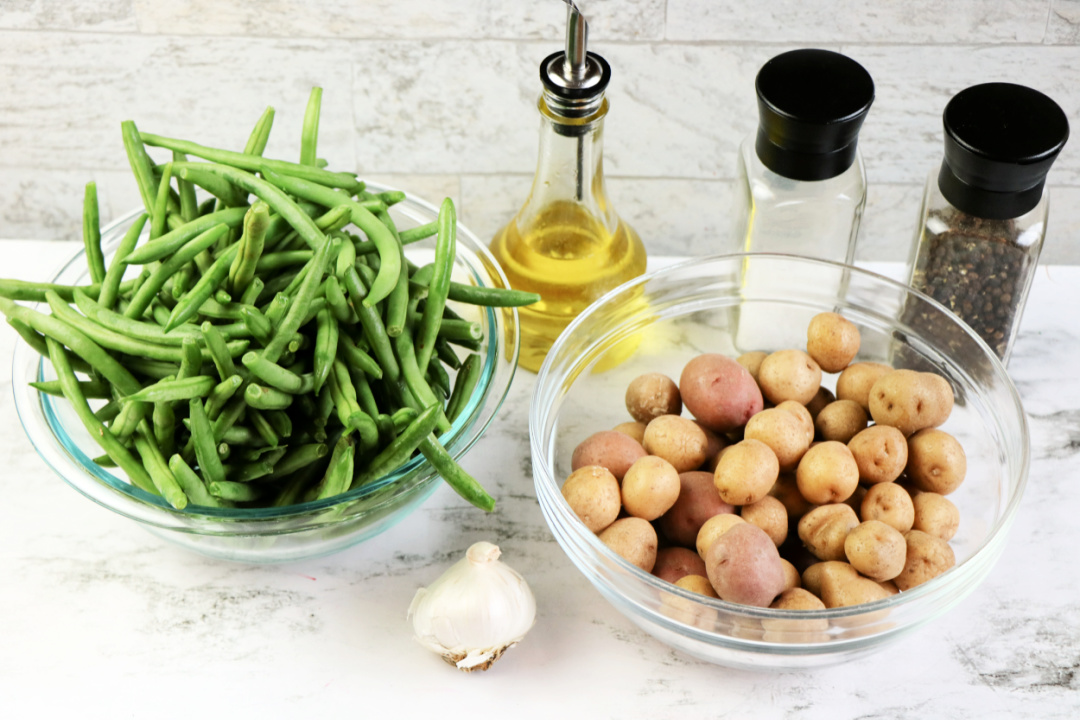
Sheet Pan Garlic Potatoes and Green Beans
Ingredients:
1 ½ pounds baby potatoes, cut in half lengthwise
2 pounds green beans, trimmed
3 tablespoons olive oil, divided
Salt and black pepper, to taste
2 to 3 garlic cloves, divided
Directions:
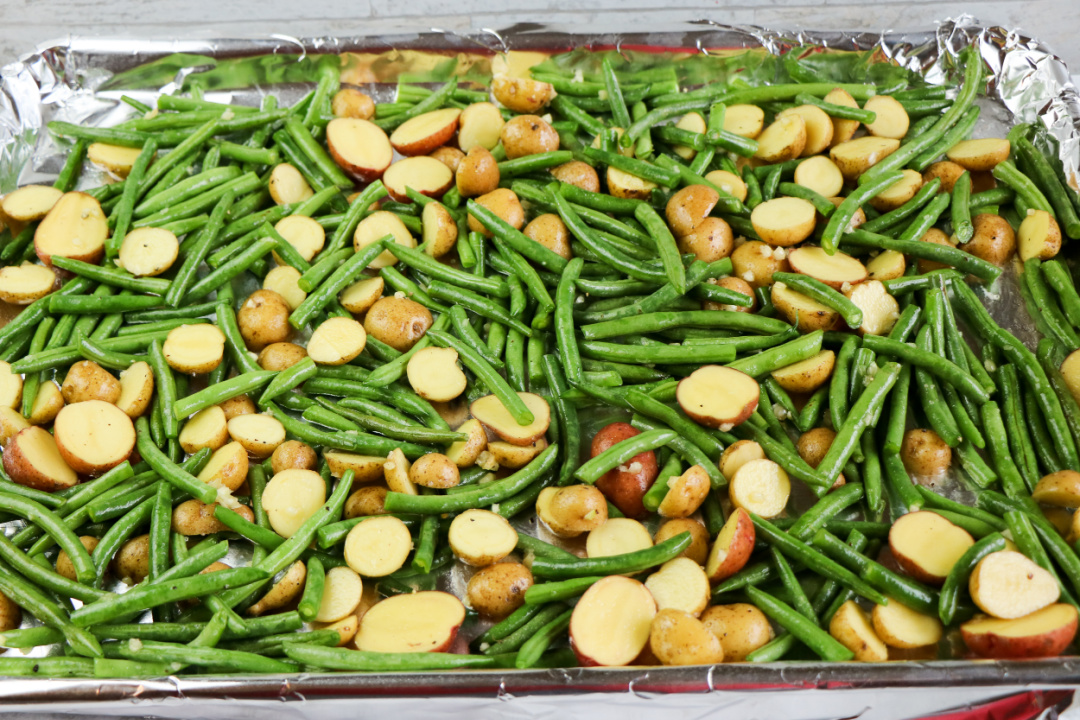
Preheat the oven to 425 degrees. Prepare a large (18×13 inch) rimmed baking sheet with aluminum foil sprayed with nonstick cooking spray.
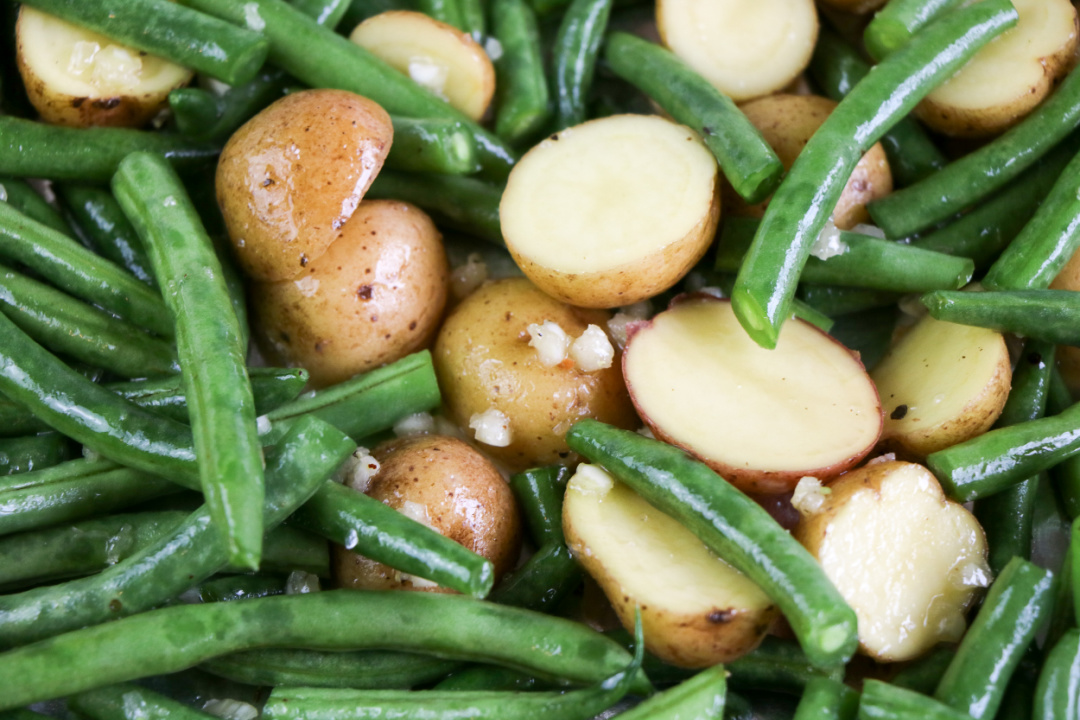
Mince 2 cloves of garlic. Drizzle the potatoes with 1 tablespoon olive oil and toss with the minced garlic, salt, and pepper.
Place the potatoes on the prepared sheet pan. Bake for 20 to 25 minutes or until tender.
Meanwhile, toss the green beans in the remaining oil, garlic, salt, and pepper.
Set the oven to broil. Place the green beans on the sheet pan and cook for 5 minutes.
Remove the baking sheet from the oven, toss to stir, and return to the oven to cook until desired doneness is reached.
Sheet Pan Garlic Potatoes and Green Beans
Ingredients
1 ½ pounds baby potatoes, cut in half lengthwise
2 pounds green beans, trimmed
3 tablespoons olive oil, divided
Salt and black pepper, to taste
2 to 3 cloves garlic, divided
Instructions
Preheat the oven to 425 degrees. Prepare a large (18×13 inch) rimmed baking sheet with aluminum foil sprayed with nonstick cooking spray.
Mince 2 cloves of garlic. Drizzle the potatoes with 1 tablespoon olive oil and toss with the minced garlic, salt, and pepper. Place the potatoes on the prepared sheet pan. Bake for 20 to 25 minutes or until tender.
Meanwhile, toss the green beans in the remaining oil, garlic, salt, and pepper.
Set the oven to broil. Place the green beans on the sheet pan and cook for 5 minutes.
Remove the baking sheet from the oven, toss to stir, and return to the oven to cook until desired doneness is reached.
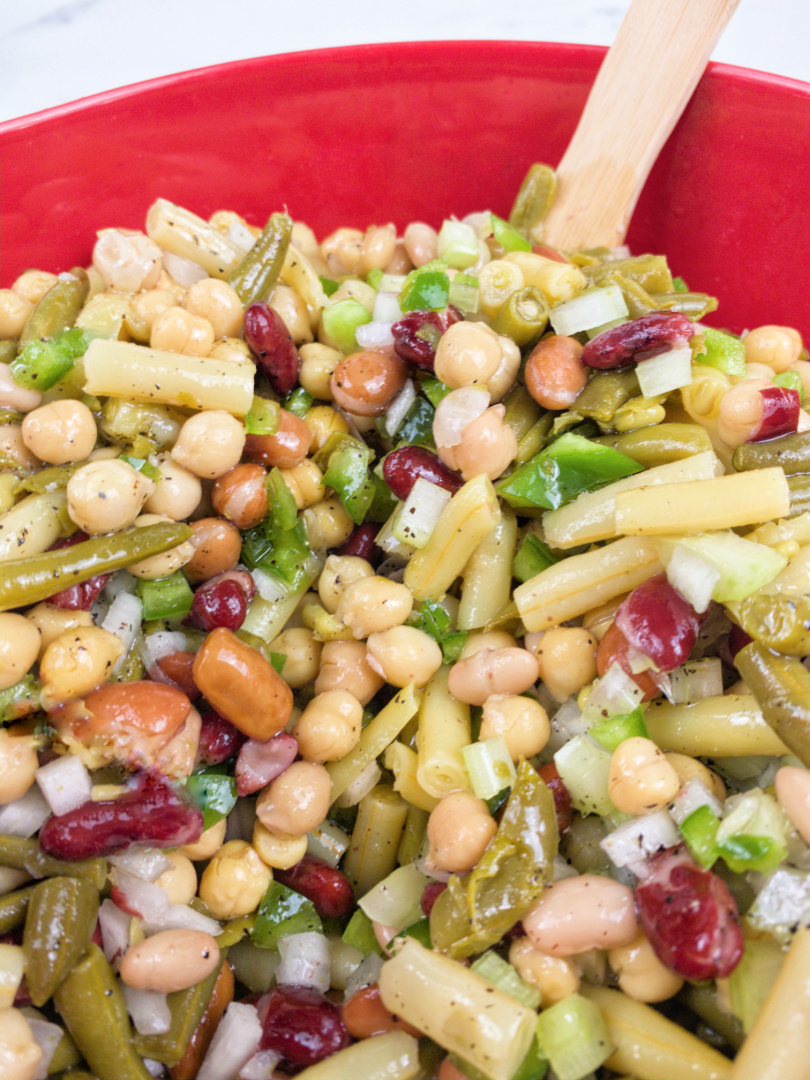
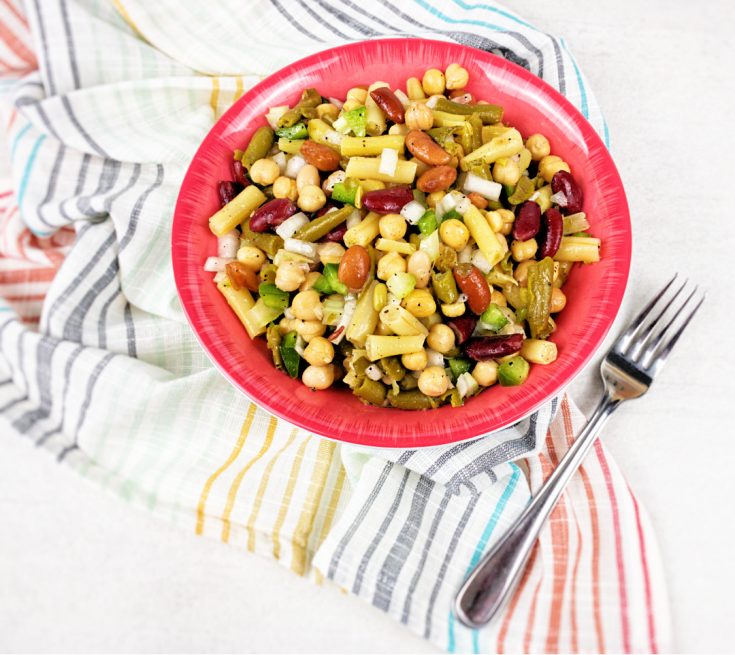
What makes this Mixed Bean Salad stand out? It’s all in the combination of ingredients and the zesty dressing that ties it all together.
With a blend of chickpeas, red kidney beans, green beans, wax beans, and mixed beans, every bite is packed with protein, fiber, and a satisfying crunch.
Plus, the addition of colorful vegetables like green pepper, celery, and yellow onion adds a pop of freshness and flavor.
One of the best parts of this recipe is its versatility. Serve it as a side dish alongside grilled meats or fish for a complete meal, or enjoy it on its own as a light and satisfying lunch.
It’s also a great option for meal prep, as it can be made ahead of time and stored in the refrigerator for several days.
The longer it sits, the more the flavors meld together, resulting in an even more delicious dish.
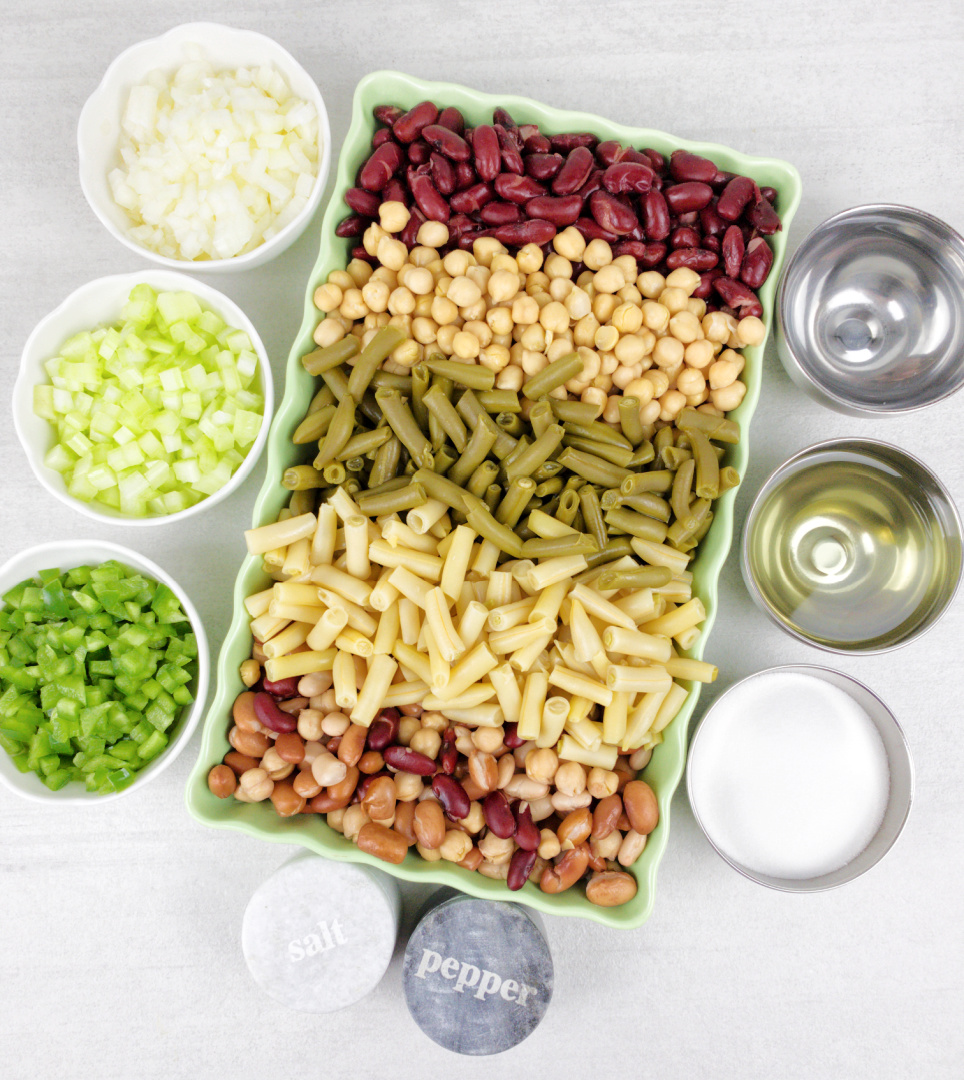
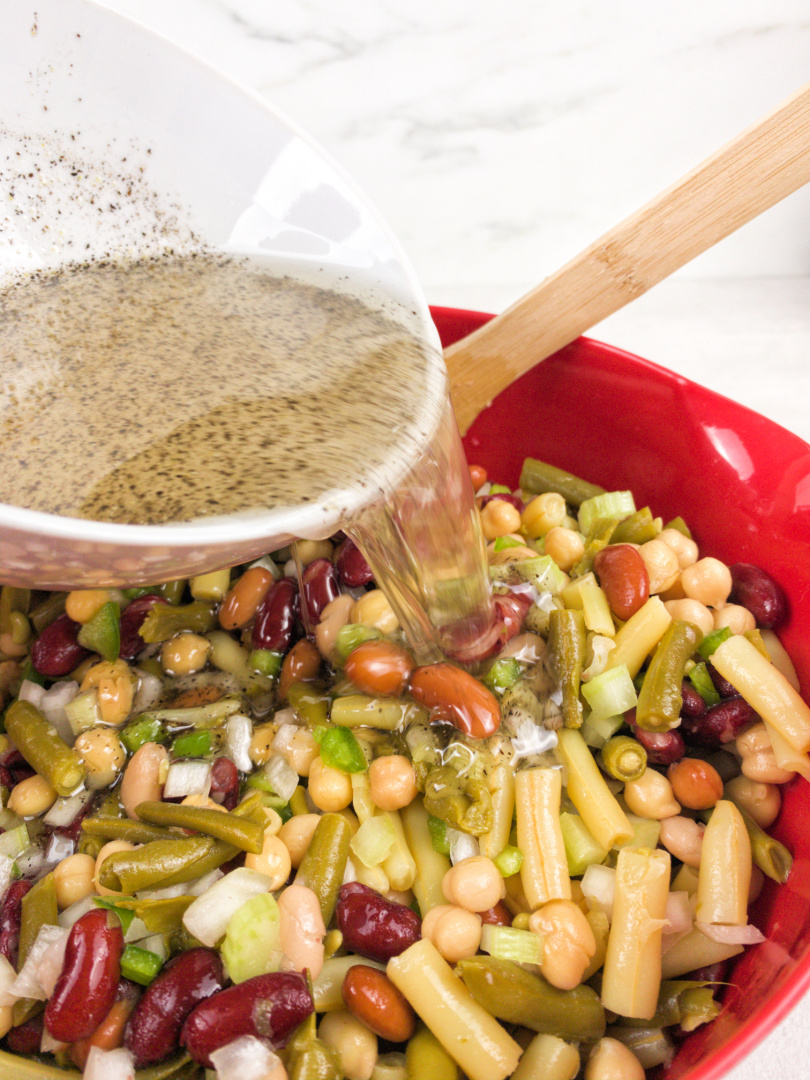
Preparing our Mixed Bean Salad is a breeze. Simply drain and rinse the canned beans, chop your vegetables, and whisk together the simple yet flavorful dressing.
Combine everything in a large bowl, toss to coat, and refrigerate overnight to allow the flavors to develop.
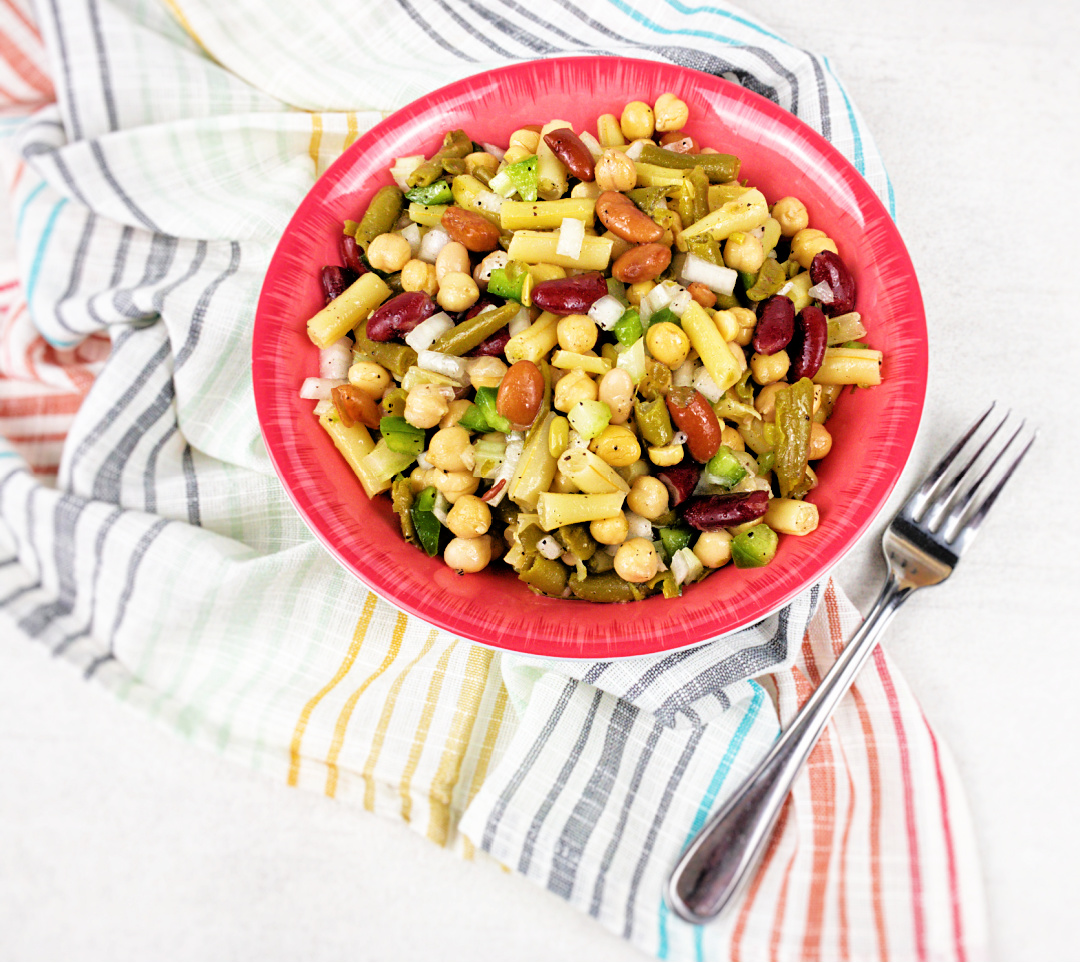
When you’re ready to serve, spoon the salad into a serving bowl, using a slotted spoon to drain off any excess dressing.
The result? A beautiful and delicious dish that will impress your guests and leave them coming back for seconds.
Whether you’re a seasoned chef or a novice in the kitchen, this Southern Mixed Bean Salad is a recipe that anyone can master.
With its bold flavors, colorful presentation, and easy preparation, it’s sure to become a staple in your recipe repertoire.
So why wait? Gather your ingredients and whip up a batch of this irresistible salad today. Your taste buds will thank you!
Mixed Bean Salad
Ingredients:
½ cup sugar
½ cup olive oil
⅔ cup white vinegar
1 tsp. salt
1 tsp. black pepper
1 medium yellow onion (approx. ¾ cup chopped)
2-3 celery stalks (approx. ¾ cup chopped)
½ large green pepper (approx. 1 cup chopped)
1 (15oz.) can chickpeas
1 (15oz.) can red kidney beans
1 (15oz.) can cut green beans
1 (15oz.) can cut wax (yellow) beans
1 (15oz.) can mixed beans
Directions:
Drain and rinse your chick peas, red kidney beans, green, wax and mixed beans. Then, place in a large bowl.
In a separate bowl, make your dressing by combining; oil, vinegar, sugar, salt and pepper.
Thinly slice and dice your 1/2 green pepper, celery and yellow onion, then add to the large bowl of mixed beans.
Pour the dressing over your salad ingredients and toss.
Cover and refrigerate overnight, stirring occasionally.
When ready, spoon bean salad into a serving bowl using a slotted spoon to drain off excess dressing before serving.
Frequently Asked Questions
Can I use fresh beans instead of canned beans in this recipe?
While canned beans are convenient and work well in this recipe, you can absolutely use fresh beans if you prefer. Simply cook them according to package instructions until they are tender, then proceed with the recipe as directed.
How long does the Mixed Bean Salad last in the refrigerator?
This salad can be stored in an airtight container in the refrigerator for up to 3-4 days. It actually tastes better as it sits and allows the flavors to meld together, making it a great option for meal prep or make-ahead dishes.
Can I adjust the dressing to suit my taste preferences?
The beauty of this recipe lies in its versatility. Feel free to adjust the amount of sugar, vinegar, salt, or pepper in the dressing to suit your taste. You can also add additional herbs or spices for extra flavor.
Can I make this salad ahead of time for a party or gathering?
This salad is perfect for making ahead of time. In fact, it’s even better if allowed to chill in the refrigerator overnight, as it gives the flavors time to meld together. Simply prepare the salad as directed, cover, and refrigerate until ready to serve.
Are there any substitutions I can make for the vegetables in this recipe?
Feel free to customize this salad with your favorite vegetables. Bell peppers, cucumber, cherry tomatoes, or even shredded carrots would all make delicious additions or substitutions. Get creative and make it your own!
Can I double or halve this recipe?
You can easily adjust the quantities of ingredients to suit your needs. Simply double the recipe for a larger crowd or halve it for a smaller gathering. Just be sure to adjust the seasoning and dressing accordingly to maintain the perfect balance of flavors.
Is this salad suitable for vegetarians and vegans?
This Mixed Bean Salad is both vegetarian and vegan-friendly. It’s a great option for those following a plant-based diet or for anyone looking to incorporate more legumes and vegetables into their meals. Enjoy it guilt-free!
Mixed Bean Salad
Ingredients
½ cup sugar
½ cup oil of choice
⅔ cup white vinegar
1 tsp salt
1 tsp black pepper
1 medium yellow onion (approx. ¾ cup chopped)
2-3 celery stalks (approx. ¾ cup chopped)
½ large green pepper (approx. 1 cup chopped)
1 can chickpeas
1 can red kidney beans
1 can cut green beans
1 can cut wax(yellow) beans
1 can mixed beans
Instructions
Drain and rinse your chick peas, red kidney beans, green, wax and mixed beans. Then, place in a large bowl.
In a separate bowl, make your dressing by combining; oil, vinegar, sugar, salt and pepper.
Thinly slice and dice your 1/2 green pepper, celery and yellow onion, then add to the large bowl of mixed beans.
Pour the dressing over your salad ingredients and toss.
Cover and refrigerate overnight, stirring occasionally.
When ready, spoon bean salad into a serving bowl using a slotted spoon to drain off excess dressing before serving.