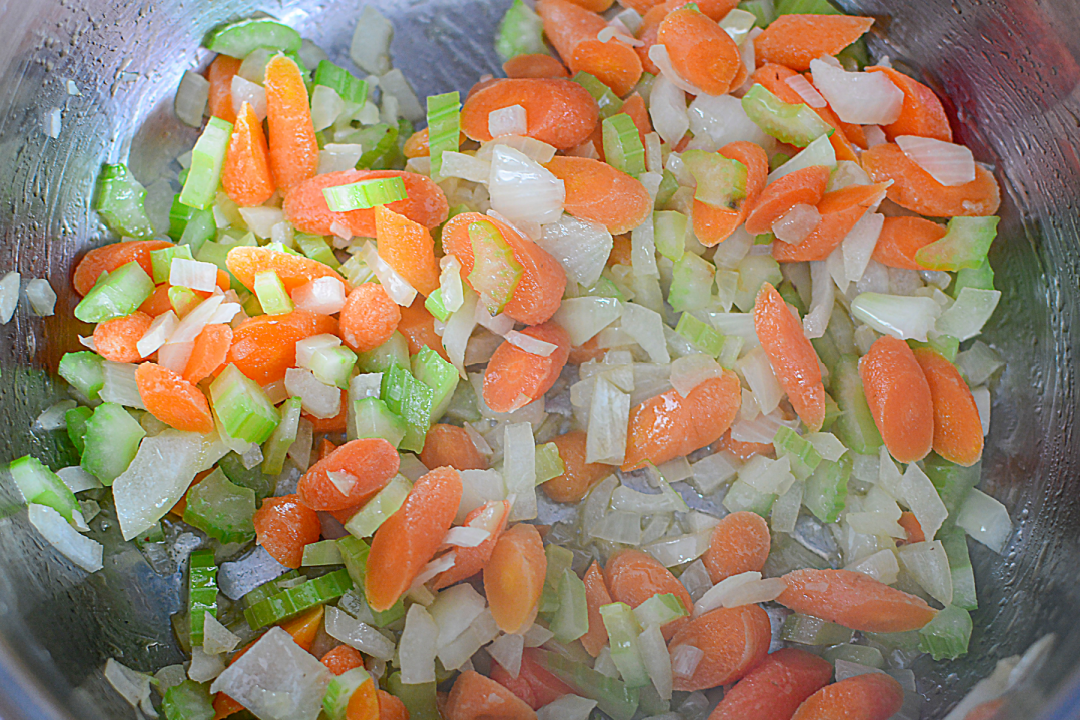
Melt butter over medium heat in a 6 quart pot or Dutch oven and saute the onion, celery, and carrots until tender.
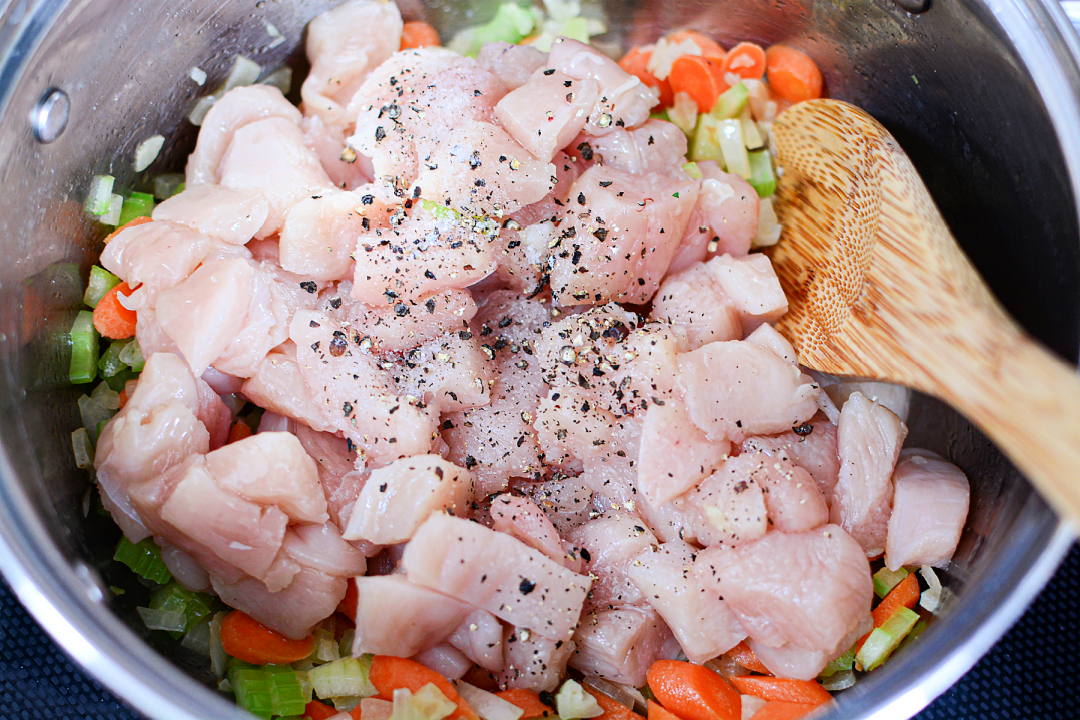
Add in the chicken and season with salt and pepper.
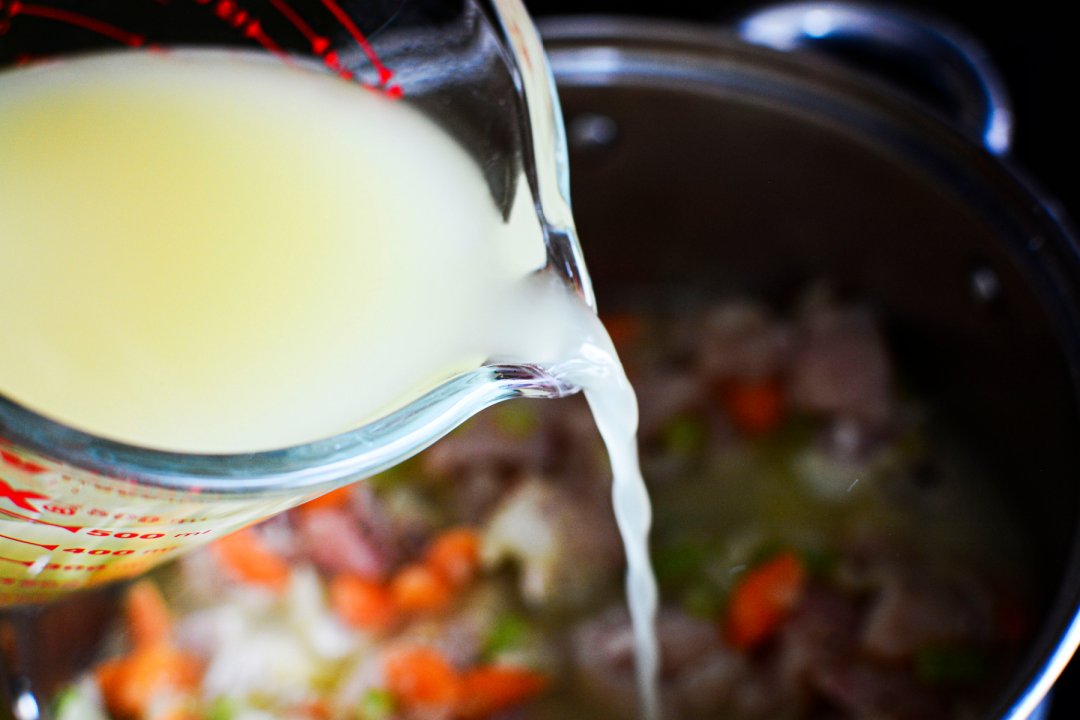
Pour chicken broth over the chicken and vegetable mixture.
Bring mixture to a boil. Cover and simmer until chicken reaches 165 degrees and is no longer pink. Approx. 20 minutes.
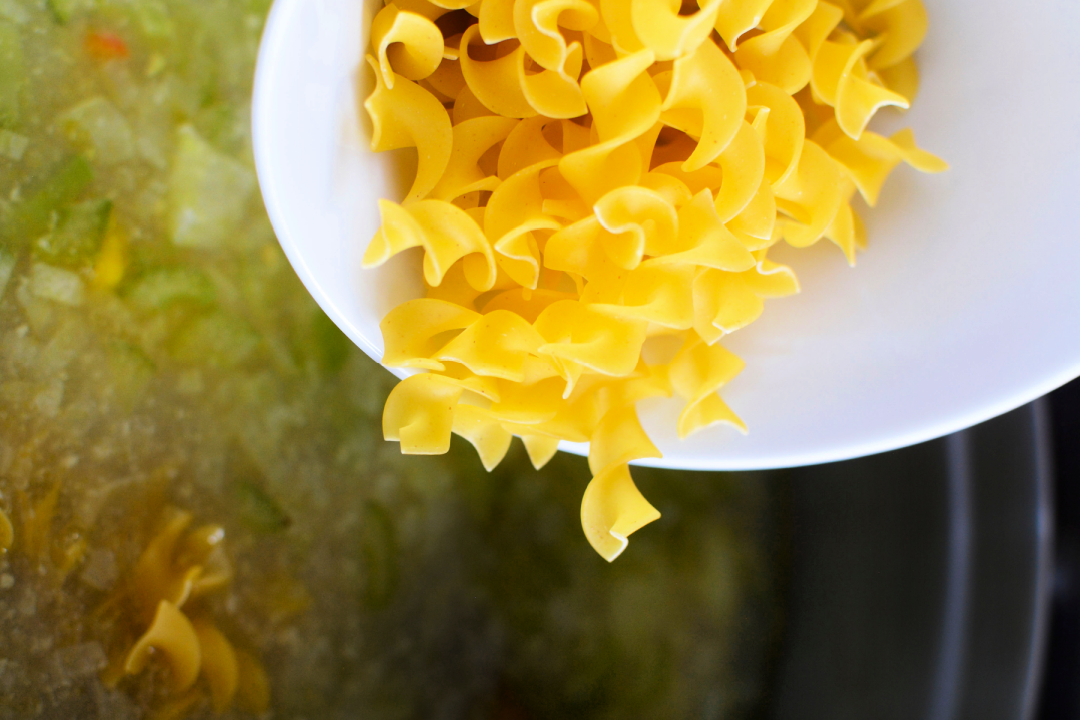
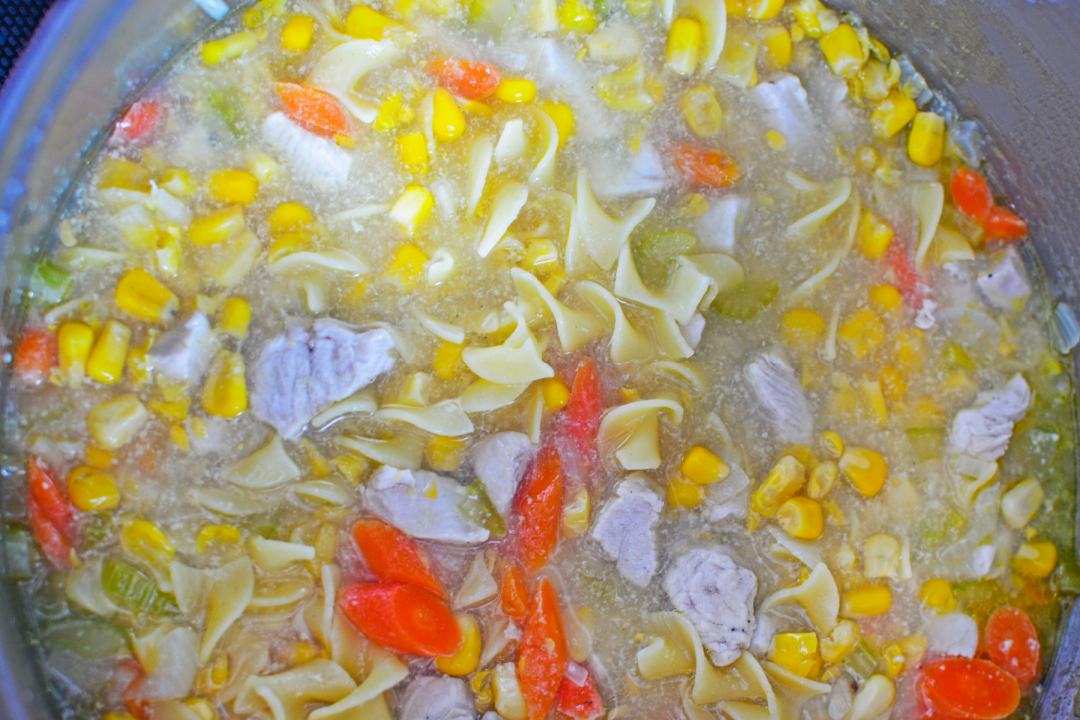
Uncover and return mixture to a boil and stir in noodles and corn.
Reduce to medium heat and cook until noodles are tender. Approx. 8 minutes. Stir occasionally.
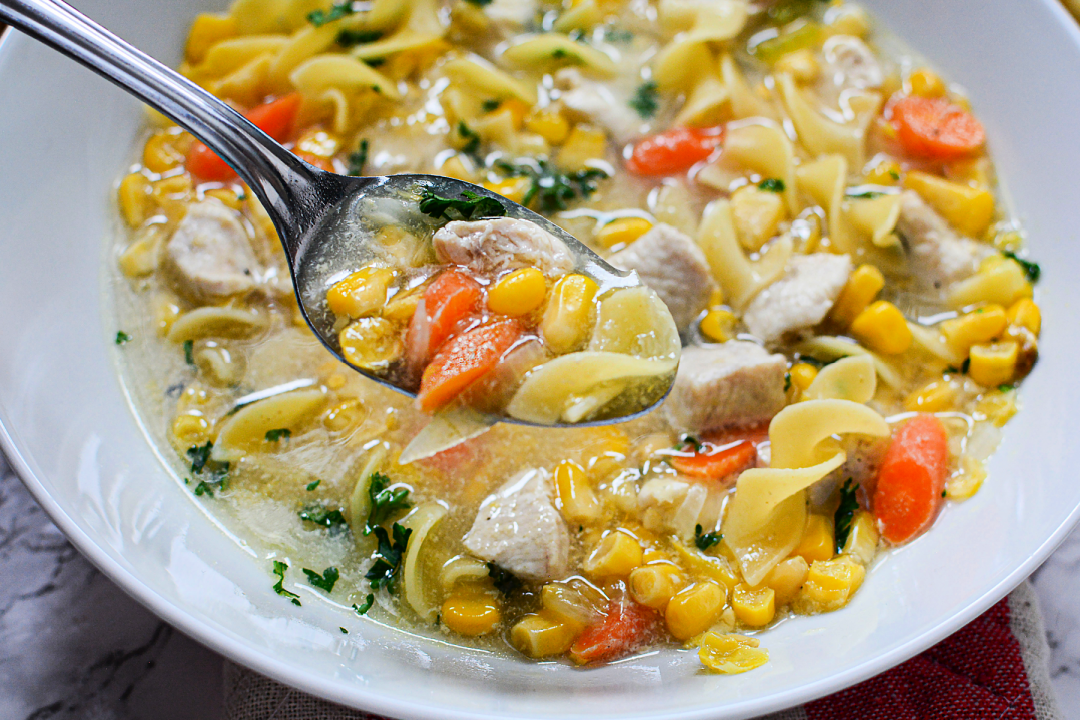
Notes: If soup is too thick, add additional chicken broth.
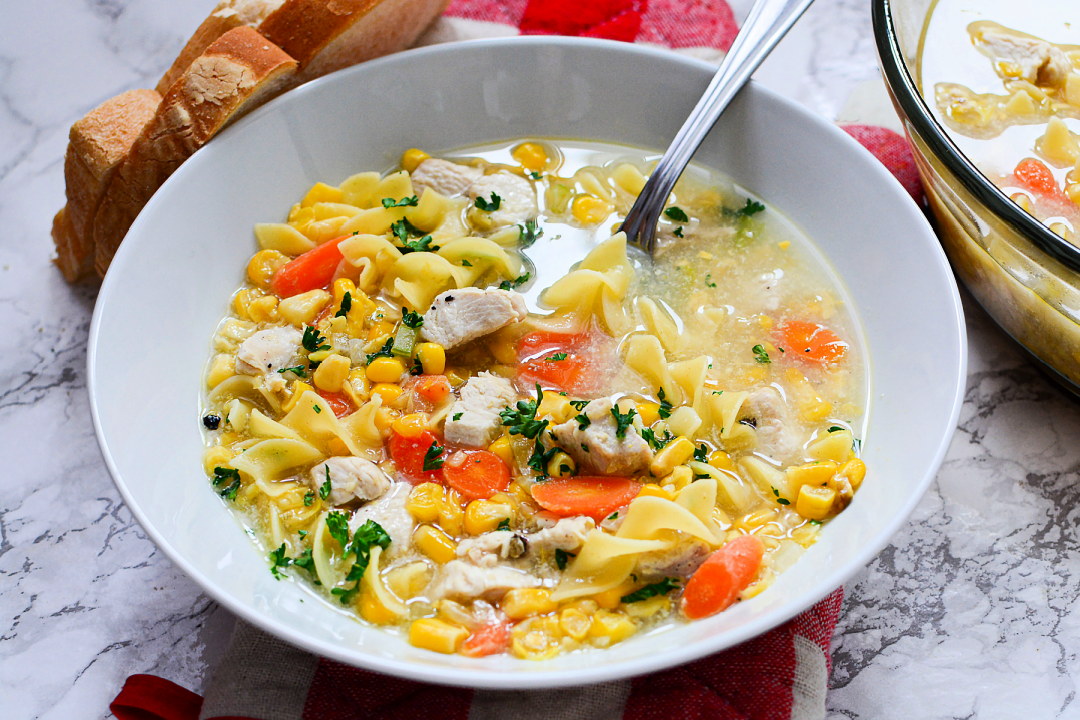
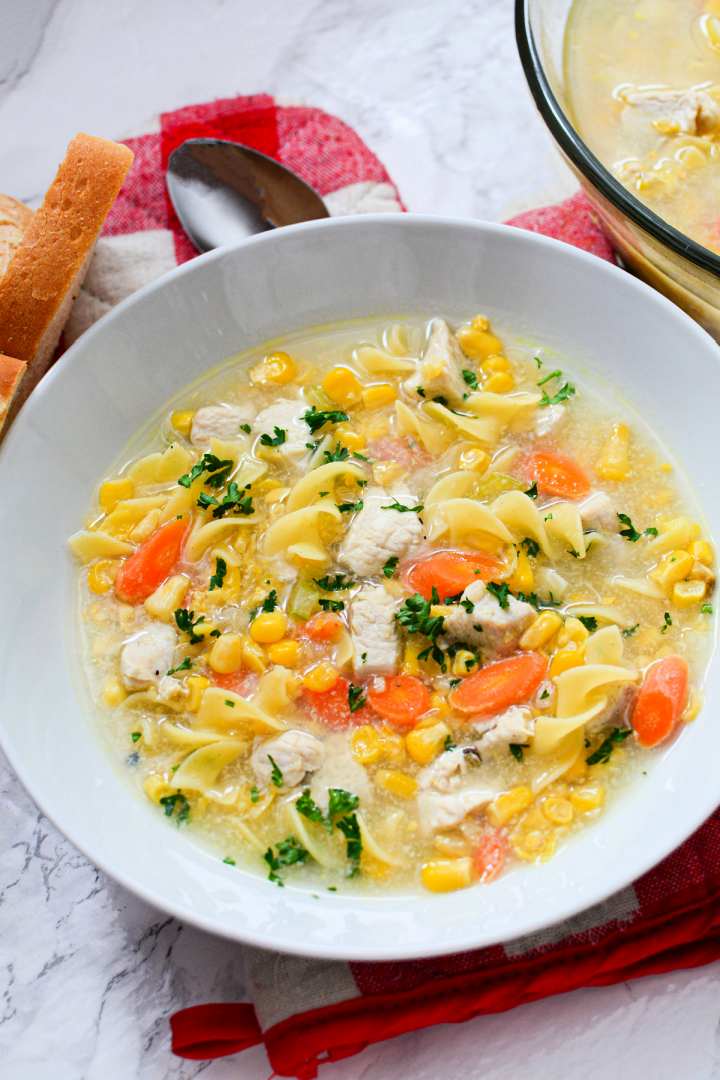
Chicken Corn Noodle Soup
Ingredients
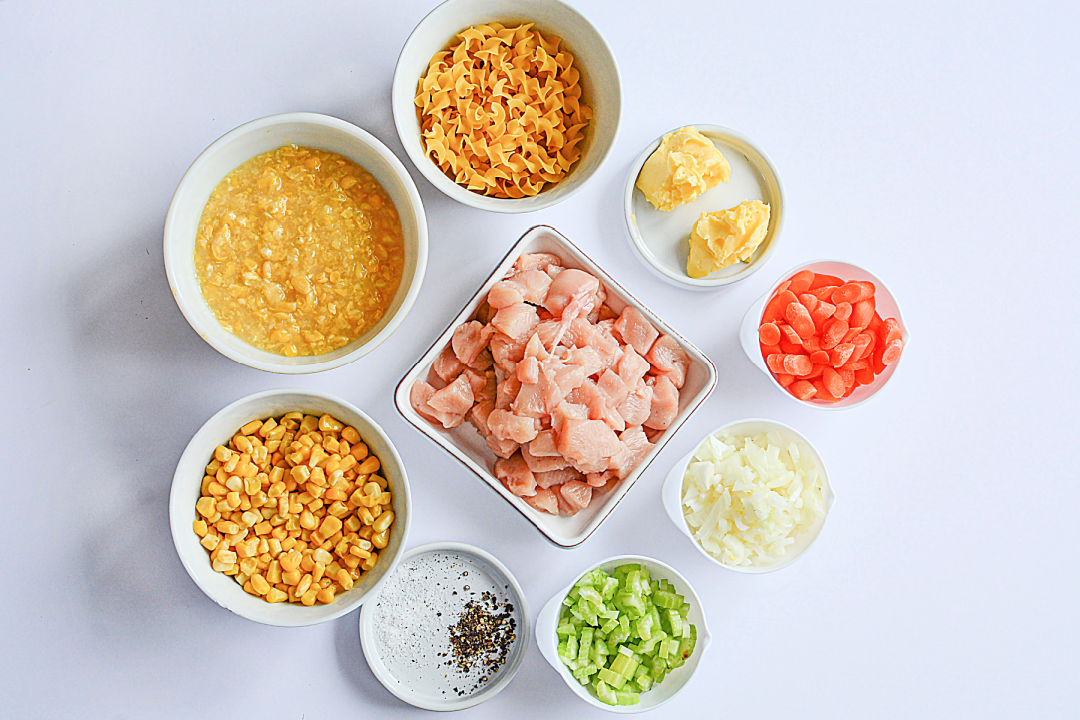
1 medium yellow onion, chopped
2 celery ribs, chopped
1 cup carrots, chopped
3 tbsp. butter
2 pounds boneless skinless chicken breasts, cubed
12 cups chicken broth or stock
1/2 tsp. salt
1/4 tsp. pepper
2 cups uncooked egg noodles
2 cans (14-3/4 oz) whole kernel corn, drained
2 cans (14-3/4 oz) cream-style corn
Instructions
Melt butter over medium heat in a 6 quart pot or dutch oven and saute the onion, celery, and carrots until tender.
Add in the chicken and season with salt and pepper.
Pour chicken broth over the chicken and vegetable mixture. Bring mixture to a boil. Cover and simmer until chicken reaches 165 degrees and is no longer pink. Approx. 20 minutes.
Uncover and return mixture to a boil and stir in noodles and corn. Reduce to medium heat and cook until noodles are tender. Approx. 8 minutes. Stir occasionally.
Notes: If soup is too thick, add additional chicken broth.
If chicken bacon ranch is your favorite flavor combo, then this dish is sure to be a hit!
These Chicken Bacon Ranch Stuffed Peppers are stuffed with a delicious blend of chicken, bacon and ranch seasoning, making them an easy and flavorful meal.
With just a few simple ingredients you can have these peppers on the table in no time. Serve them as an entrée or as the perfect side dish for any occasion.
No matter how you serve them up, these chicken bacon ranch stuffed peppers will leave every one happy and satisfied!
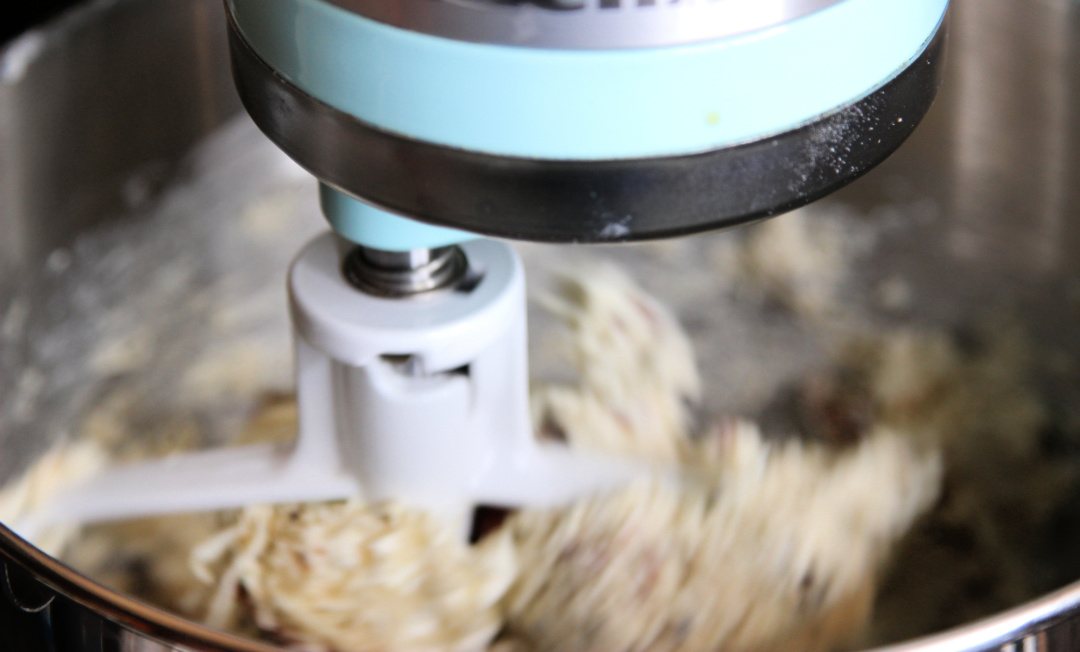
In a mixing bowl, combine the shredded chicken, cream cheese, ranch packet, half the cheddar cheese, bacon and mix until combined. A stand mixer is great for this.
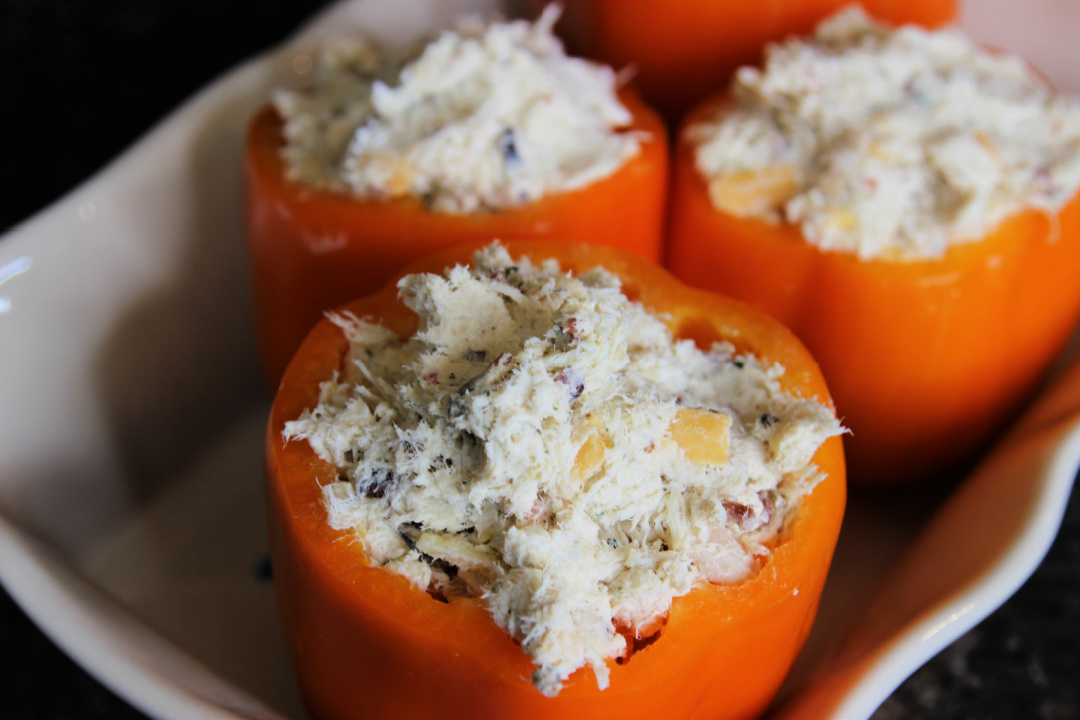
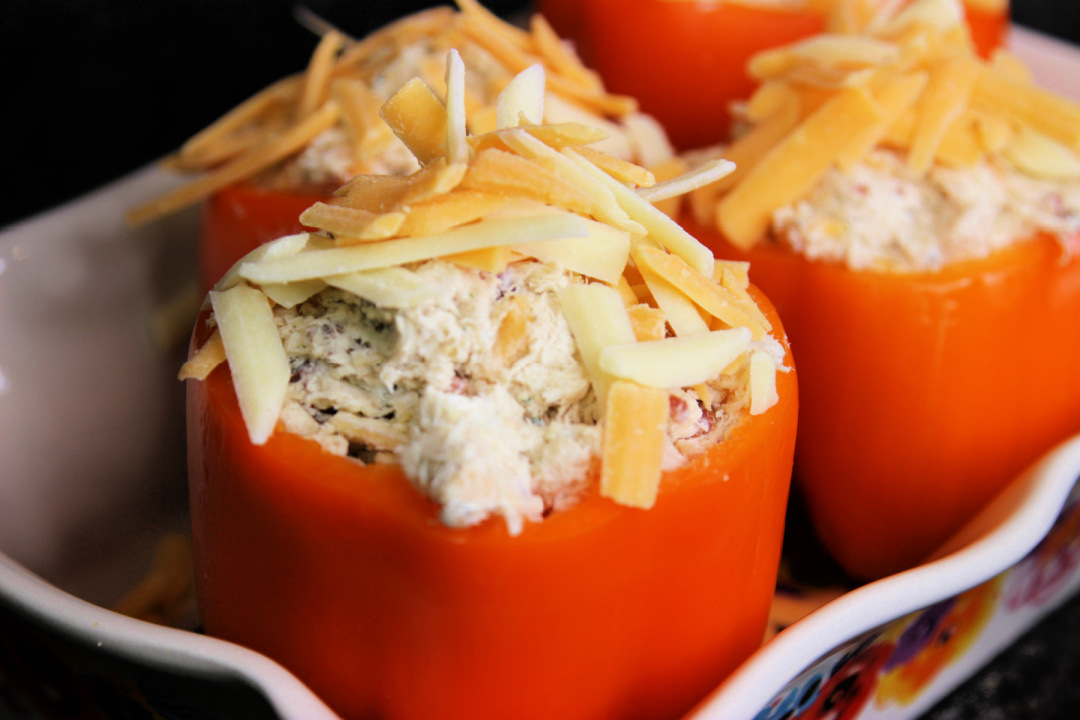
Wash the peppers, cut the tops off, and remove the seeds and ribs from the inside of the pepper. Stuff each pepper with about 1 cup of the chicken mixture.
Place the peppers in a baking dish. Top the peppers with the remainder of the cheese.
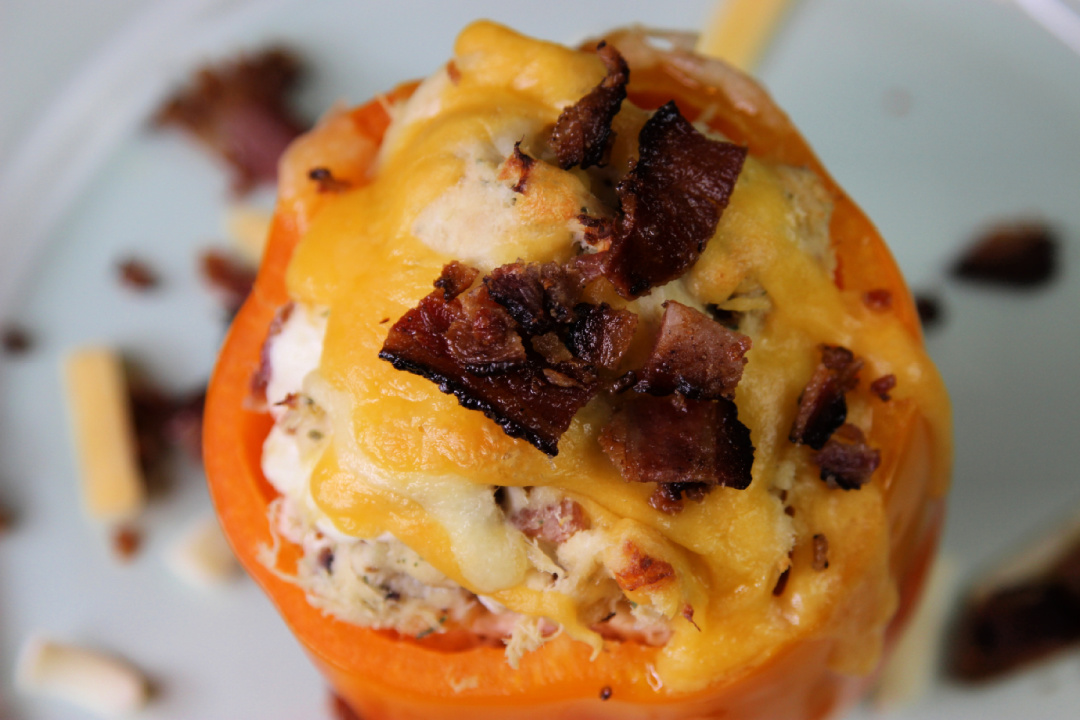
Bake for 35-45 minutes or until the peppers are tender.
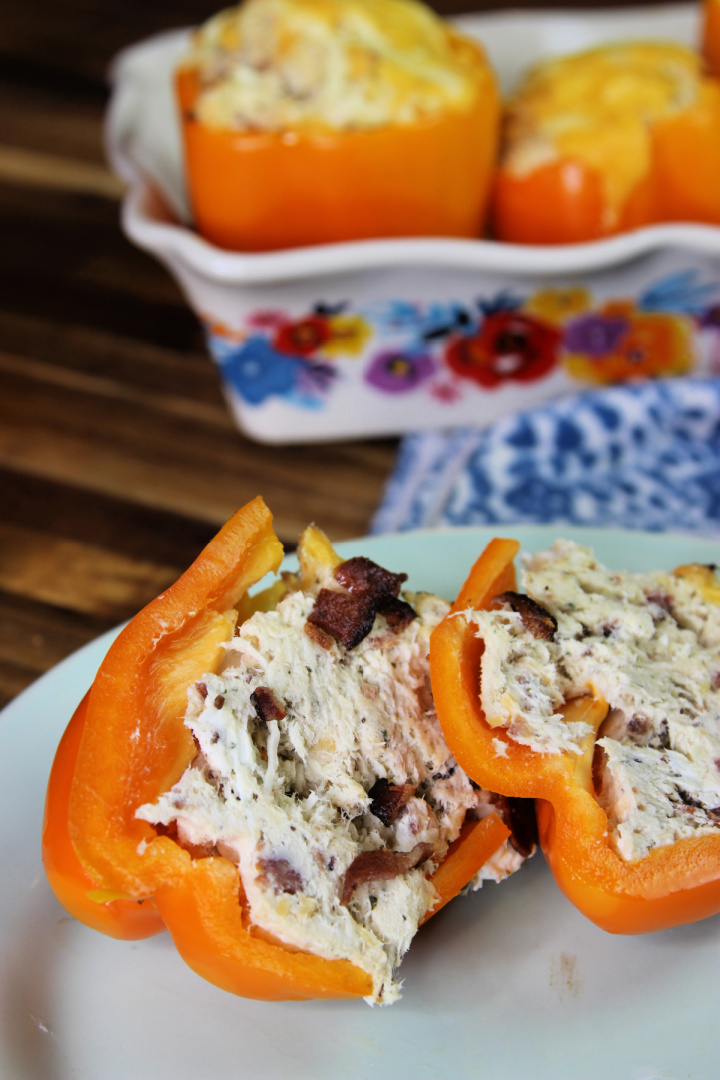
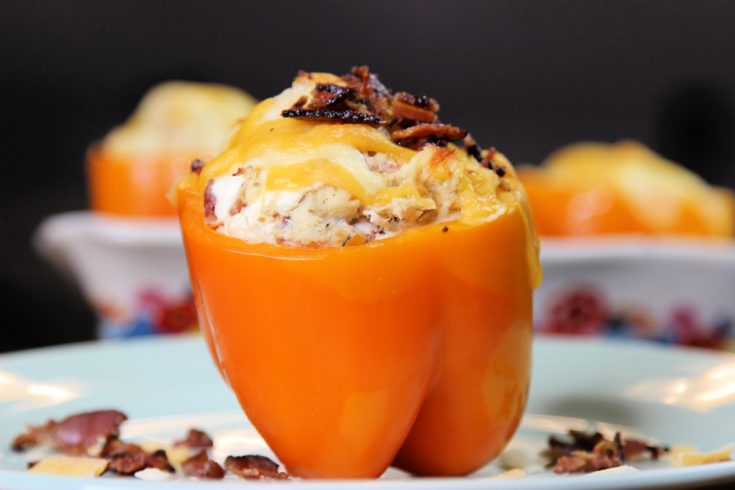
Garnish with additional bacon if desired. Serve hot. Enjoy!
Chicken Bacon Ranch Stuffed Peppers
Ingredients
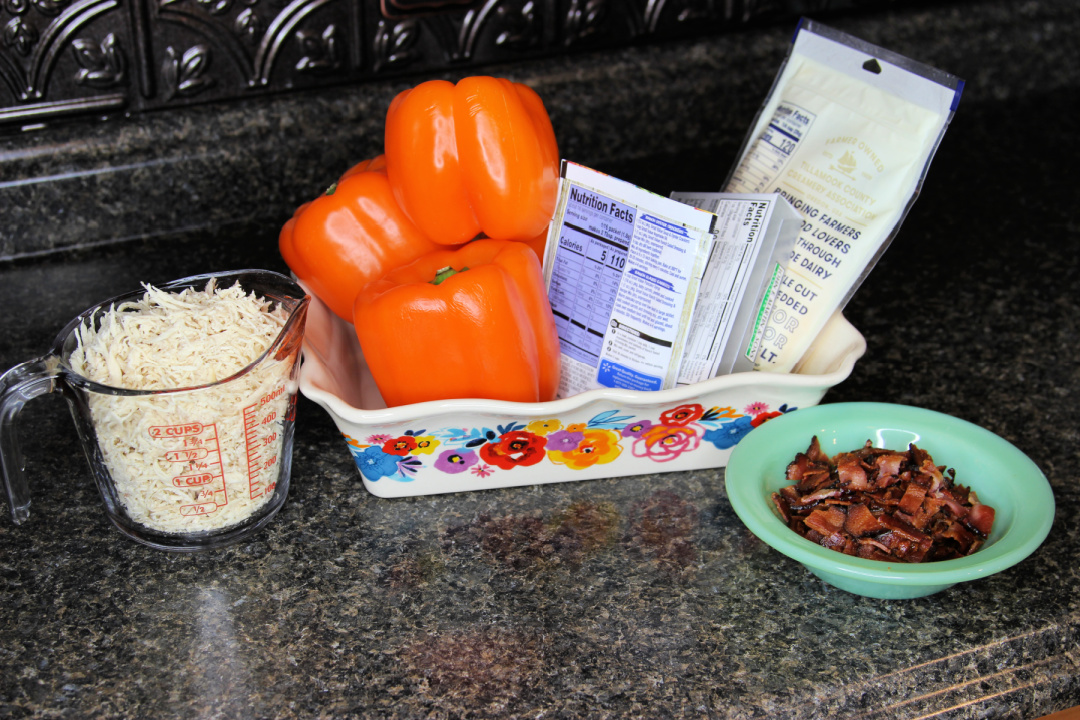
4 colored bell peppers
2 cups cooked shredded chicken
8 oz softened cream cheese
1 packet dry ranch dressing
1/2 cup shredded cheddar cheese, divided
8 slices cooked bacon, crumbled
Notes
In a mixing bowl, combine the shredded chicken, cream cheese, ranch packet, half the cheddar cheese, bacon and mix until combined. A stand mixer is great for this.
Wash the peppers, cut the tops off, and remove the seeds and ribs from the inside of the pepper. Stuff each pepper with about 1 cup of the chicken mixture.
Place the peppers in a baking dish. Top the peppers with the remainder of the cheese.
Bake for 35-45 minutes or until the peppers are tender.
Garnish with additional bacon if desired. Serve hot. Enjoy!
Tired of your typical weeknight dinner? Spice it up with Chicken Nacho Foil Packets – the perfect, easy meal for anyone that’s hungry!
Easy Chicken Nacho Foil Packets – A Simple Southern Recipe with Big Flavor
If you’re looking for a no-fuss dinner that’s packed with flavor and easy cleanup, these Chicken Nacho Foil Packets are the way to go.
Whether you’re feeding a hungry family, cooking outdoors, or need something quick on a busy weeknight, this easy foil packet meal is a solid solution that delivers every time.
A Family-Friendly Chicken Nacho Recipe Everyone Can Customize
One of the best parts of this chicken nacho foil packet recipe is how flexible it is. Got picky eaters? No problem.
These nachos can be built individually, meaning every person gets what they want—no onions for one, extra jalapeños for another.
You can set out the ingredients like a nacho bar and let everyone assemble their own foil packet before grilling or baking.
This makes it a fun and easy dinner for kids and adults alike.
Quick and Easy Dinner for Busy Nights
With just 15 minutes of prep time, this easy chicken nacho recipe is perfect for those hectic evenings when time is tight and appetites are big.
Using pre-cooked chicken speeds things up, and everything cooks right in the foil—no extra dishes to wash.
Whether you’re coming home from work or feeding a crowd on game night, you can get this on the table fast.
Perfect for Backyard Cookouts or Oven-Baked Comfort
This recipe shines whether you’re cooking outside on the grill or inside in the oven. On warmer evenings, fire up the grill and keep the heat out of the kitchen.
When the weather turns cool, toss these foil packets on a baking sheet and pop them in the oven.
It’s the same great taste either way, and the cleanup stays easy no matter where you cook.
Great for Tailgates, Camping Trips, and Casual Gatherings
Chicken nacho foil packets also work great beyond the kitchen.
They’re ideal for tailgating since you can prep everything ahead of time and heat them up right on the grill.
Heading out on a camping trip? These foil packets are perfect for tossing on the fire.
They’re also a hit at casual get-togethers—just set up a toppings bar, prep the foil packs, and let everyone make their own.
Why This Chicken Nacho Foil Packet Recipe Works
This recipe hits all the marks for an easy, flavorful, and crowd-pleasing meal. It’s:
Made with simple ingredients
Quick to assemble
Customizable for any taste
Great for indoor or outdoor cooking
Easy to clean up—just toss the foil
And since the base is chips, cheese, chicken, and taco sauce, you’ve already got the foundation of a hearty, satisfying dish that everyone loves.
How to Serve Chicken Nacho Foil Packets
Once the foil packets come off the grill or out of the oven, the fun part begins—adding all the toppings.
Fresh cilantro, diced tomatoes, jalapeños, sour cream, avocado—you can go as simple or as loaded as you like.
Serve the open foil packets right on a plate or place them in a shallow bowl.
They’re great on their own, or you can pair them with a side of black beans, grilled corn, or a fresh green salad.
This easy chicken nachos in foil packets recipe is one of those go-to meals that works anytime—weeknights, weekends, summer cookouts, or even rainy day dinners inside.
It’s flavorful, adaptable, and low-stress, which is exactly what every home cook needs in their back pocket.
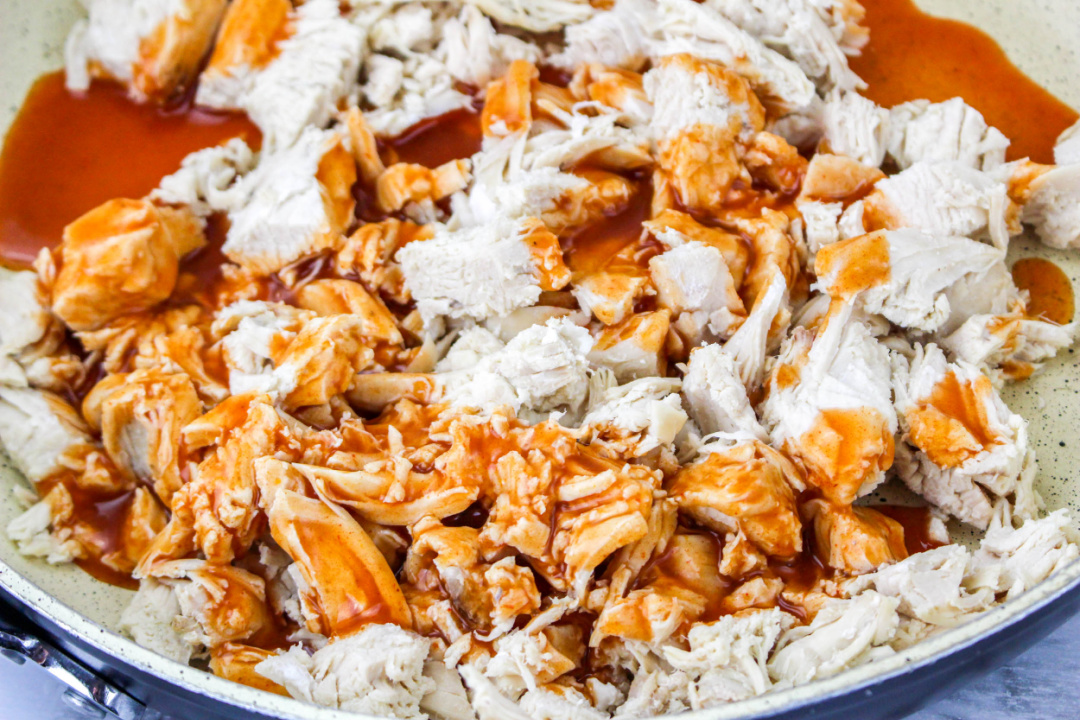
In a medium skillet over medium-high heat, add the chicken and taco sauce. Stir to combine and heat for 5 to 8 minutes or until the chicken has heated through.
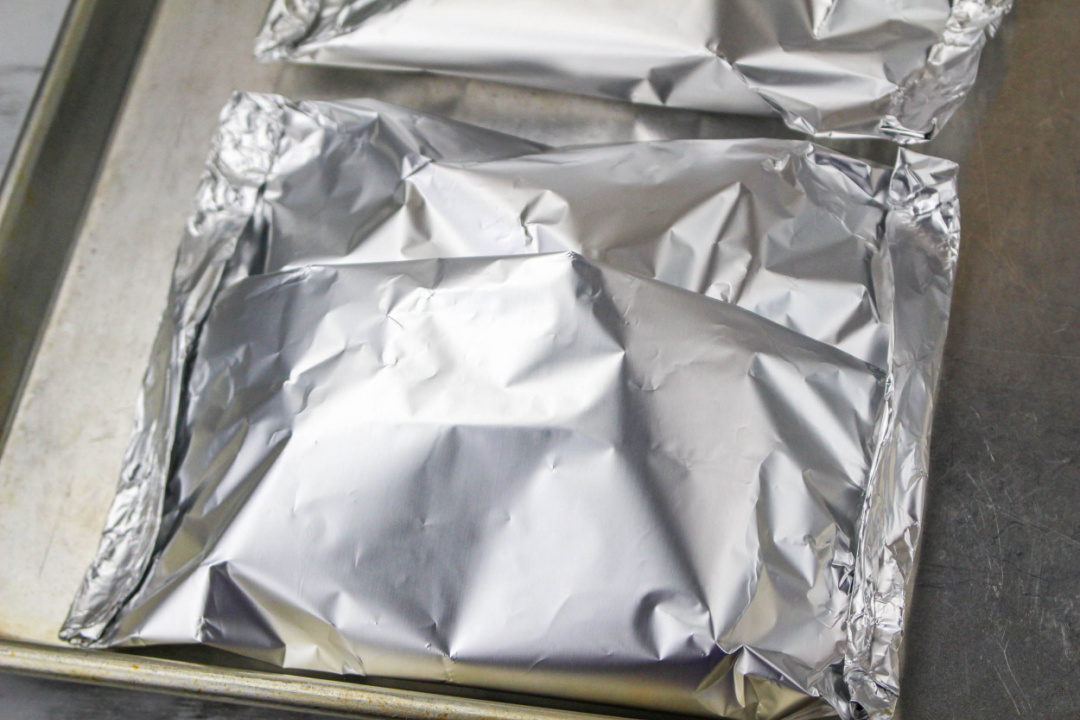
Cut aluminum foil into squares.
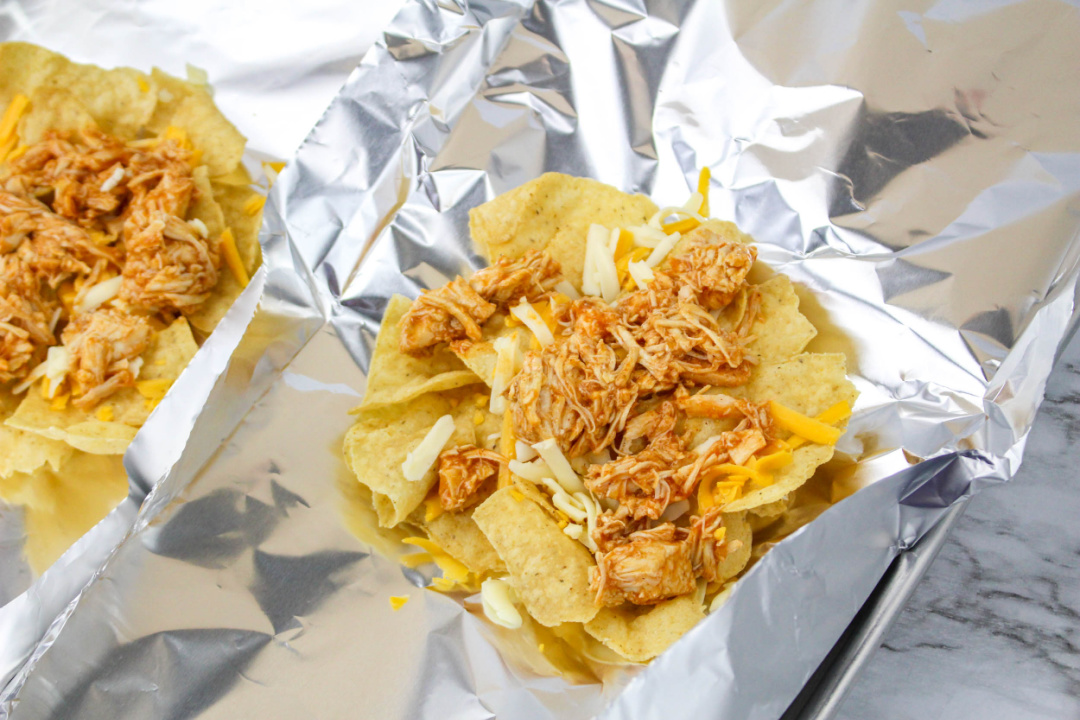
In the middle of the square, place a mound of tortilla chips. Top the chips with cheese and chicken. Fold the aluminum foil over the chip and chicken creating a pocket. Roll up any open edges to seal the pocket.
For the oven:
Preheat the oven to 350 degrees. Place the foil packets on a large rimmed baking sheet. Bake for 15 minutes or until the ingredients are heated through and the cheese is melted.
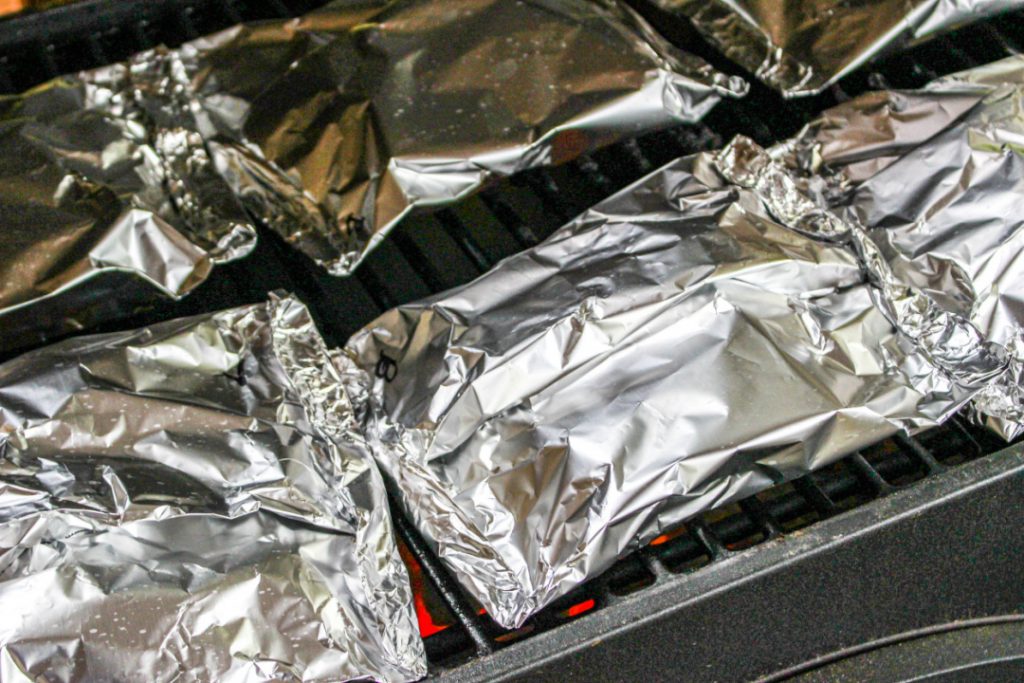
For grilling:
Prepare the grill for medium heat (about 350 degrees.) Place the foil packets on the grill and cook for about 10 minutes or until the ingredients have warmed through and the cheese has melted.
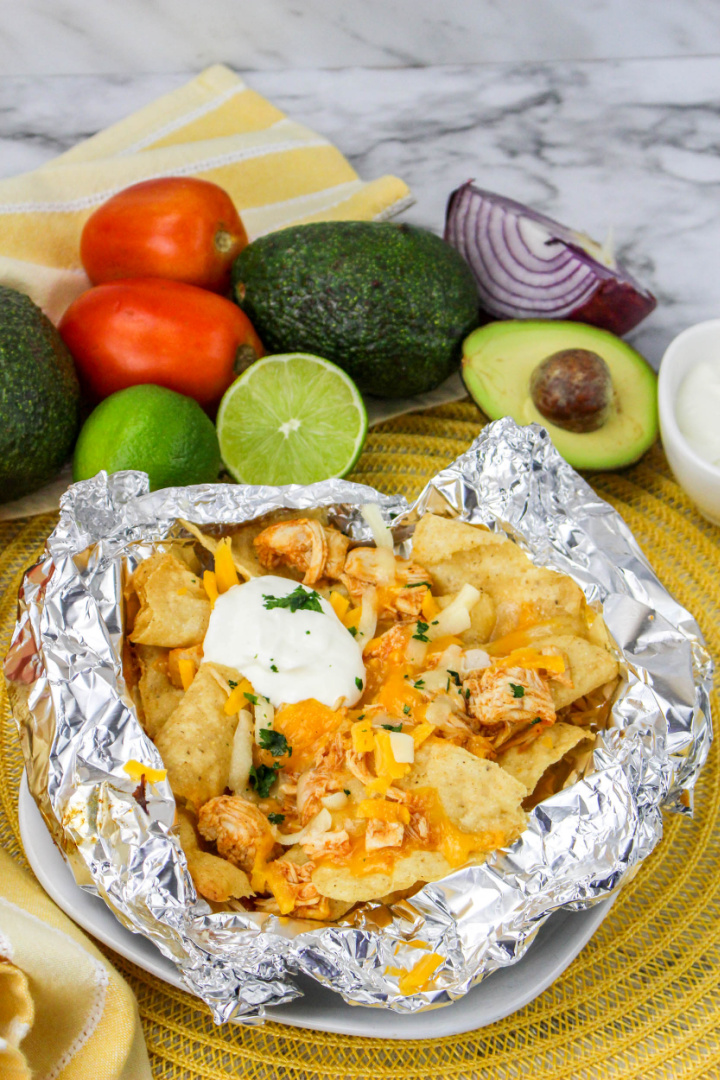
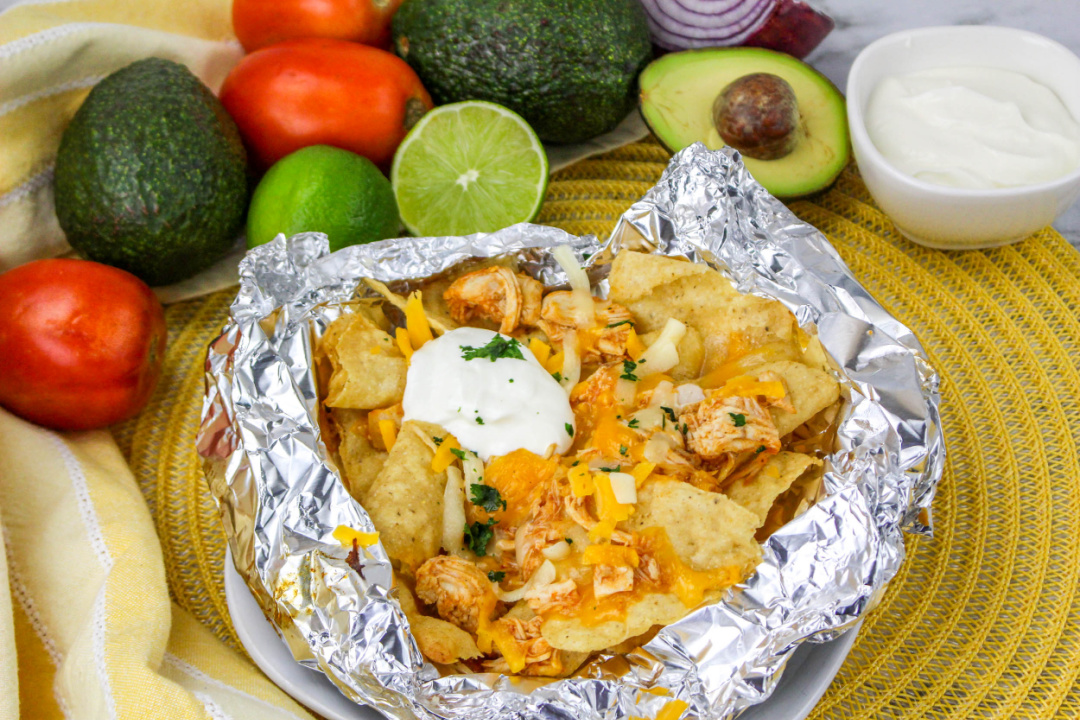
To serve, place the open packet on a plate or in a bowl. Carefully open the foil packets. Top the nachos with additional toppings as desired.
Notes: I used restaurant-style tortilla chips but any style can be used. These nachos can be personalized based on preference. Set up the ingredients like a taco bar and then prepare the nachos on the grill or in the oven.
Frequently Asked Questions About Chicken Nacho Foil Packets
1. Can I make chicken nacho foil packets ahead of time? Yes, you can prep everything in advance. Assemble the foil packets with chips, cooked chicken, taco sauce, and cheese. Keep them in the fridge for a few hours before grilling or baking. Wait to add fresh toppings like tomatoes, sour cream, or avocado until after cooking.
2. What kind of chicken works best for nacho foil packets? Rotisserie chicken, grilled chicken, or leftover shredded chicken all work great. You want something that’s already cooked so the prep is quick and the foil packets heat evenly.
3. Can I bake chicken nacho foil packets in the oven instead of grilling? Absolutely. Preheat your oven to 350°F and place the foil packets on a rimmed baking sheet. Bake for about 15 minutes or until the cheese is melted and everything is heated through.
4. What kind of tortilla chips should I use? Restaurant-style tortilla chips hold up well, but you can use your favorite kind. Thicker chips tend to stay crisp longer when heated in the foil.
5. How do I keep the chips from getting soggy in the foil packet? To help keep the chips crisp, avoid adding too much moisture inside the foil. Use a slotted spoon when adding the chicken and don’t overload the packet with sauces. Serve fresh toppings after cooking to avoid extra moisture.
6. What toppings go best with chicken nacho foil packets? Popular nacho toppings include diced tomatoes, sliced jalapeños, chopped onions, cilantro, avocado, sour cream, and even a squeeze of lime juice. These should be added after cooking for the best flavor and texture.
7. Can I cook foil packet nachos over a campfire? Yes! Foil packet chicken nachos are great for camping. Wrap the foil packets tightly and place them near the hot coals (not directly in the flames) for 10–15 minutes, checking often to avoid burning.
8. Can I use ground beef or another meat instead of chicken? Definitely. This recipe is very flexible. Swap the chicken for cooked ground beef, pulled pork, or even black beans for a meatless option.
9. Is this foil packet nacho recipe good for kids? Yes, it’s a kid-friendly recipe. Let kids help build their own foil packets with the ingredients they like. It’s a fun, hands-on meal that even picky eaters enjoy.
10. How should I serve the nacho foil packets? You can open the foil packet and serve it directly on a plate or in a shallow bowl. Add your favorite toppings after opening, and serve with a fork (or eat them straight off the foil—up to you!).
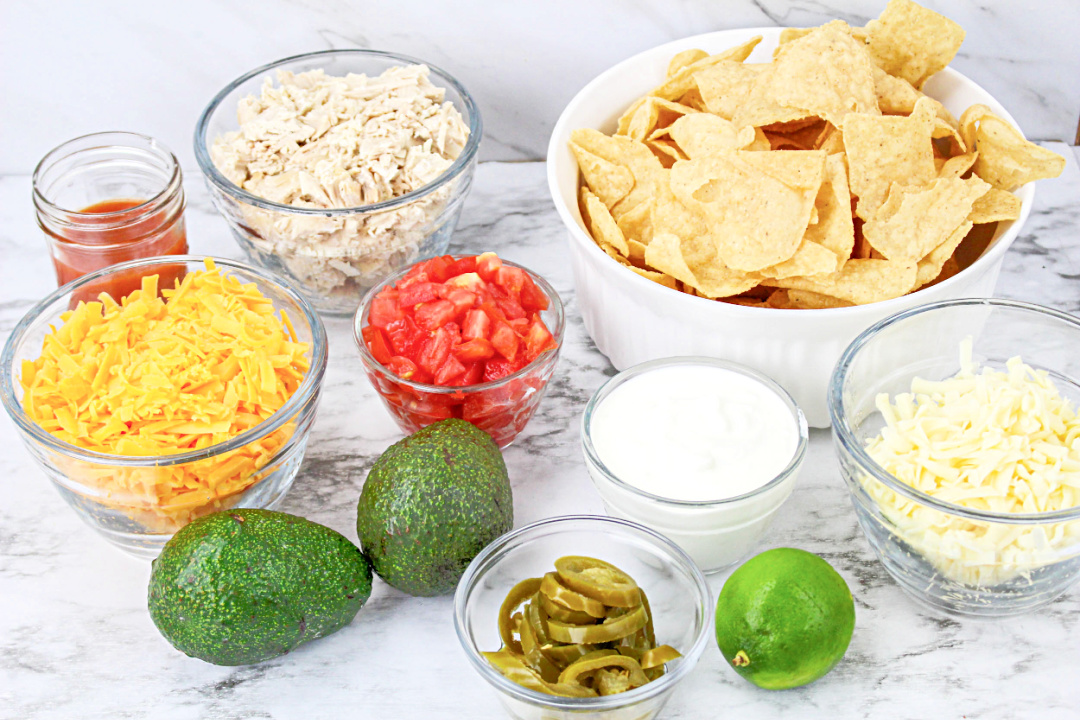
Chicken Nacho Foil Packets
Ingredients
1 bag tortilla chips
2 cups shredded or chopped cooked chicken
½ cup taco sauce
1 ½ cup shredded sharp cheddar cheese
1 ½ cup shredded Monterey Jack cheese
Instructions
In a medium skillet over medium-high heat, add the chicken and taco sauce. Stir to combine and heat for 5 to 8 minutes or until the chicken has heated through.
Cut aluminum foil into squares.
In the middle of the square, place a mound of tortilla chips. Top the chips with cheese and chicken. Fold the aluminum foil over the chip and chicken creating a pocket. Roll up any open edges to seal the pocket.
For the oven:
Preheat the oven to 350 degrees. Place the foil packets on a large rimmed baking sheet. Bake for 15 minutes or until the ingredients are heated through and the cheese is melted.
For grilling:
Prepare the grill for medium heat (about 350 degrees.) Place the foil packets on the grill and cook for about 10 minutes or until the ingredients have warmed through and the cheese has melted.
To serve, place the open packet on a plate or in a bowl. Carefully open the foil packets. Top the nachos with additional toppings as desired.
Notes: I used restaurant-style tortilla chips but any style can be used. These nachos can be personalized based on preference. Set up the ingredients like a taco bar and then prepare the nachos on the grill or in the oven.
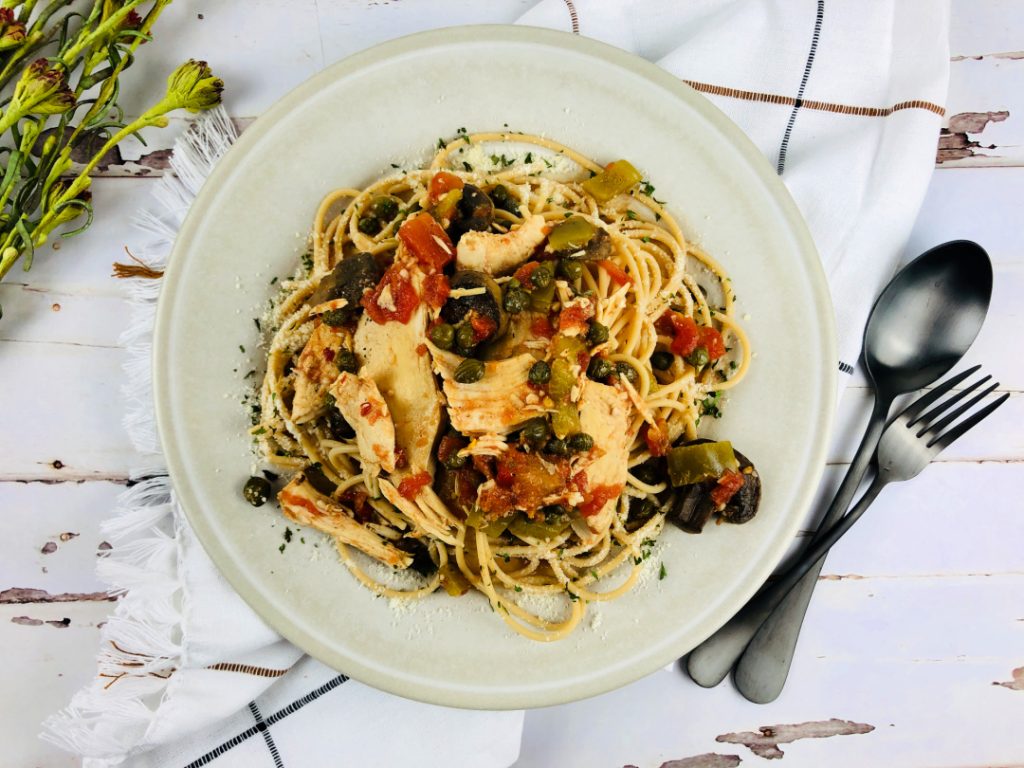
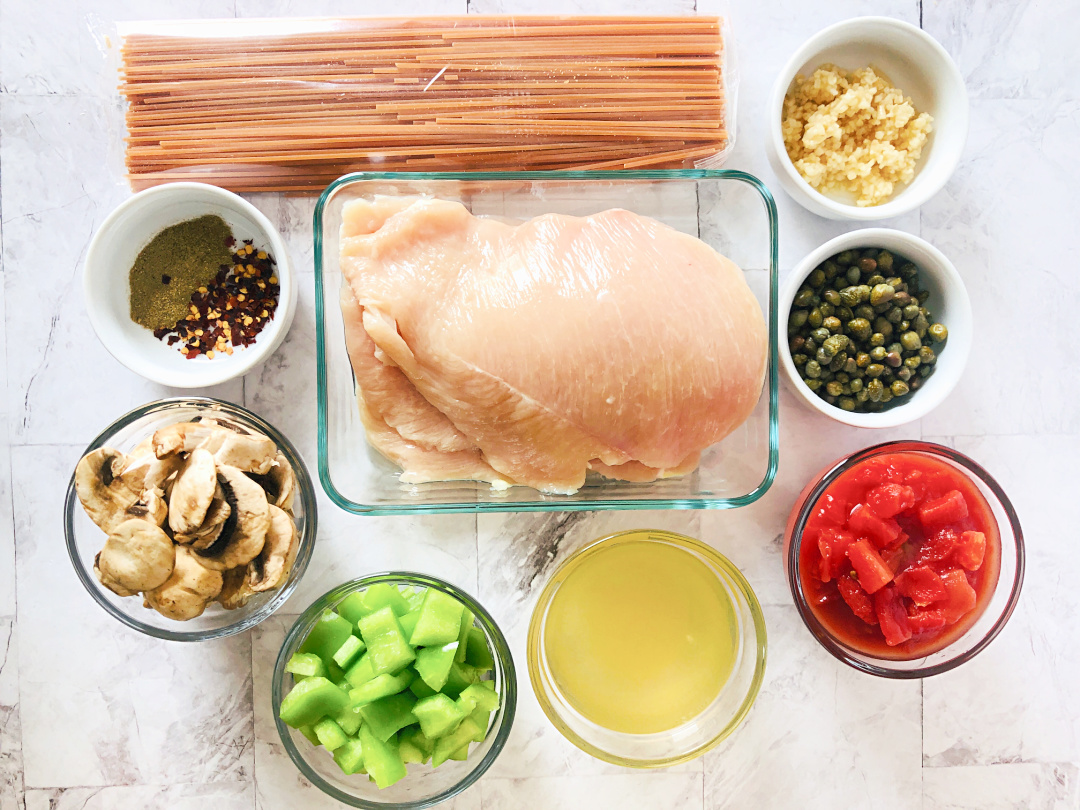
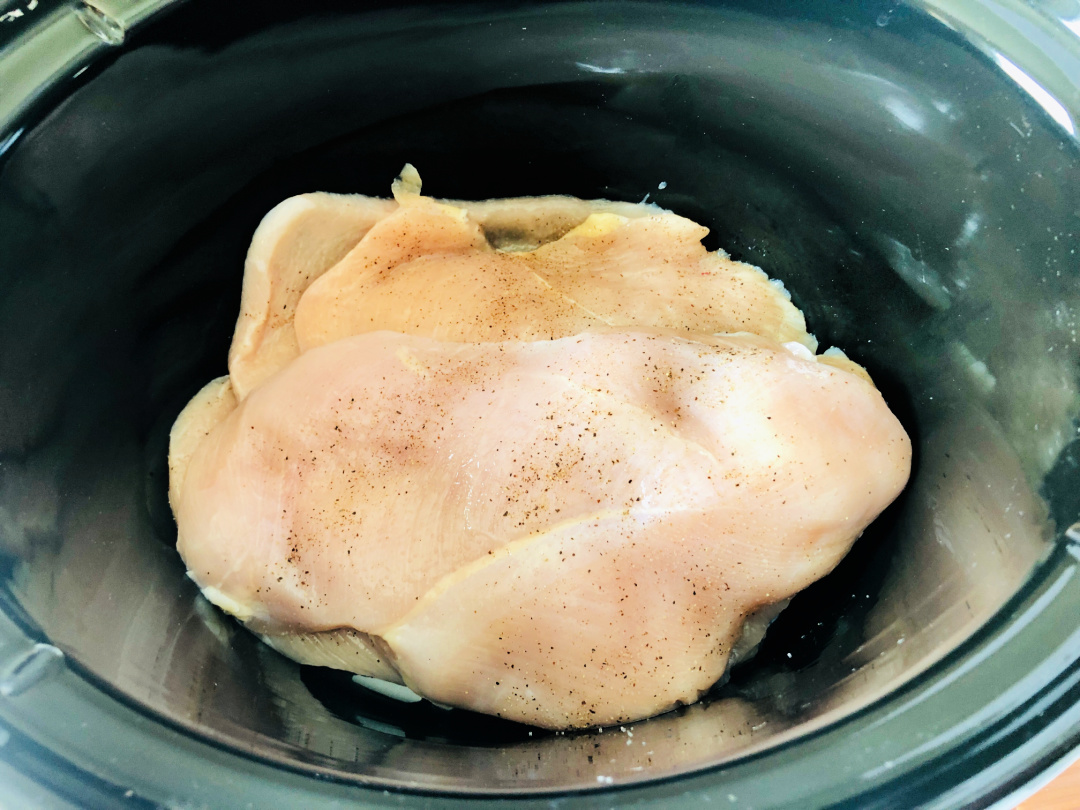
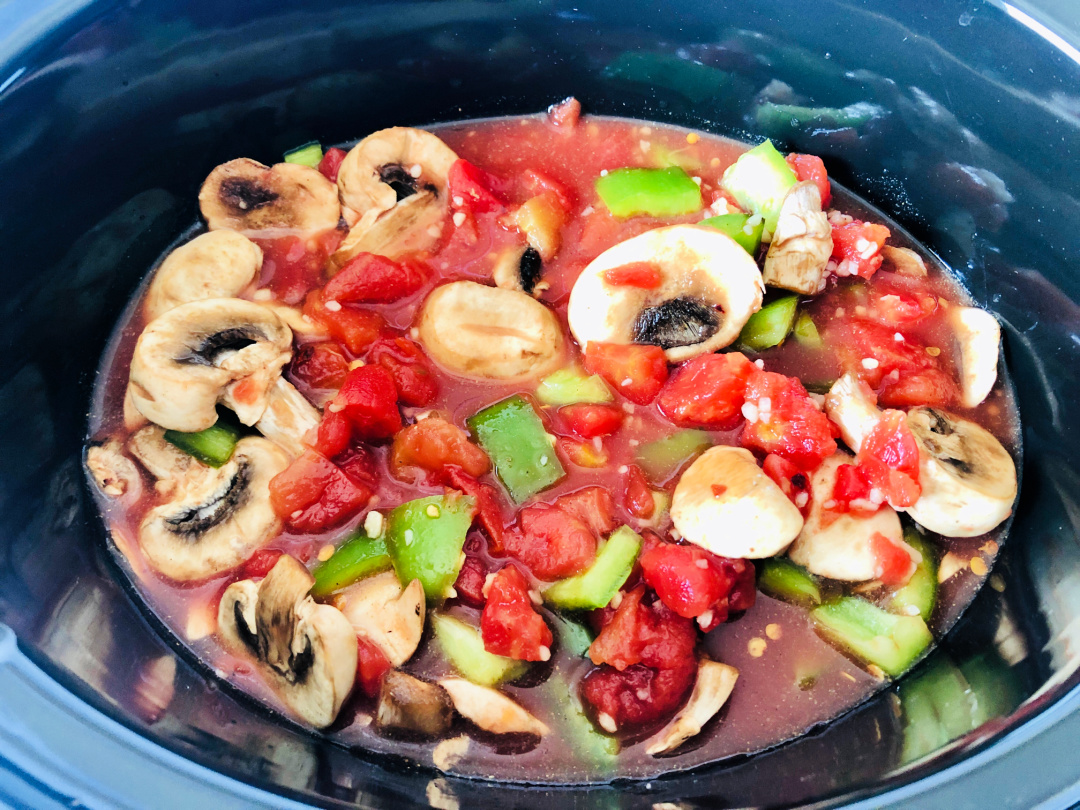
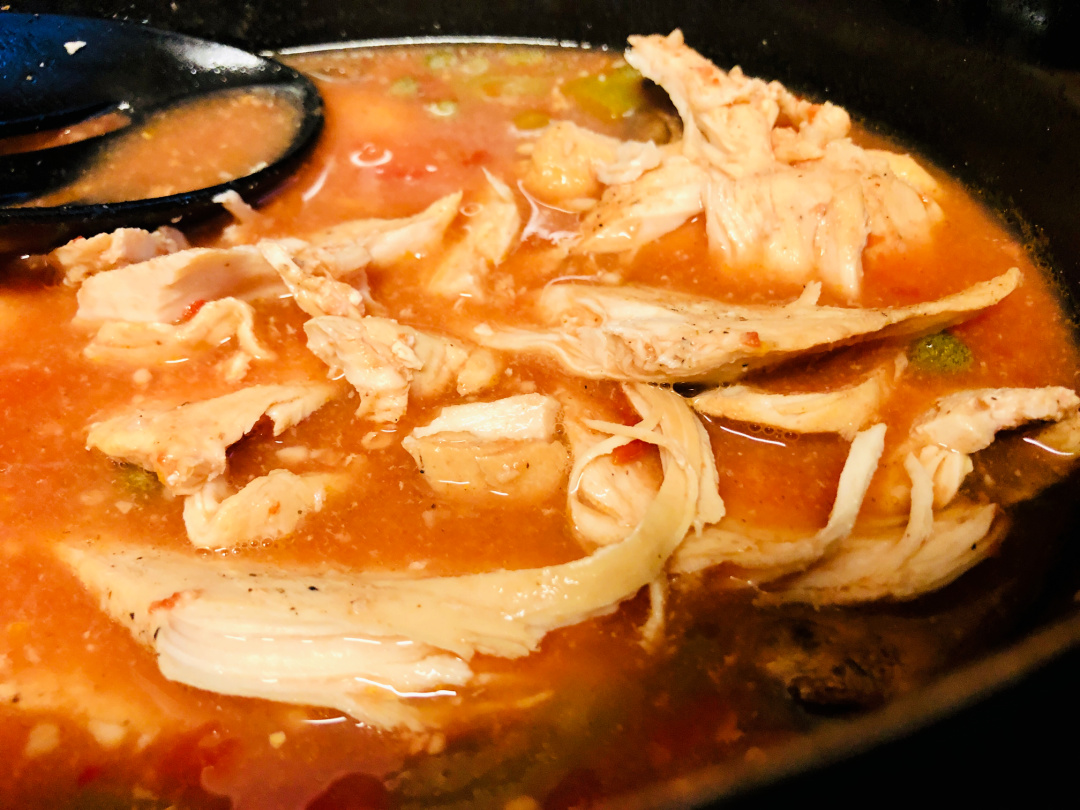
Get out your slow cooker! If you are looking for an easy and tasty dinner time dish to serve your family, try this Slow Cooker Chicken Cacciatore with Capers!
Slow Cooker Chicken Cacciatore is an easy and delicious way to make a classic Italian dish.
The slow cooker does all the work, so all you have to do is sit back and enjoy the deliciousness.
Because it’s made in the slow cooker, it’s also a healthy way to enjoy this classic dish.
If you’re looking for an easy and delicious slow cooker chicken recipe, look no further than Slow Cooker Chicken Cacciatore recipe!
Chicken Cacciatore is a hearty and flavorful chicken dish that’s perfect for a winter meal. There are a few reasons why you should make this dish in your slow cooker.
First, this recipe packed with flavor. The chicken is cooked in a sauce that’s seasoned with delicious seasonings. This combination of flavors gives the chicken a delicious taste that you’ll love.
Second, this recipe is easy to make. There’s no need to spend hours slaving over a hot stove when you can let your slow cooker do the work for you.
Finally, this recipe includes healthy ingredients. The chicken is a lean protein source, and the sauce is packed with nutrients. This dish is a great way to get your daily dose of vegetables.
So, if you’re looking for a delicious and healthy chicken dish to make in your slow cooker, Chicken Cacciatore is a great choice.
Give it a try the next time you’re in the mood for something hearty and flavorful.
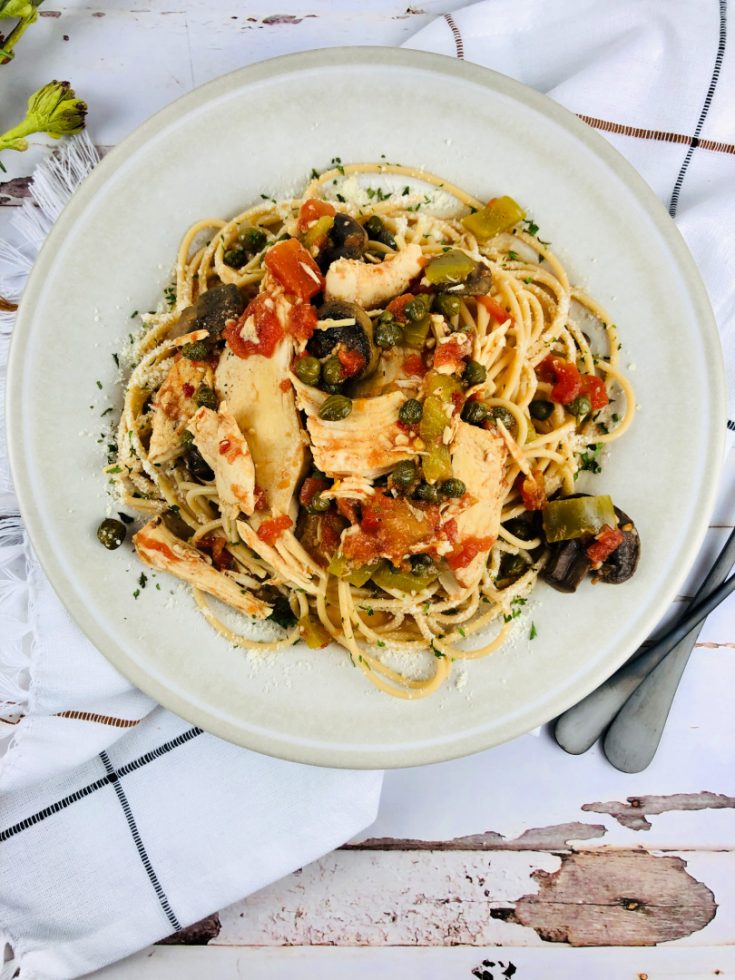
What is Chicken Cacciatore?
Chicken Cacciatore is a chicken dish that originates from Italy.
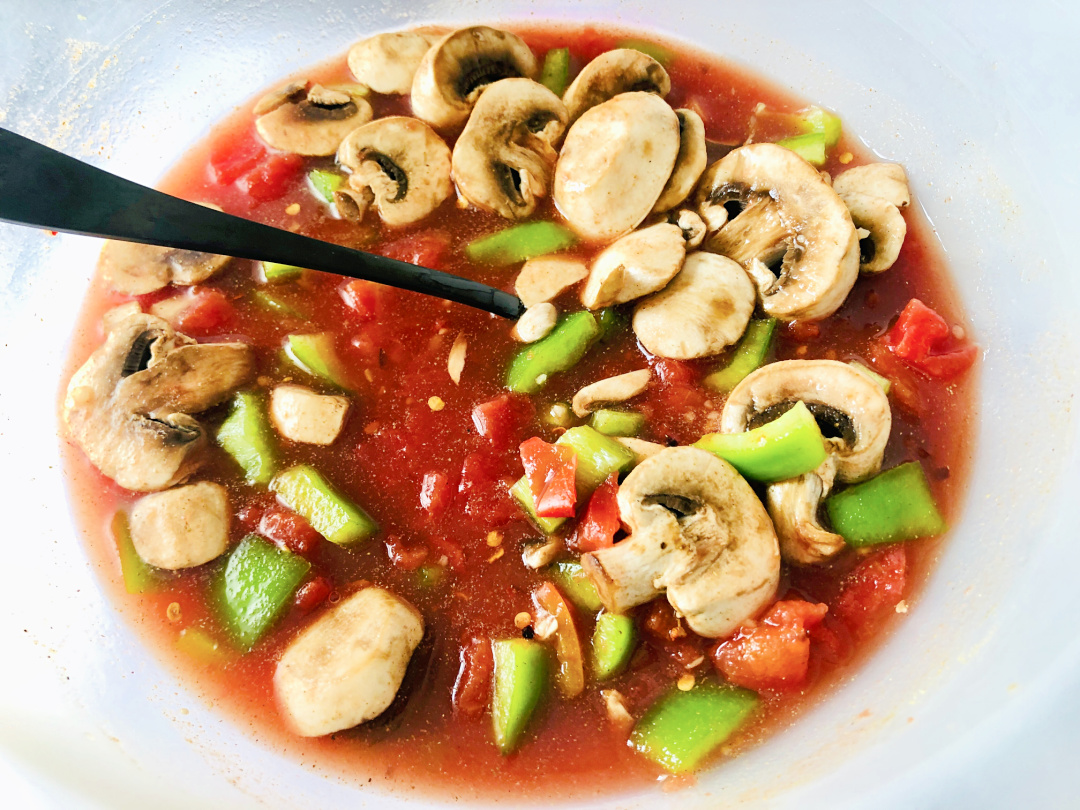
The dish typically consists of chicken that is browned and then simmered in a sauce that includes tomatoes, peppers, onions, and herbs.
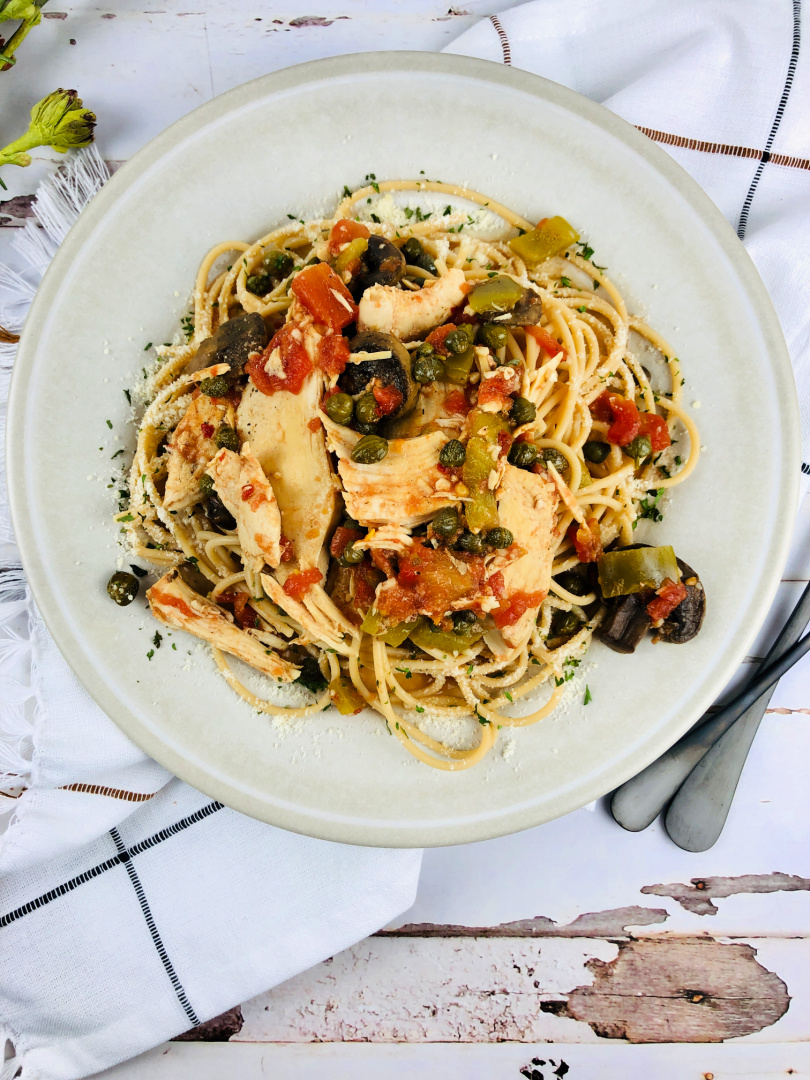
Chicken Cacciatore is often served over pasta or rice.
What are capers?
Capers are the small, pickled buds of a Mediterranean flower. They have a sharp, tangy flavor that is often used to enhance other dishes.
Capers are commonly used in Mediterranean and Italian cuisine, and can be found in many recipes such as pasta sauce, chicken dishes, and salads.
How do you store leftover Chicken Cacciatore?
If you have leftover chicken cacciatore, the best way to store it is in an airtight container in the fridge. It will keep for up to four days.
You can also freeze chicken cacciatore, and it will keep for up to six months. When you’re ready to eat it, simply defrost and reheat.
Can you freeze Chicken Cacciatore?
The answer is yes, you can! This dish can be made ahead of time and frozen for later.
Simply prepare the recipe as directed, then allow it to cool completely before freezing.
To reheat, thaw in the refrigerator overnight and reheat in the oven until warm.
What can you pair Chicken Cacciatore with?
Chicken Cacciatore pairs well with a number of different foods. Try it with pasta, rice, or even a simple salad.
For a heartier dish, try pairing chicken cacciatore with some bread or potatoes. Whatever you choose, chicken cacciatore is sure to be a hit!
Can you use canned chicken for Chicken Cacciatore?
Chicken Cacciatore is a chicken dish that is traditionally made with fresh chicken. However, some people may ask if it is possible to use canned chicken instead.
While it is possible to use canned chicken for chicken cacciatore, it is not the preferred method. Fresh chicken will always produce the best results.
What pasta can you use for Chicken Cacciatore?
There are many different types of pasta that can be used for chicken cacciatore. Some of the most popular include penne, spaghetti, and rigatoni.
The type of pasta you use is really up to personal preference. Just make sure to cook it al dente so it doesn’t get mushy. For this recipe, I used linguine.
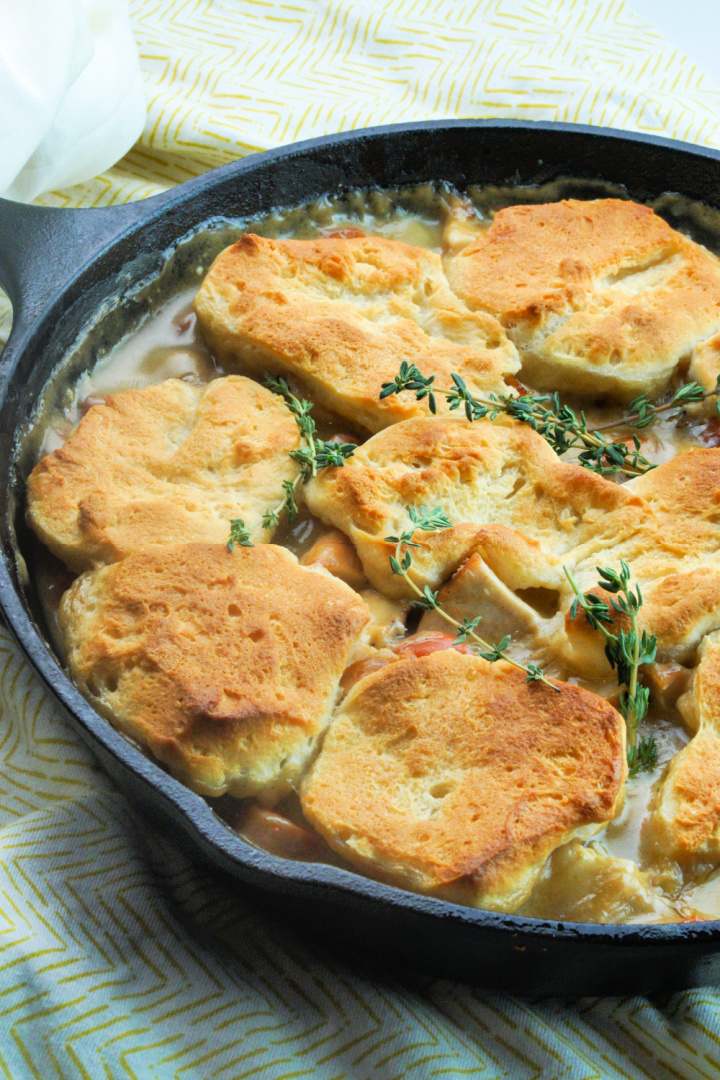
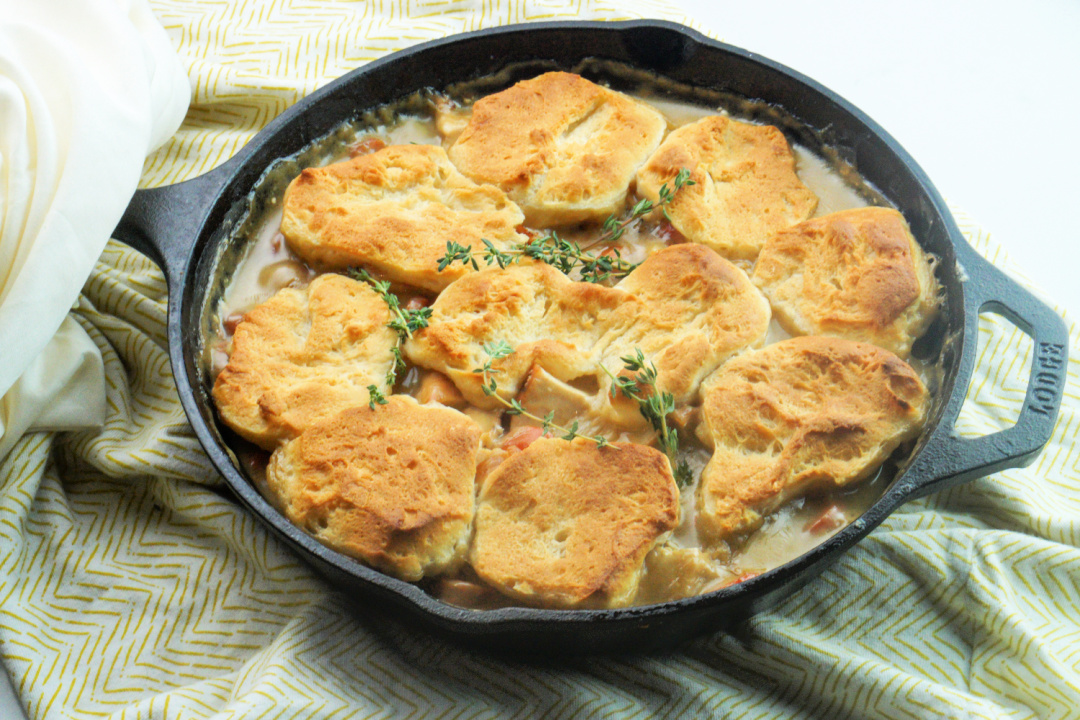
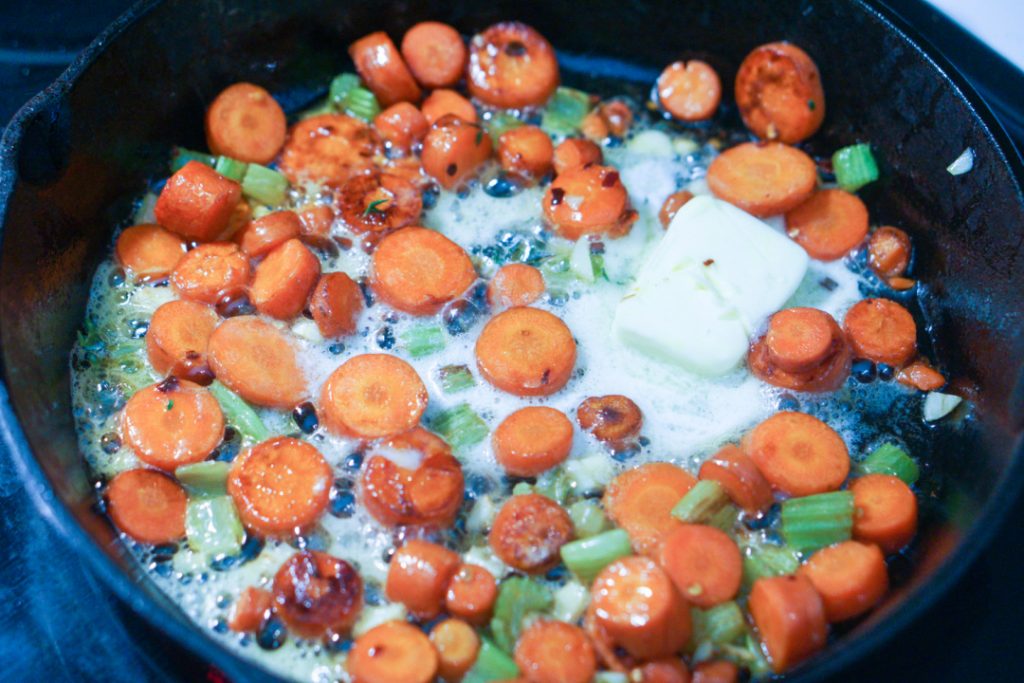
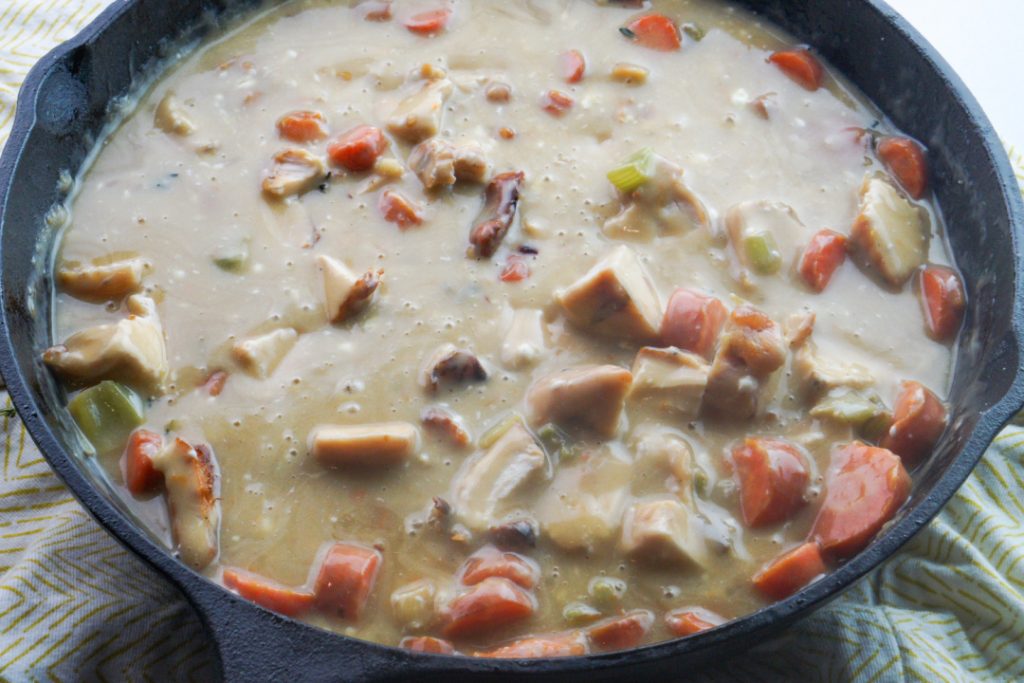
Get out your cast iron skillets and make this Cast Iron Skillet Chicken Pot Pie using biscuits for the crust! This is a classic comfort food that your family will love.
There’s nothing quite like the smell of a homemade chicken pot pie cooking in the oven.
There are plenty of reasons to love cast iron skillet chicken pot pie.
For one, it’s a hearty and satisfying dish that’s perfect for cold winter nights. But what really makes cast iron skillet chicken pot pie stand out is its simplicity.
This dish is easy to make and only requires a few ingredients, so it’s perfect for busy weeknights.
Plus, the cast iron skillet gives the chicken pot pie a rustic look that will make your guests feel right at home.
If you’re looking for a delicious and easy-to-make meal, cast iron skillet chicken pot pie is the way to go.
If you have a cast iron skillet, it’s even easier to make than you might think. Just layer all your ingredients in the skillet and pop it in the oven for an easy, one-pot meal.
Your family will love this delicious take on a classic dish.
What makes a pot pie?
Basic pot pies include ingredients like the crust, meat, vegetables, and gravy.
One of the great things about chicken pot pie is that it can be made with a variety of ingredients. While the classic recipe includes chicken, carrots, potatoes, and peas, there are endless possibilities for ingredients.
Some other ingredients that can be added to chicken pot pie include: onions, celery, corn, green beans, mushrooms, and even diced apples or pears.
Basically, any vegetables that you enjoy eating can be added to chicken pot pie.
Get creative and experiment with different ingredients to find your perfect pot pie recipe!
What can I serve with Cast Iron Skillet Chicken Pot Pie?
There are a few different ways that you can serve chicken pot pie.
One option is to serve it with a side of green beans. Another option is to serve it with a side salad. You could also serve it with some boiled potatoes.