Here’s why you should consider creating this delectable dessert using our tantalizing recipe:
Irresistible Creaminess
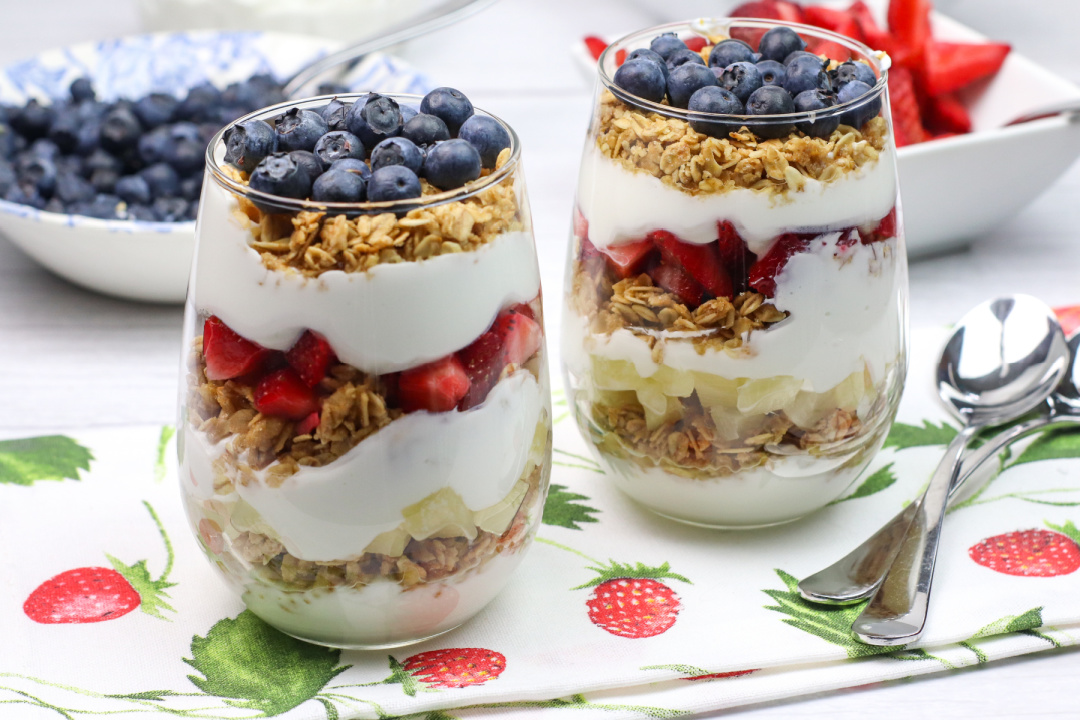
The star of this parfait is the Greek yogurt. Its rich and velvety texture will delight your palate with each spoonful.
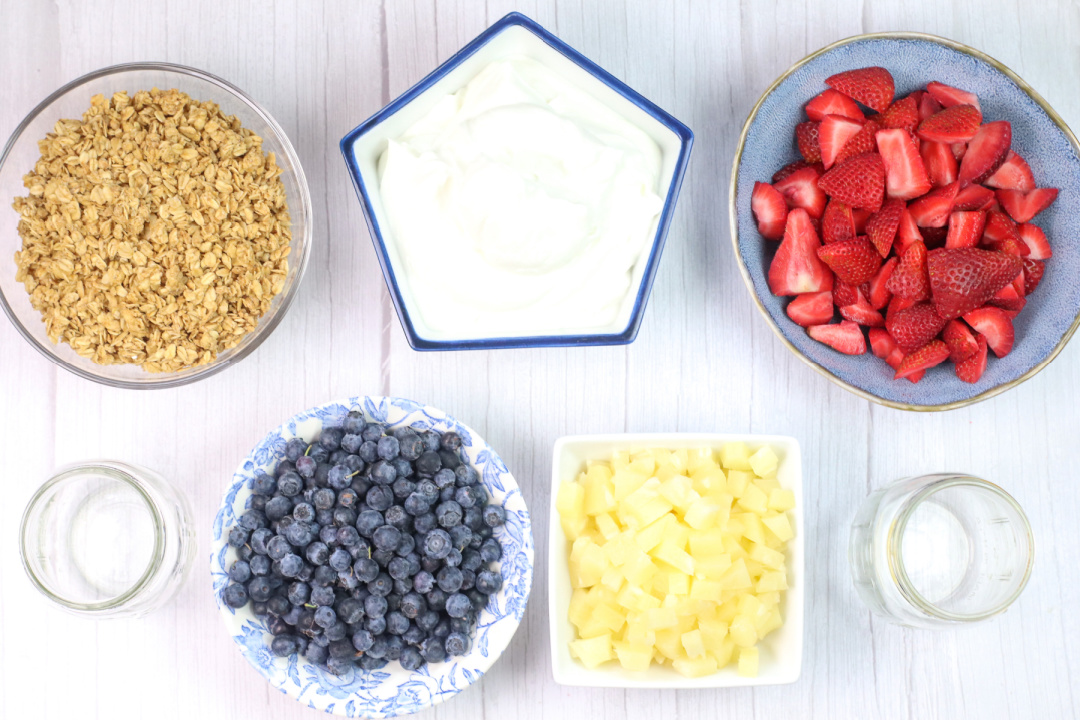
With 2 cups of original or vanilla Greek yogurt, you’ll experience a luscious and satisfying base that will complement the other ingredients perfectly.
A Symphony of Flavors
The combination of fresh blueberries, strawberries, and pineapple adds a burst of vibrant flavors to your parfait.
The sweetness of the berries, paired with the tropical tang of pineapple, creates a harmonious balance that will leave you craving more.
Each bite will take your taste buds on an enchanting journey through a medley of fruity goodness.
Textural Delight
We believe that texture is just as important as taste when it comes to a truly enjoyable dessert.
That’s why we’ve included 2 cups of granola in our recipe.
The granola adds a satisfying crunch and creates a delightful contrast to the smoothness of the yogurt and the juiciness of the fruits.
Beautiful Presentation
Aesthetics play a significant role in our overall dining experience.
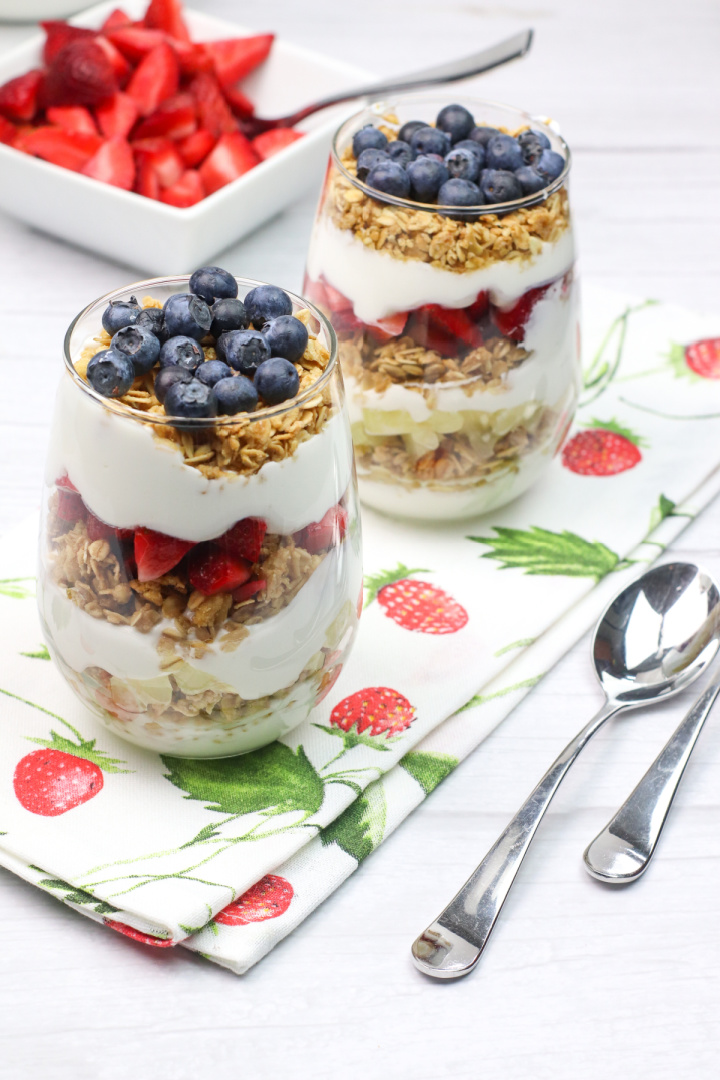
Imagine layering the colorful fruits, creamy yogurt, and crunchy granola in elegant 8-ounce glasses or mason jar containers.
The visually appealing layers will make your dessert not only a treat for your taste buds but also a feast for your eyes.
Health and Well-being
Indulging in a dessert doesn’t have to mean sacrificing your commitment to a healthy lifestyle.
By choosing Greek yogurt as the base, you’re adding a good source of protein, calcium, and probiotics to your parfait.
Fresh fruits provide essential vitamins, antioxidants, and dietary fiber. This dessert will satisfy your sweet tooth while still nourishing your body.
So, dessert lover, why deny yourself the pleasure of a fruit and yogurt parfait?
It’s a dessert that combines taste, texture, and visual appeal, all while supporting your well-being.
Give this recipe a try, and let yourself be enchanted by the delightful symphony of flavors that awaits you in each spoonful.
Fruit and Yogurt Parfait
Ingredients:
2 cups original or vanilla Greek yogurt
2 cups granola
1 cup fresh blueberries, rinsed
1 cup fresh strawberries, rinsed, hulled, and cut into fourths
1 cup fresh pineapple, diced
4 – 8-ounce glasses or mason jar containers
Directions:
In your glass or container, add approximately ¼ cup of the yogurt.
On top of the yogurt, add approximately ¼ cup of the granola.
On top of the granola, add approximately ¼ cup of the blueberries.
Repeat steps 1-3 with additional fruits until the glass or the container is full.
Serve immediately.
Berry Fruit and Yogurt Parfait
Ingredients
2 cups Greek yogurt (your favorite flavor!)
2 cups granola
1 cup fresh blueberries, rinsed
1 cup fresh strawberries, rinsed, hulled, and cut into fourths
1 cup fresh pineapple, diced
4 – 8-ounce glasses or mason jar containers
Instructions
In your glass or container, add approximately ¼ cup of the yogurt.
On top of the yogurt, add approximately ¼ cup of the granola.
On top of the granola, add approximately ¼ cup of the blueberries.
Repeat steps 1-3 with additional fruits until the glass or the container is full.
Classic Southern Banana Nut Muffins Recipe That’s Easy to Make at Home
If you’re looking for a simple, homemade muffin recipe that’s packed with flavor and perfect for breakfast, snacks, or even a quick dessert, banana nut muffins are a solid choice.
This easy-to-follow banana nut muffins recipe brings together ripe bananas, warm spices, and crunchy walnuts for a treat that’s both comforting and satisfying.
Whether you’re a busy parent trying to whip up something tasty for the family or a seasoned home cook wanting a reliable muffin recipe, these banana nut muffins are for you.
Kids love the sweet banana flavor, and adults appreciate the subtle spice and nutty crunch.
This recipe is ideal for anyone wanting an easy banana muffin recipe made from scratch, using common pantry ingredients.
Why Make Banana Nut Muffins from Scratch?
Making banana nut muffins at home is not only satisfying but also allows you to control the ingredients, avoiding preservatives found in store-bought options.
This recipe is perfect when you have a few overripe bananas sitting on the counter.
Plus, it’s a great way to get the family involved in baking — these muffins don’t require fancy techniques, just a few basic steps and mixing bowls.
When and Where to Serve Banana Nut Muffins
These muffins are great for morning breakfasts on the go or a mid-afternoon snack paired with coffee or tea.
Pack them for school lunches, take them along on road trips, or serve them at family gatherings and brunches.
They also make a smart choice for potlucks and community events where homemade treats are always appreciated.
How to Use Banana Nut Muffins Creatively
Beyond just eating them plain, banana nut muffins can be sliced and toasted with a bit of butter or cream cheese spread for a richer breakfast option.
You can also crumble them over vanilla yogurt with fresh fruit for a quick parfait.
For a fun twist, turn these muffins into mini dessert trifles layered with pudding and bananas or serve them alongside a scoop of vanilla ice cream for a simple treat.
Easy Banana Nut Muffins Recipe Tips for Success
To keep your muffins moist and flavorful, use ripe bananas that are heavily spotted or even slightly mashed.
Don’t overmix the batter once you add the dry ingredients — a few lumps are fine and help keep the muffins tender.
Coating the walnuts with a little flour before folding them in prevents them from sinking to the bottom of the muffins. Baking at 350 degrees ensures a golden top with a soft crumb inside.
This banana nut muffins recipe is a classic for a reason.
It’s straightforward, uses ingredients you likely have on hand, and offers plenty of ways to enjoy it throughout your day.
Give it a try, and you’ll have a fresh batch of muffins ready to enjoy in less than 30 minutes.
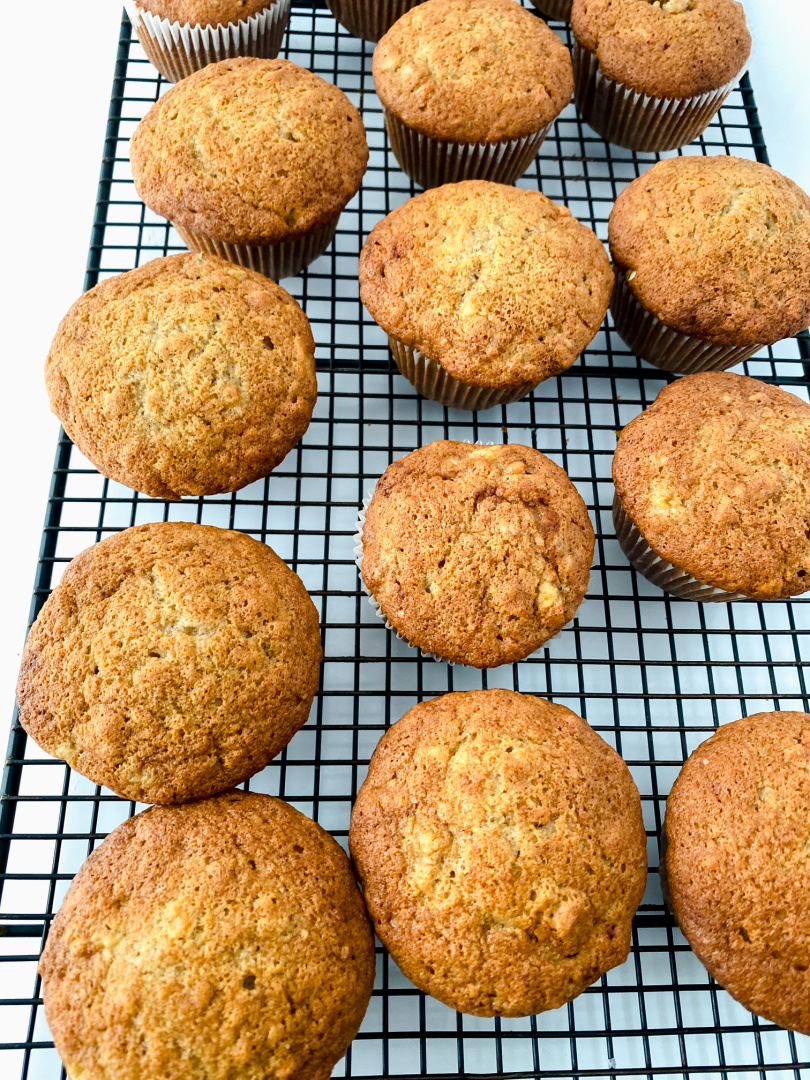
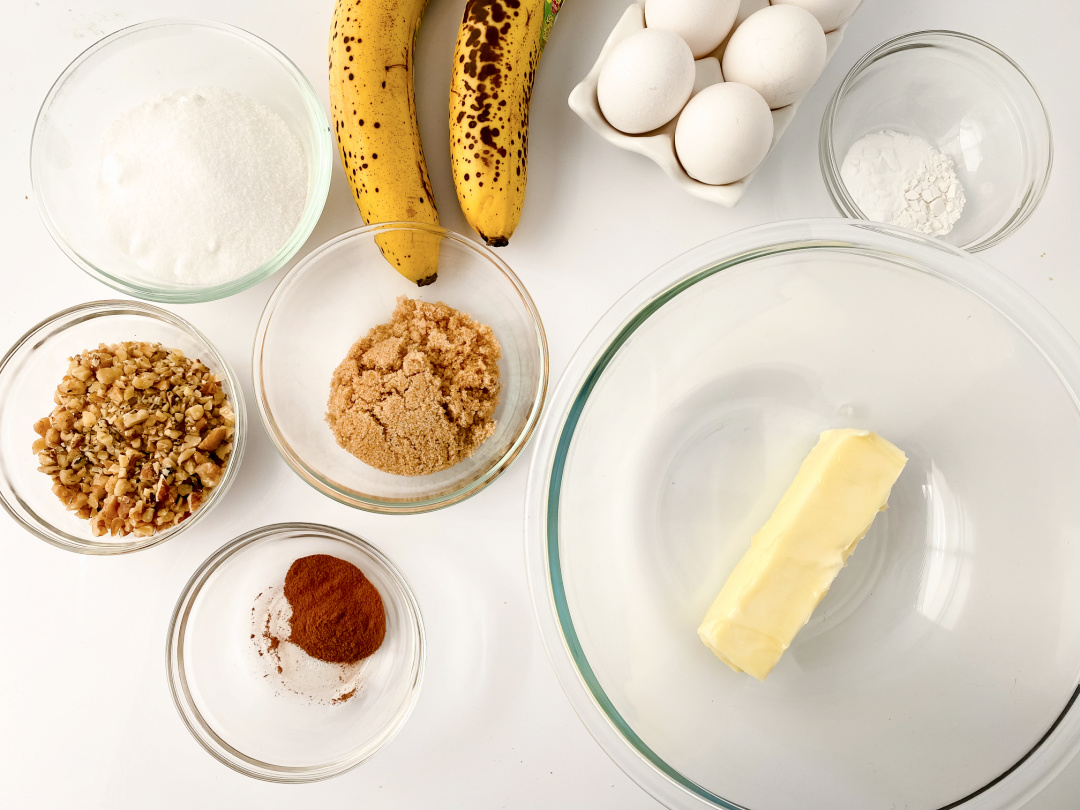
Banana Nut Muffins
Ingredients:
1/2 cup (1 stick) unsalted butter, softened
3/4 cup granulated sugar
1/4 cup packed brown sugar
2-3 large bananas
2 large eggs
3 tbsp. whole milk
1 tsp. vanilla
2 cups, all purpose flour, scooped and leveled
1 tsp. baking soda
1 tsp. baking powder
1 tsp. ground cinnamon
1 tsp. all spice
1/2 chopped walnuts
Directions:
Preheat the oven to 350.
Line muffin tin with liners
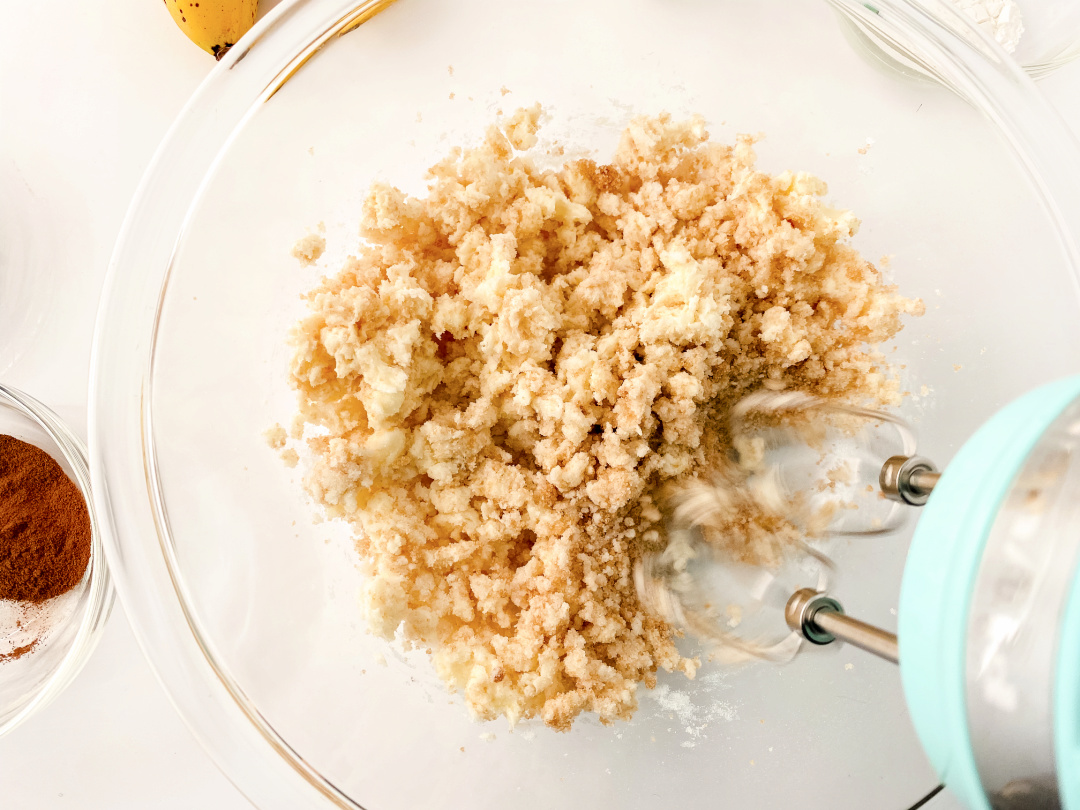
In a large bowl cream butter and sugar until light and fluffy.
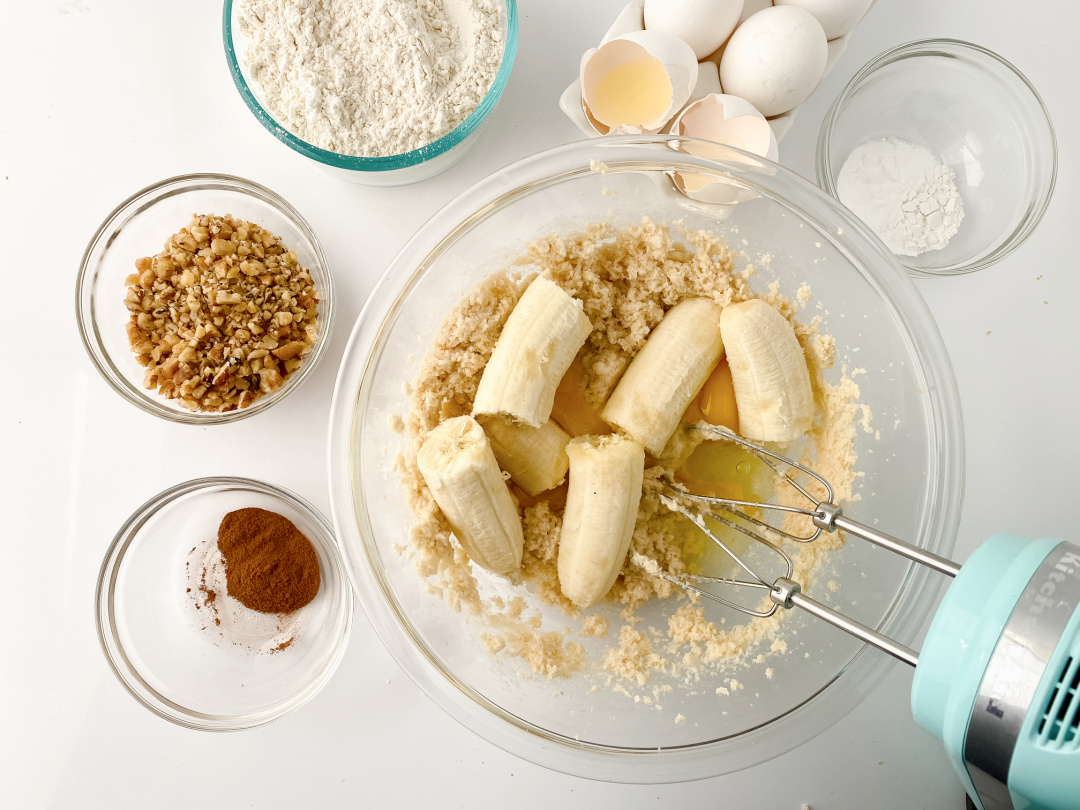
Add bananas and mix into butter/sugar mixture.
Add the eggs, milk and vanilla extract.
It will be lumpy from the bananas which is fine.
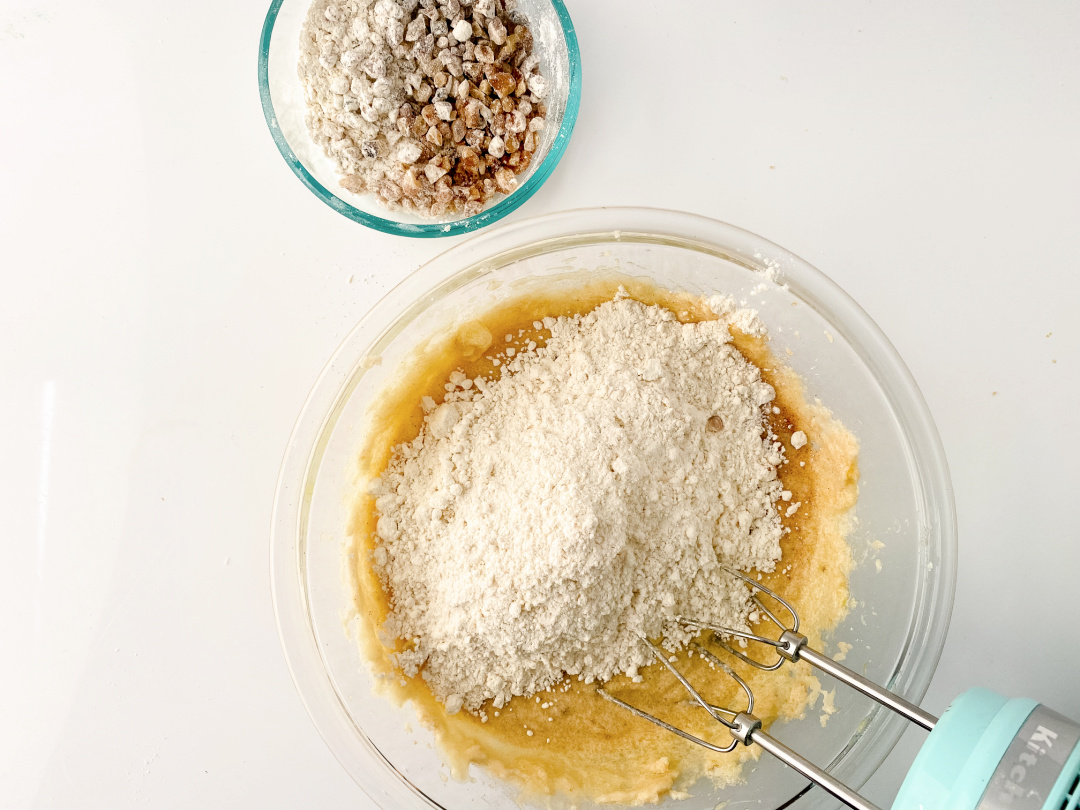
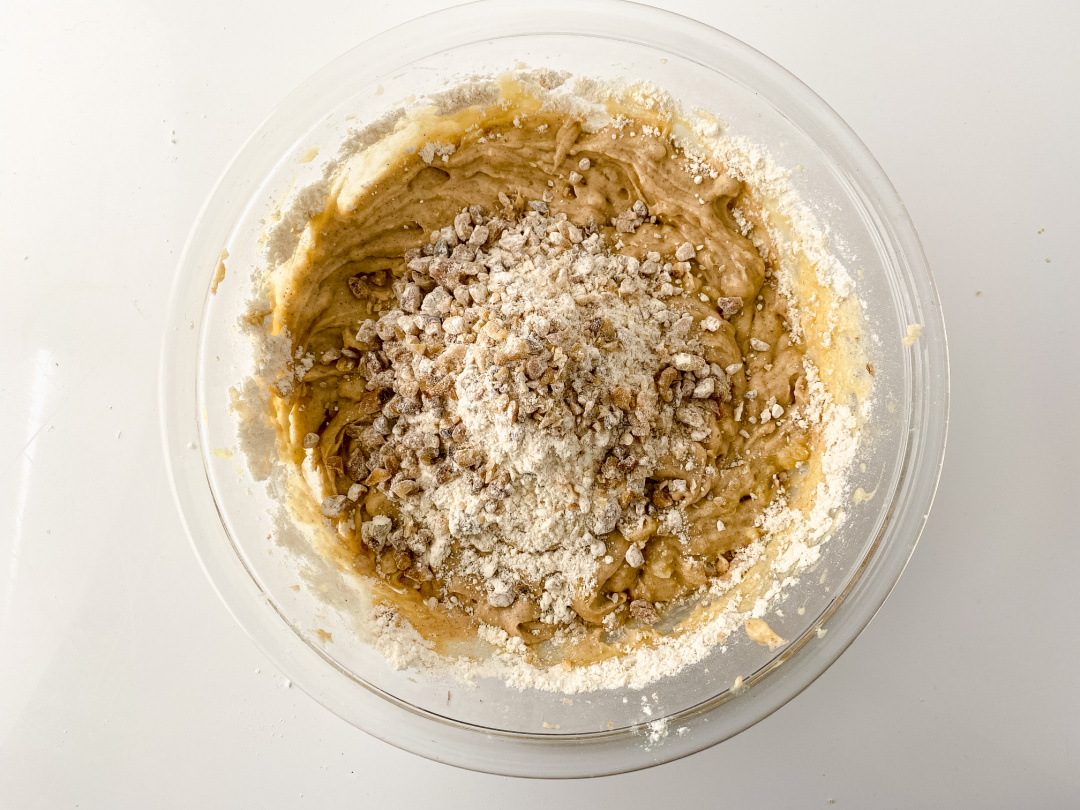
Add flour, baking soda, baking powder, cinnamon and all spice to the batter.
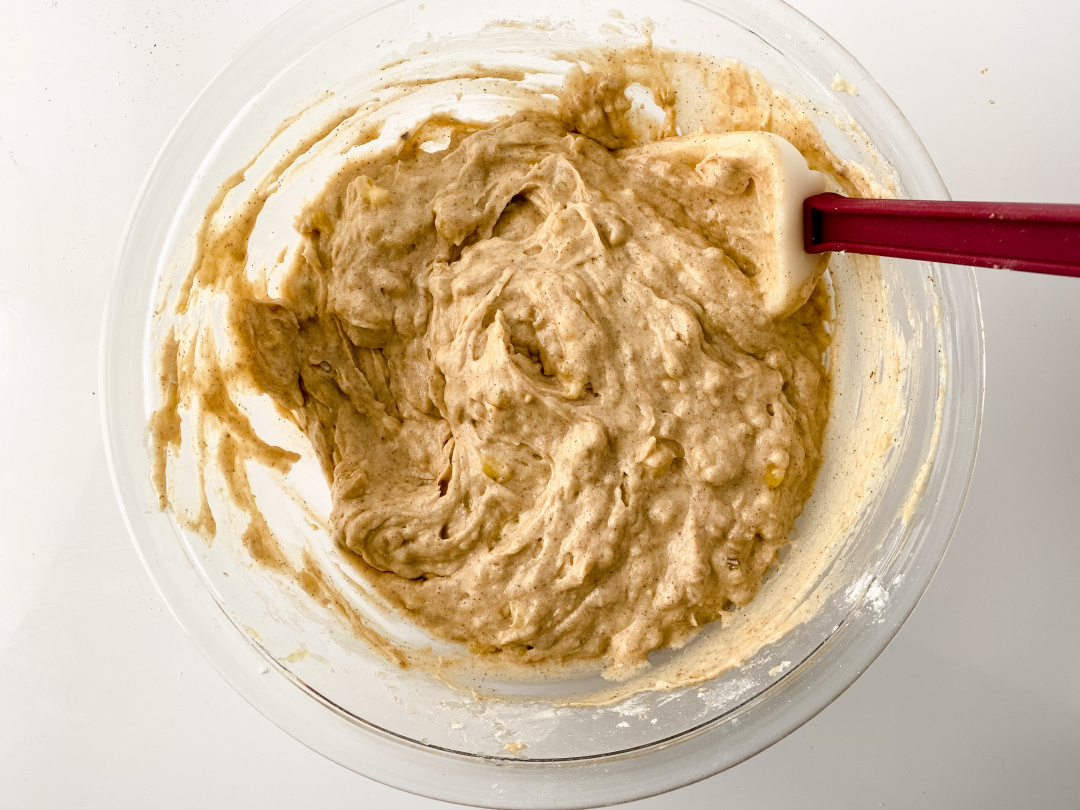
Mix until flour is combined.
Coat walnuts in a little flour and stir into batter.
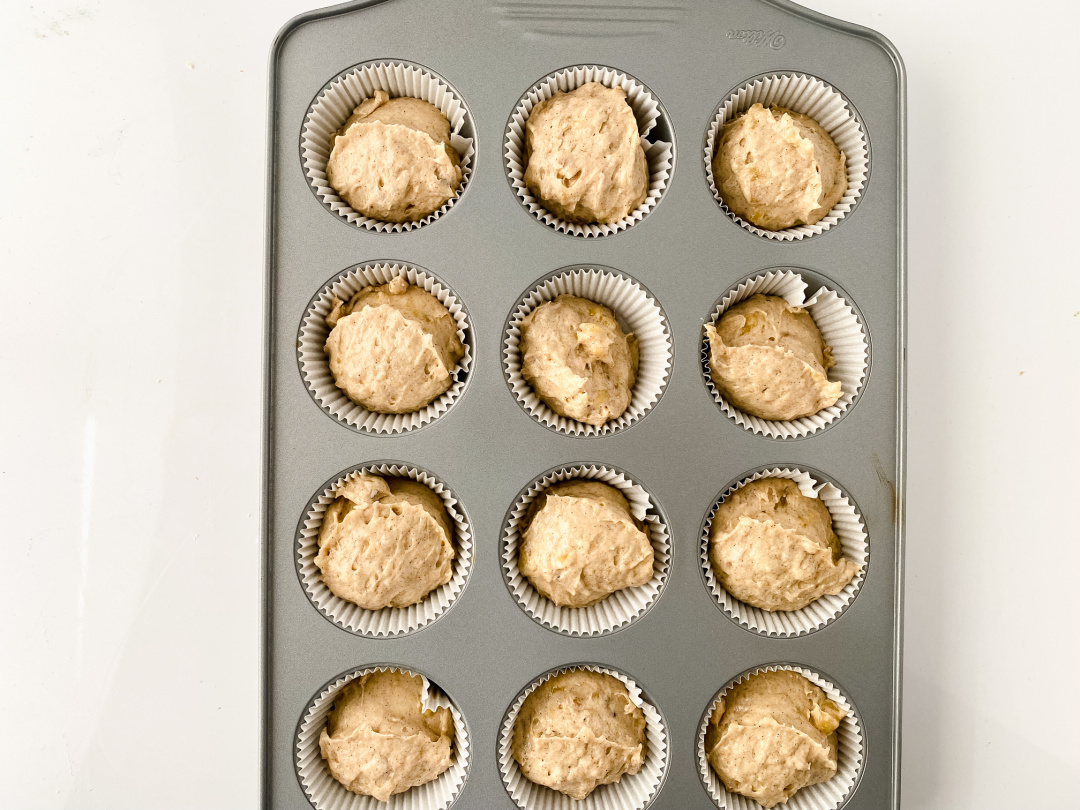
Spoon into prepared liners and bake for 18-20 min or until a tooth pick comes out clean.
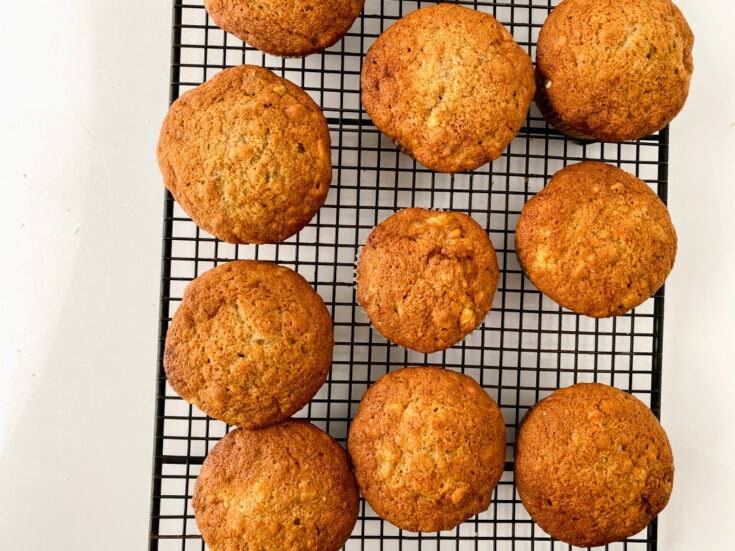
Remove from heat and let chill on cooling rack.
Frequently Asked Questions About Homemade Banana Nut Muffins
How ripe should bananas be for banana nut muffins? For the best banana nut muffins, use overripe bananas that are heavily speckled or mostly brown. The riper the banana, the sweeter and more flavorful your muffins will be. This is a great way to use up bananas that are too soft to eat on their own.
Can I make banana nut muffins without walnuts? Yes, you can make banana muffins without nuts if you have an allergy or prefer a nut-free version. The texture will be a little different, but the muffins will still be moist and flavorful. You can substitute chocolate chips, sunflower seeds, or leave them plain.
What’s the best way to store banana nut muffins? Store your banana nut muffins in an airtight container at room temperature for up to 3 days. If you want them to last longer, refrigerate them for up to a week or freeze them for up to 3 months. Reheat frozen muffins in the microwave for about 20–30 seconds or let them thaw at room temperature.
Can I freeze banana nut muffins after baking? Absolutely. Freezing banana nut muffins is a smart way to save time and reduce food waste. Let them cool completely, then wrap each muffin individually in plastic wrap or foil and place them in a freezer-safe bag. This easy make-ahead muffin recipe freezes beautifully.
How do I keep my banana muffins moist? To keep banana nut muffins soft and moist, don’t overmix the batter and be sure to use bananas that are fully ripe. Also, avoid overbaking. Take them out as soon as a toothpick inserted in the center comes out clean or with a few moist crumbs.
What makes these banana nut muffins a good breakfast option? These easy homemade banana nut muffins are a great grab-and-go breakfast. They’re made with real bananas and walnuts, offering natural sweetness and a bit of protein and crunch to keep you satisfied longer.
Can I use oil instead of butter in banana nut muffins? Yes, you can substitute oil for butter if needed. Use the same amount of vegetable or canola oil (½ cup). Butter adds a rich flavor, but oil will keep the muffins extra moist. This swap works well in most banana nut muffin recipes from scratch.
Are banana nut muffins healthy? While banana nut muffins are not considered a low-calorie food, they are made with wholesome ingredients like real bananas and nuts. You can make them healthier by reducing the sugar slightly or using whole wheat flour. This is a balanced option for a homemade muffin treat.
Can I make these banana nut muffins into mini muffins? Yes, just spoon the batter into a mini muffin tin and reduce the baking time to about 10–13 minutes. Keep an eye on them and test with a toothpick. These mini banana nut muffins are great for kids or serving at parties and brunches.
Why did my banana muffins come out dry? Dry banana muffins usually happen from overmixing the batter or baking them too long. Be sure to mix only until the ingredients are combined and use a timer to avoid overbaking. Moist banana muffins come from using ripe bananas and not skipping the butter or milk.
Banana Nut Muffins
Ingredients
1/2 cup (1 stick) unsalted butter, softened
3/4 cup granulated sugar
1/4 cup packed brown sugar
2-3 large bananas
2 large eggs
3 tbsp whole milk
1 tsp vanilla
2 cups, all purpose flour, scooped and leveled
1 tsp baking soda
1 tsp baking powder
1 tsp ground cinnamon
1 tsp all spice
1/2 chopped walnuts
Notes
Preheat the oven to 350
Line muffin tin with liners
In a large bowl cream butter and sugar until light and fluffy.
Add bananas and mix into butter/sugar mixture.
Add the eggs, milk and vanilla extract.
It will be lumpy from the bananas which is fine.
Add flour, baking soda, baking powder, cinnamon and all spice to the batter.
Mix until flour is combined.
Coat walnuts in a little flour and stir into batter.
Spoon into prepared liners and bake for 18-20 min or until a tooth pick comes out clean.
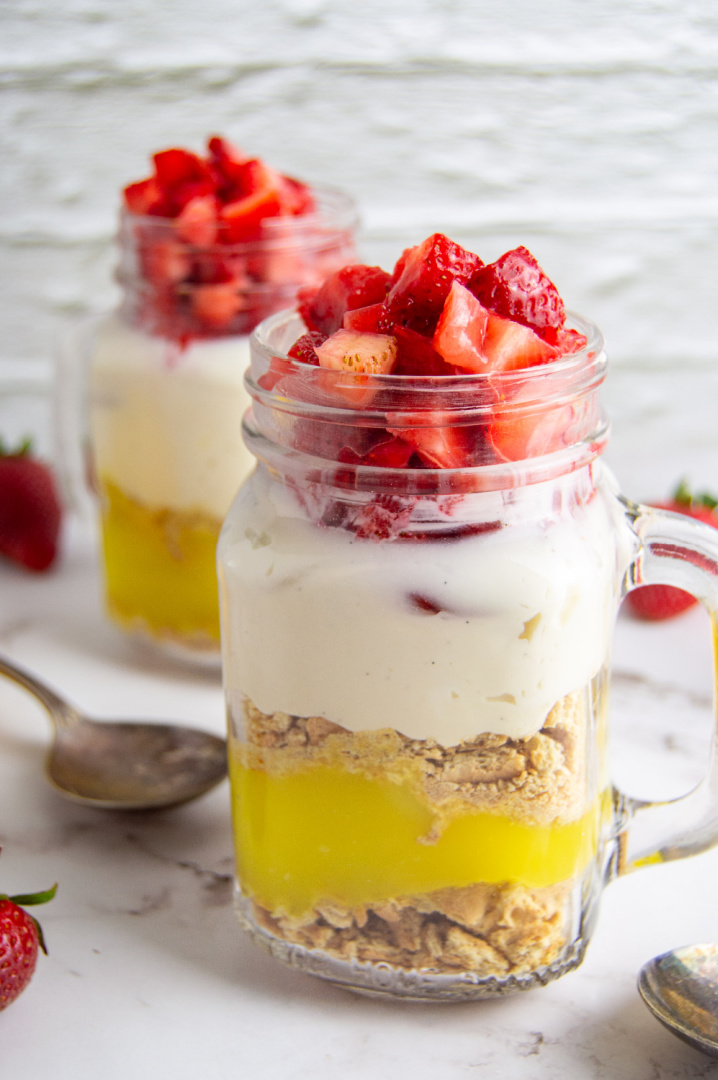
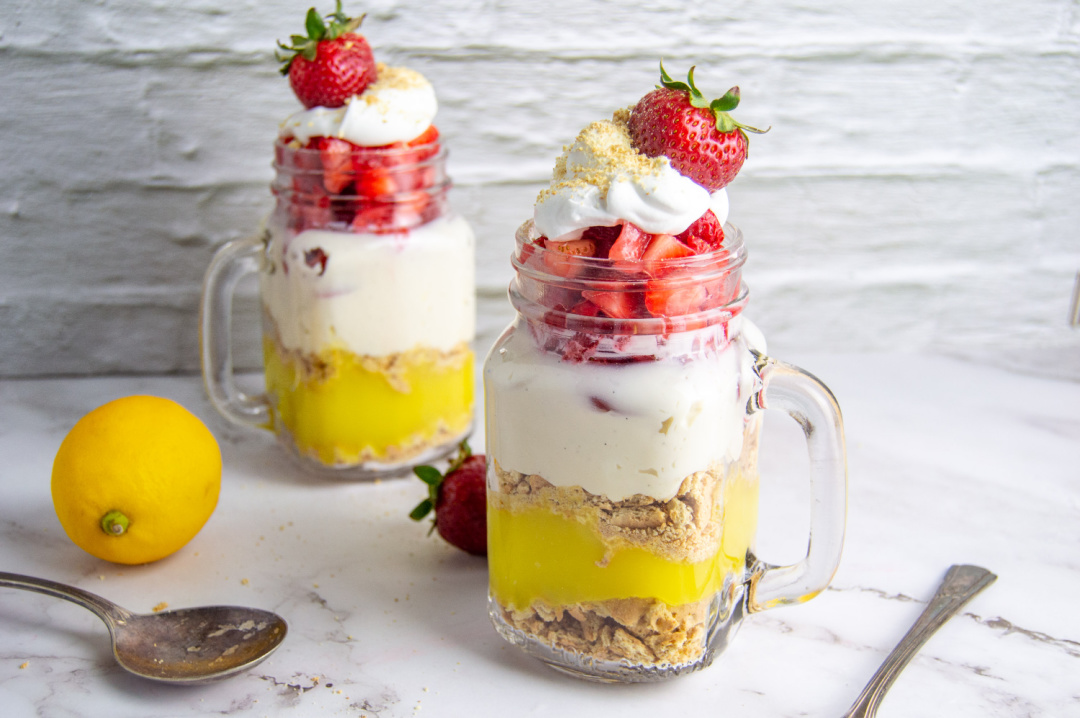
This is a go-to recipe when strawberries are in season and you want to take advantage of that fresh flavor, but it works year-round with store-bought or frozen berries, too.
It’s especially good for spring and summer get-togethers — backyard BBQs, baby showers, church potlucks, or even just Sunday lunch.
And if you’re planning a brunch, these little jars are a no-brainer.
Where should you serve it?
Serve this dessert in a jar anywhere you’d serve a good dessert.
These are perfect for outdoor gatherings because they travel well in jars and don’t need to be sliced or scooped.
You can even pack them up for a picnic or send a few home with guests as a take-home treat.
I’ve also served them at family gatherings right on the kitchen counter, and they disappear fast.
Why this recipe works
It’s the contrast. The sweet strawberries, the tangy lemon, and the creamy layers come together just right.
Plus, it’s served in a jar, so there’s no need to worry about slicing or plating. It also looks good, and we all know presentation matters — even if it’s just for the folks around your table.
You can make them ahead, stash them in the fridge, and pull them out when you’re ready to serve.
No last-minute scrambling.
How to serve it
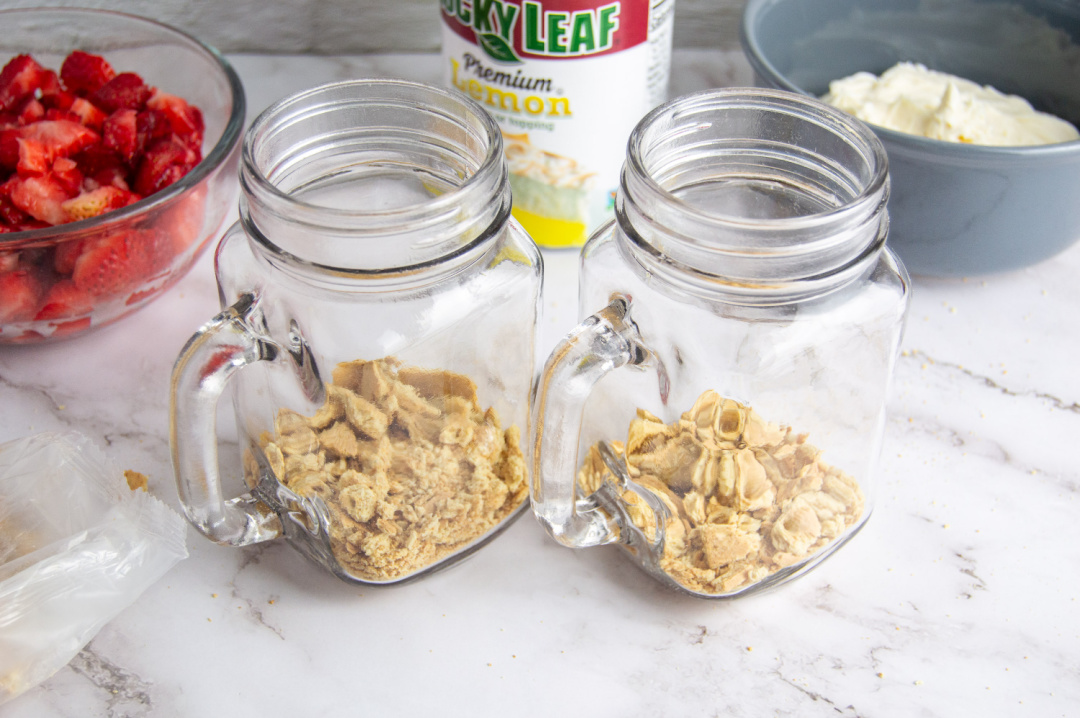
Layer this strawberry dessert in small mason jars or any clear cup you’ve got.
If you’re hosting, tie a little twine around the rim or add a spoon and stack them in a cooler — they hold up great.
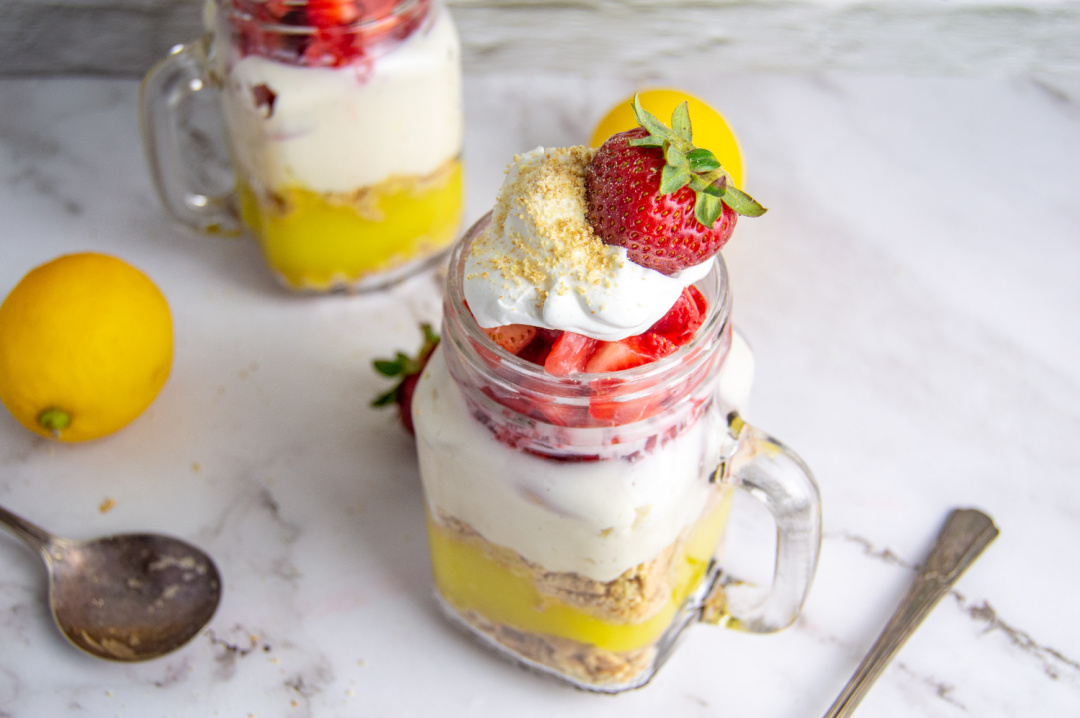
Want to make it extra fun? Add a mini lemon wedge or strawberry slice on top for a little garnish.
These also make a nice dessert board addition — just line them up with some cookies, fresh fruit, and maybe a little whipped cream on the side.
This is one of those recipes that feels homemade without a lot of hassle, and it’s flexible enough to fit whatever you’ve got going on.
Keep a few jars ready in the fridge, and you’ve got dessert handled all week long.
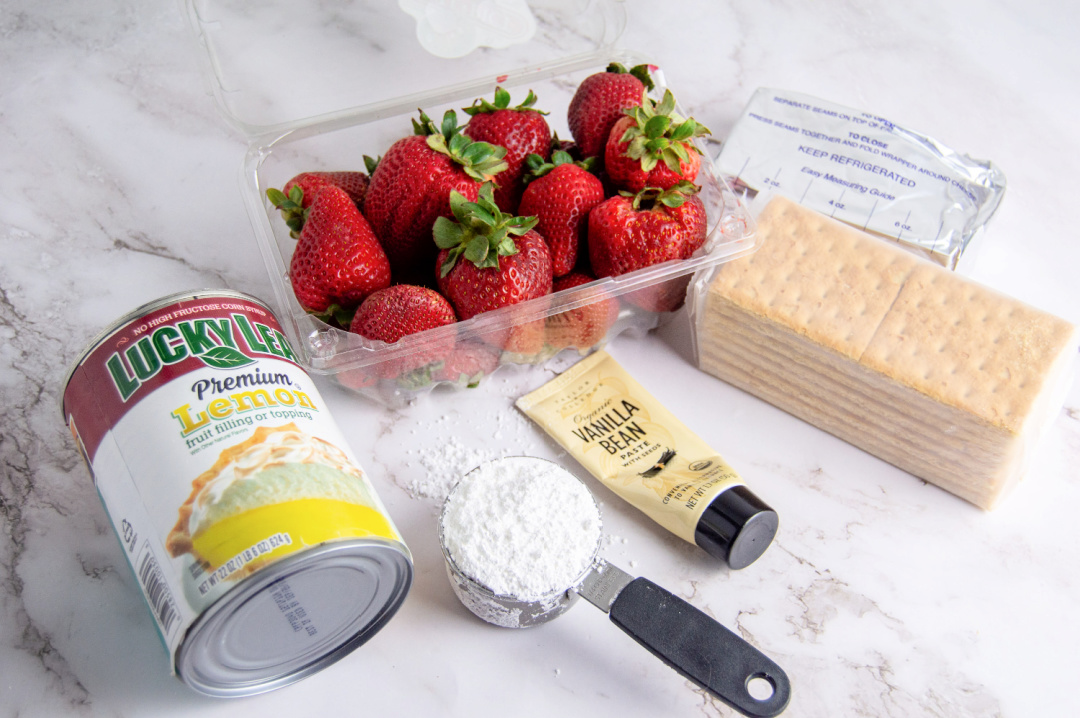
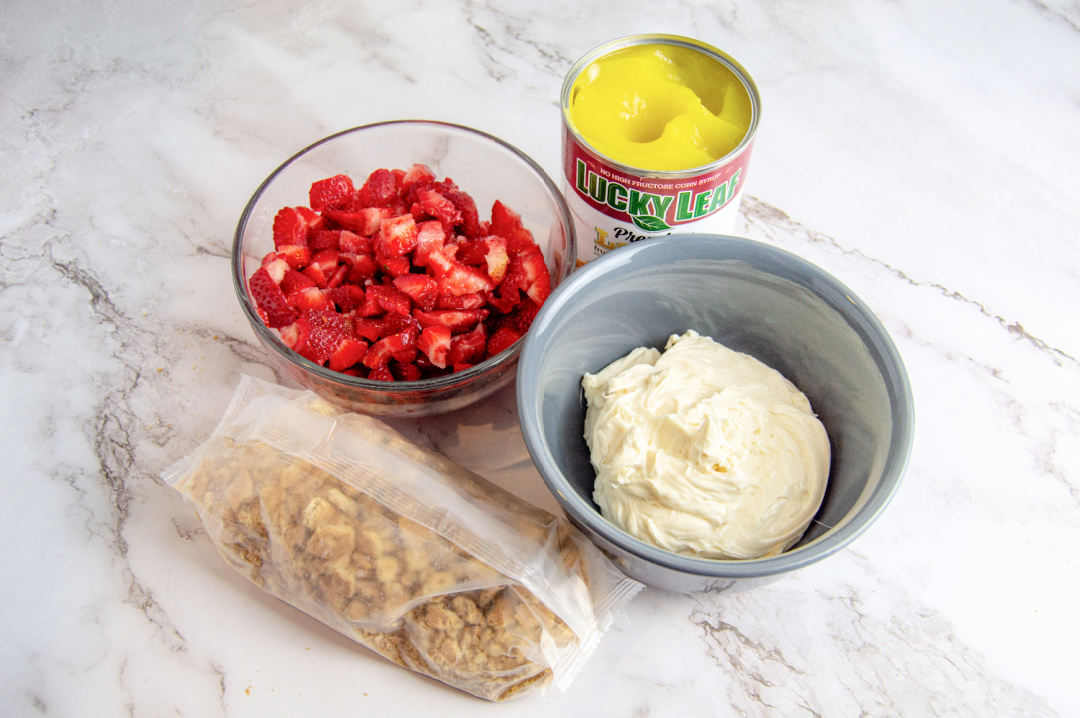
Strawberry Lemon Parfait
Ingredients:
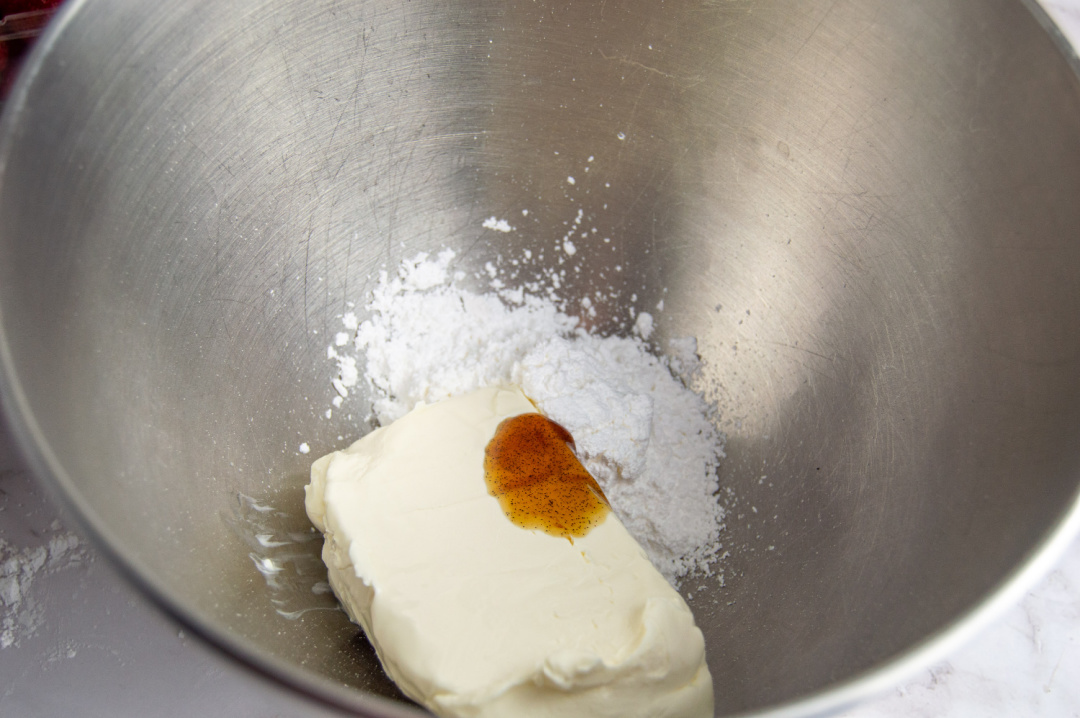
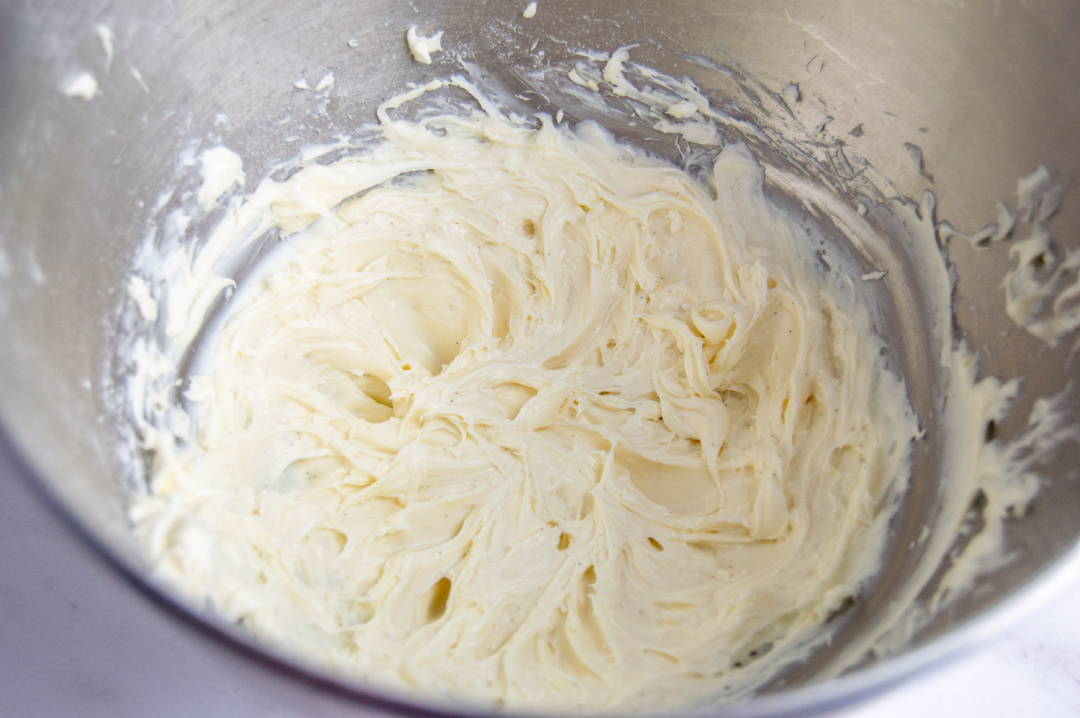
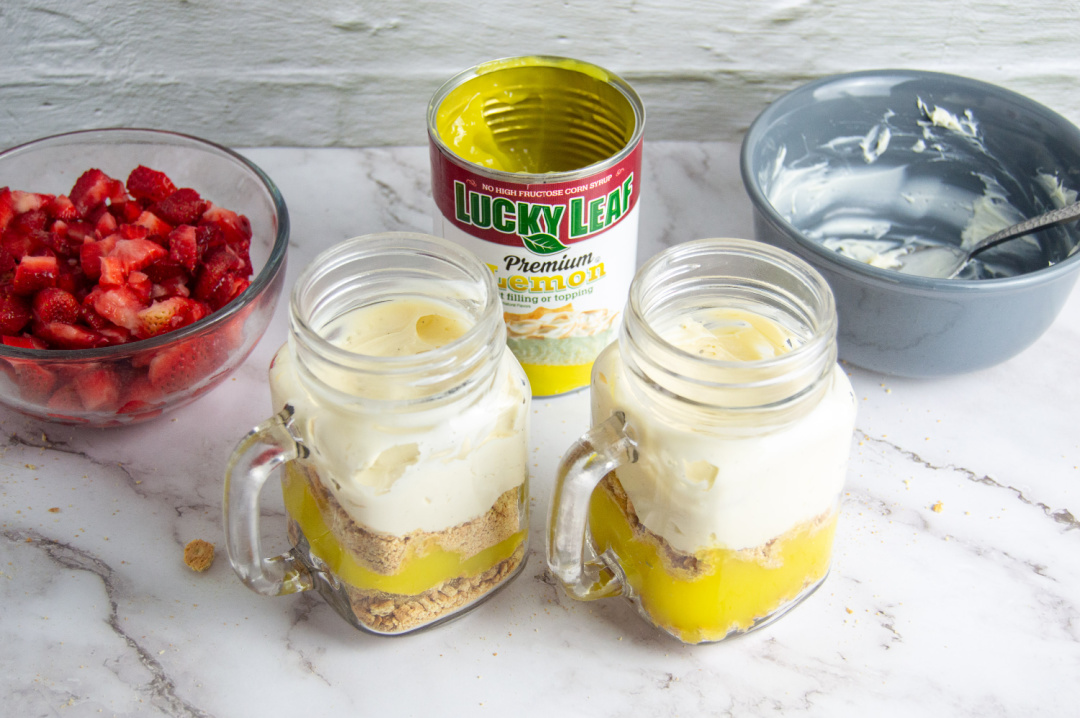
8 oz. package light cream cheese, softened
¼ cup powdered sugar
1 tsp. vanilla bean paste
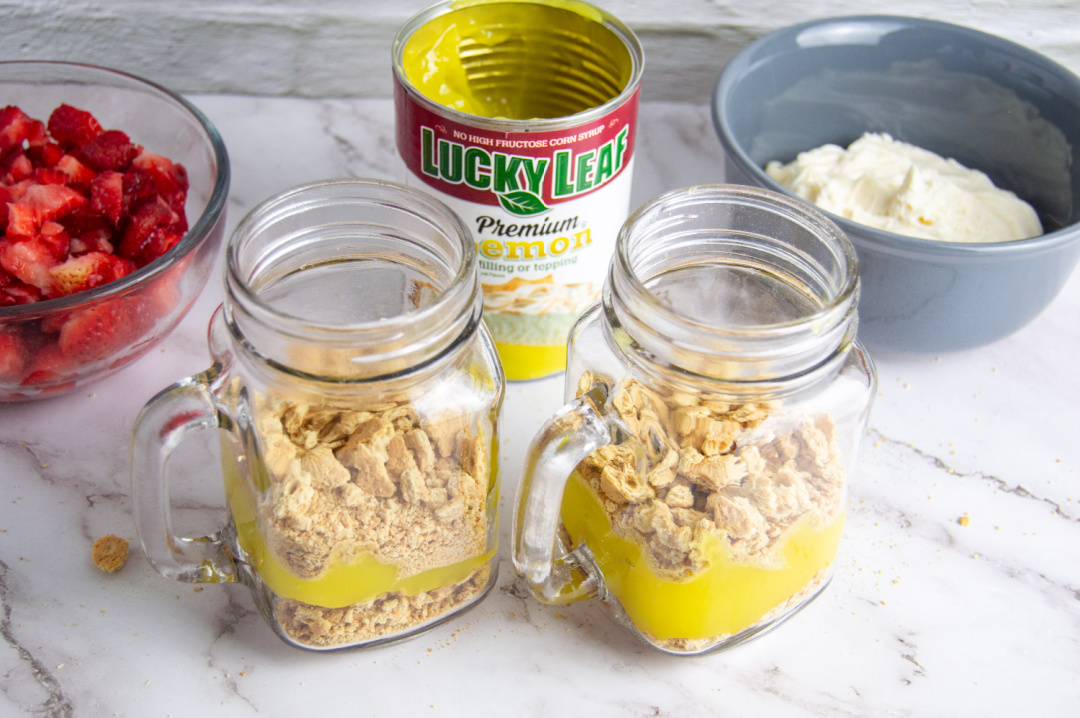
1 pack graham crackers
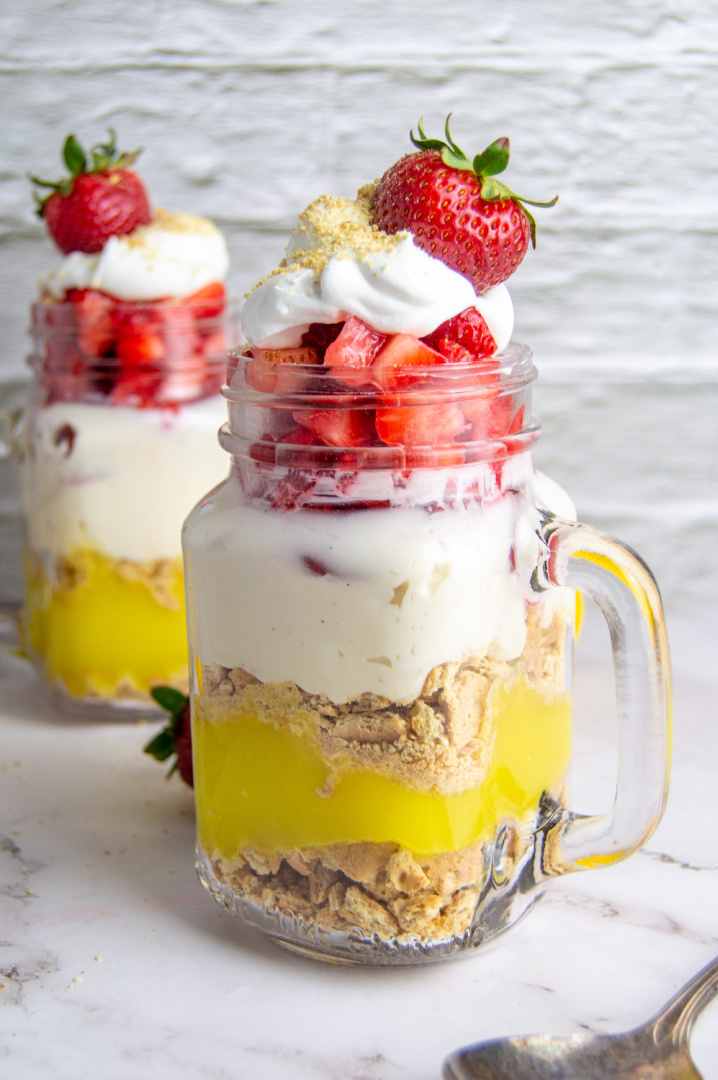
1 pint strawberries
lemon pie filling/topping
Directions:
Beat cream cheese, vanilla, and powdered sugar for about 1 minute.
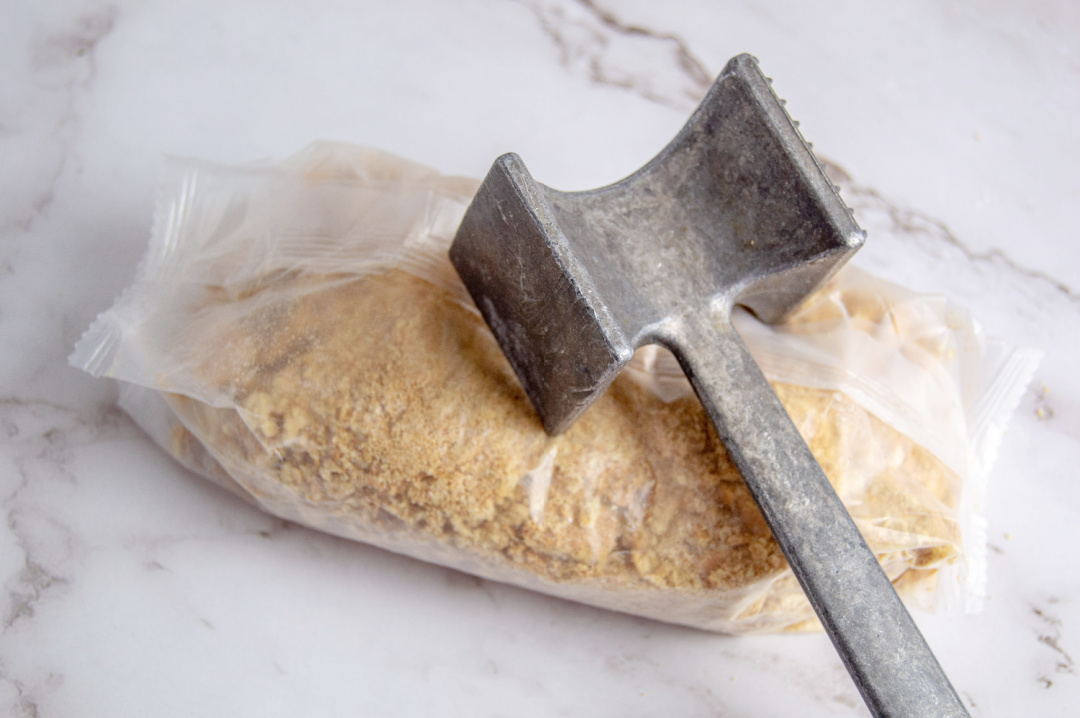
Crush graham crackers into small pieces.
Wash, dry and cut strawberries.
Open can of lemon pie filling.
Put together:
Sprinkle in a layer of crushed graham crackers.
Add a few tablespoons of lemon pie filling.
Sprinkle more graham crackers.
Spoon in the cream cheese mixture and use the back of the spoon to spread.
Add strawberries.
Optional: top with whipped topping or whipped cream, some crushed graham crackers and a strawberry.
Recipe Notes:
To crush the graham crackers, place them in a sealed bag and roll over them with a rolling pin. If you’re without a bag, you can lightly tap the unopened cracker sleeve with a kitchen tool like a mallet — just go slow to avoid a mess. For a finer texture, a few quick pulses in a food processor will do the trick.
No vanilla bean paste? Regular vanilla extract works just fine as a substitute.
Making this for a larger group? You don’t have to change much — just spread the ingredients a bit thinner across more jars, and increase the cream cheese mixture as needed by doubling or tripling it.
Strawberry Lemon Parfait FAQs
1. Can I make this dessert ahead of time? Yes, this parfait is great for prepping ahead. You can assemble the jars a few hours before serving and keep them refrigerated. If you’re making them more than a day in advance, wait to add the strawberries and topping until right before serving to keep things fresh.
2. What kind of container should I use? Small mason jars work perfectly, but you can also use clear plastic cups, dessert glasses, or even small bowls. Just keep in mind that the serving size will vary depending on the container.
3. Can I substitute the lemon pie filling with something else? Absolutely. If lemon’s not your thing, you could use any fruit pie filling like blueberry or raspberry. You could also swap it out for a layer of strawberry jam or a homemade fruit compote.
4. What’s the difference between vanilla bean paste and vanilla extract? Vanilla bean paste has a richer flavor and includes the little specks from real vanilla beans. But if you don’t have it, vanilla extract works just fine as a substitute.
5. Do I have to use light cream cheese? Nope. You can use regular cream cheese if you prefer. The light version just cuts down on richness a bit, but it still turns out smooth and creamy either way.
6. Can I double or triple the recipe for a party? Yes. This recipe scales easily. Just multiply the ingredients based on how many servings you want. You can also use smaller jars or cups to stretch the recipe for more people.
7. What’s the best way to crush graham crackers? You can use a food processor for a fine crumb, or place the crackers in a plastic bag and crush them with a rolling pin. If you’re in a pinch, you can even crush them right in the unopened sleeve—just go slow so the package doesn’t split open.
8. Can I make this without strawberries? Sure. You can leave out the strawberries or swap them for another fresh fruit like blueberries, raspberries, or even sliced peaches depending on what’s in season.
9. How long will these parfaits last in the fridge? They’ll keep well for about 2–3 days in the fridge. If you’re making them in advance, hold off on adding the whipped topping and strawberries until just before serving for the best texture.
10. Can I make this dessert gluten-free? Yes. Just use gluten-free graham crackers, and double-check that your pie filling is gluten-free (most are, but it’s good to read the label).
Tips & Tricks for the Best Strawberry Lemon Parfait in a Jar:
How to keep layered desserts from getting soggy: If you’re making these ahead of time, try adding a thin layer of melted white chocolate or a dab of cream cheese mixture between the graham crackers and wet ingredients. This helps keep the texture just right.
Best jars to use for individual layered desserts:Mason jars are a popular pick, but small dessert tumblers or even clear plastic cups work great for parties and BBQs. Look for jars with straight sides for the cleanest layers.
How to pack desserts in a jar for a picnic or potluck: Once assembled, close each jar with a lid and store in a cooler with ice packs. You can even tie a plastic spoon to each one with twine for easy serving on the go.
Creative ways to serve jar desserts at parties: Set up a “dessert jar bar” and let guests layer their own parfaits with a variety of fillings like fresh berries, cookie crumbs, lemon curd, or whipped cream. Great for baby showers, bridal showers, or cookouts.
How to make a southern-style summer dessert that travels well: This strawberry lemon parfait is a smart choice for road trips, lake days, or beach picnics. The jars seal tight, travel easily, and stay cool in a chilled tote.
Using this recipe for a make-ahead Easter or Mother’s Day dessert: These jars look beautiful with fresh fruit and light layers, making them a simple yet thoughtful make-ahead option for spring holidays. Add a sprig of mint or lemon zest for extra color.
How to customize dessert jars for picky eaters or kids: Let each person choose their layers—some may want extra cream cheese, others might go heavy on fruit. It’s a fun way to get kids involved and keeps everyone happy.
Turning this into a dessert board centerpiece: Arrange several jars on a large tray or board surrounded by fresh strawberries, lemon wedges, and extra crushed graham crackers. It looks impressive and makes for an easy self-serve station.
Ways to lighten up jar desserts for summer: Use low-fat cream cheese, opt for less sweet toppings, or mix in some Greek yogurt with the cream layer for a lighter texture and a bit of tang.
Freezing parfaits in mason jars: While these are best fresh, you can freeze them without the fresh fruit layer. Just thaw in the fridge and top with strawberries right before serving.
Strawberry Lemon Parfait
Ingredients
8oz pkg light cream cheese, softened
¼ C powdered sugar
1 tsp vanilla bean paste
1 pack graham crackers
1-pint strawberries
Lemon Pie Filling/Topping
Instructions
Beat cream cheese, vanilla, and powdered sugar for about 1 minute.
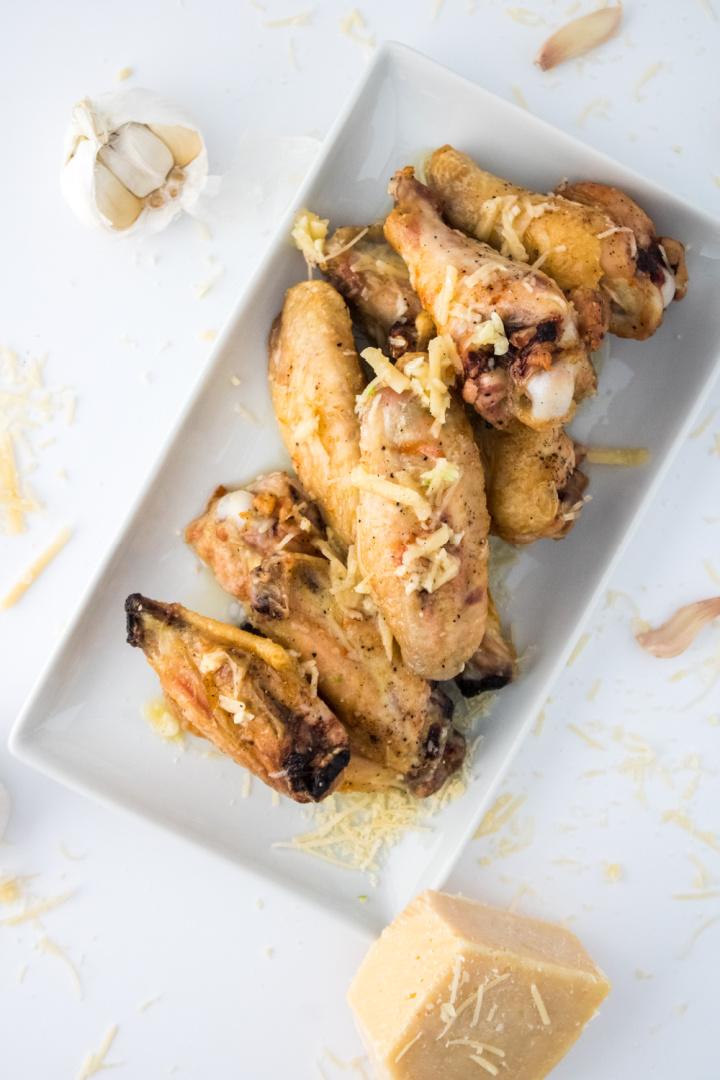
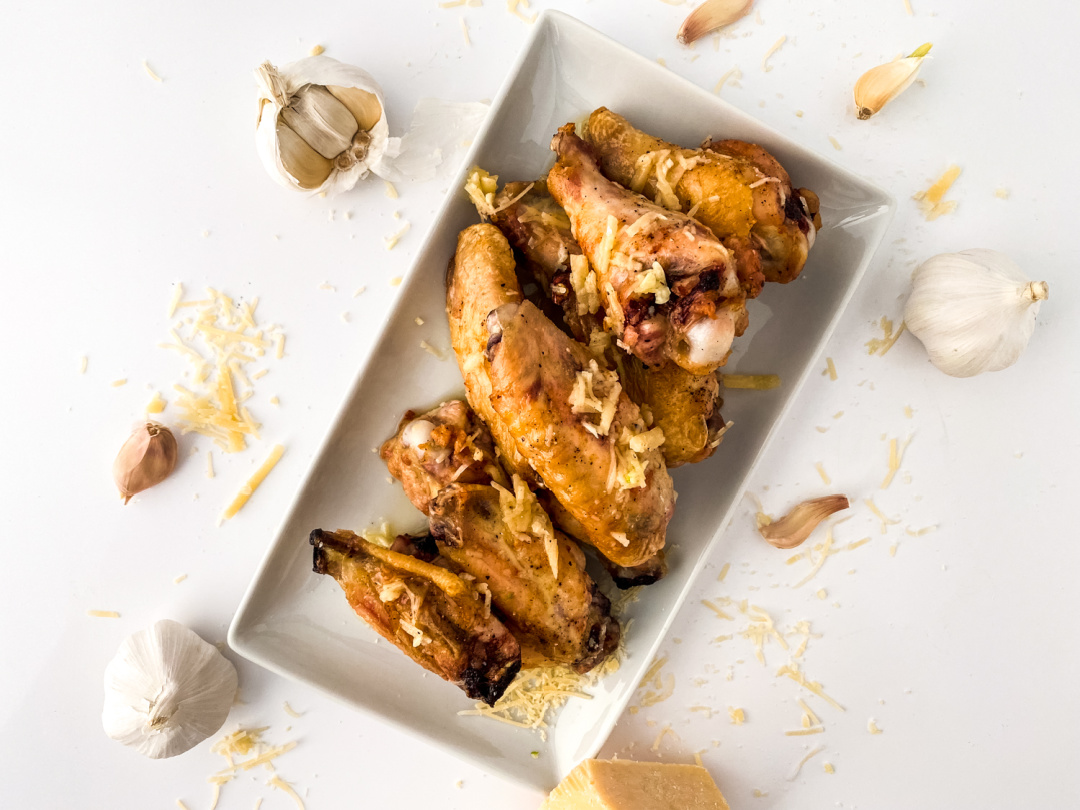
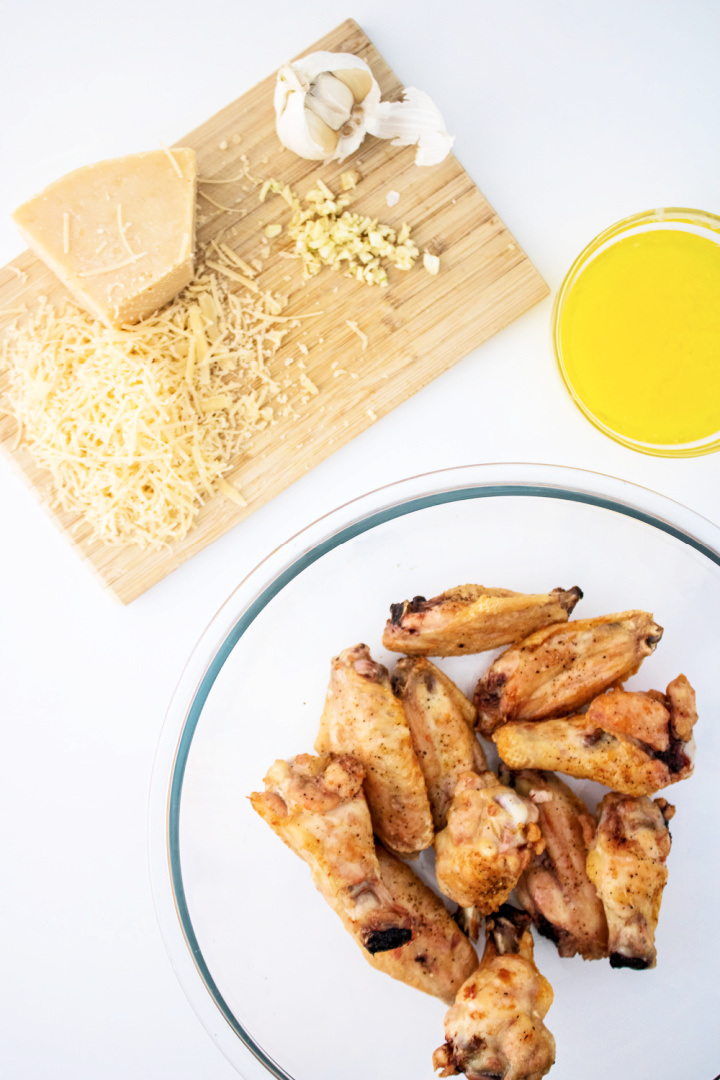
Making Copycat Buffalo Wild Wings Garlic Parmesan Wings at home is easy and delicious!
If you love Buffalo Wild Wings and garlic parmesan wings, why not make them at home?
This copycat recipe for Buffalo Wild Wings Garlic Parmesan Wings is the perfect indulgence.
Crispy fried chicken wings smothered in a silky garlic and parmesan-flavored sauce – what could be better?
The garlic parmesan flavor combination of these wings has become a classic favorite for game day gatherings or any occasion when you’re in the mood for some flavorful wings.
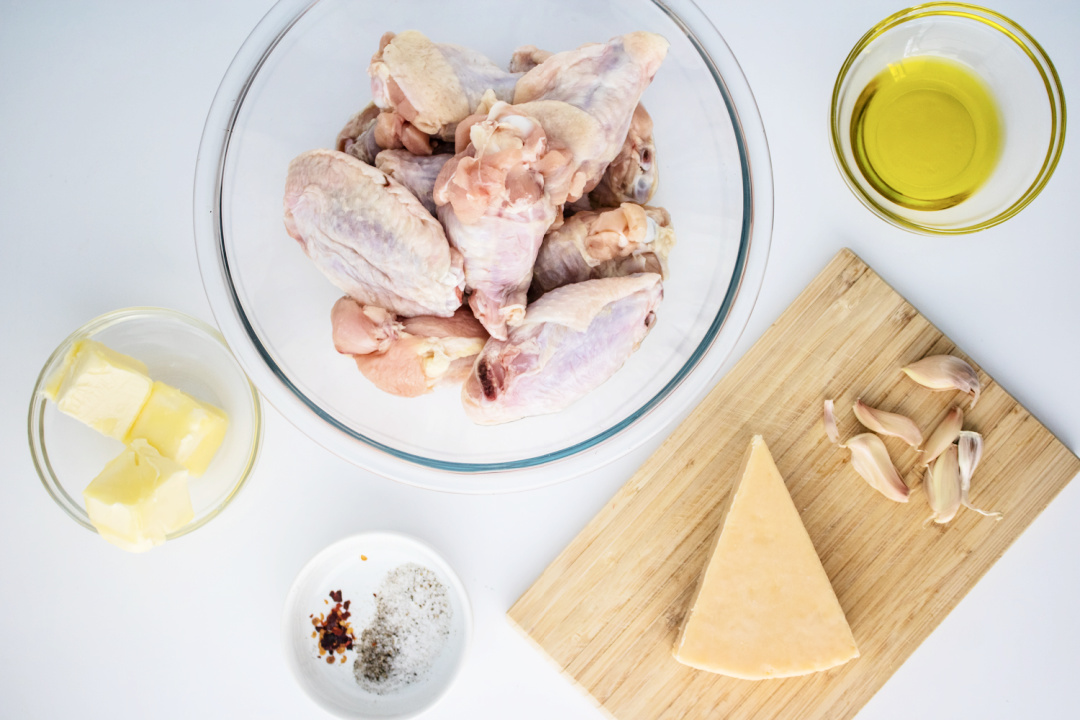
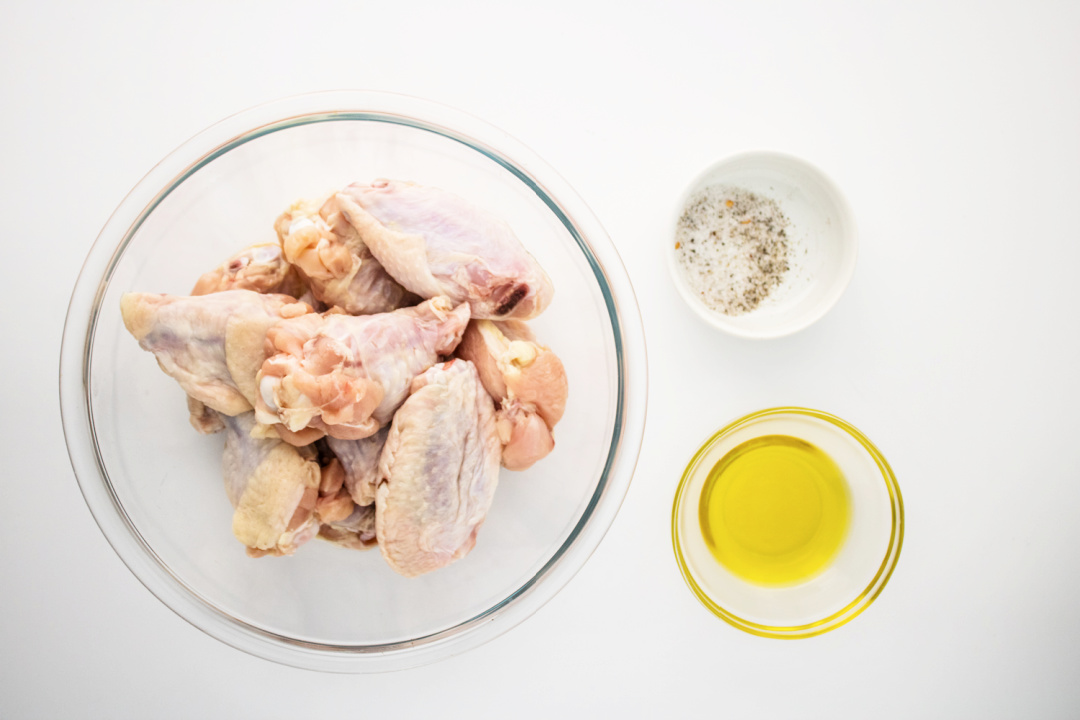
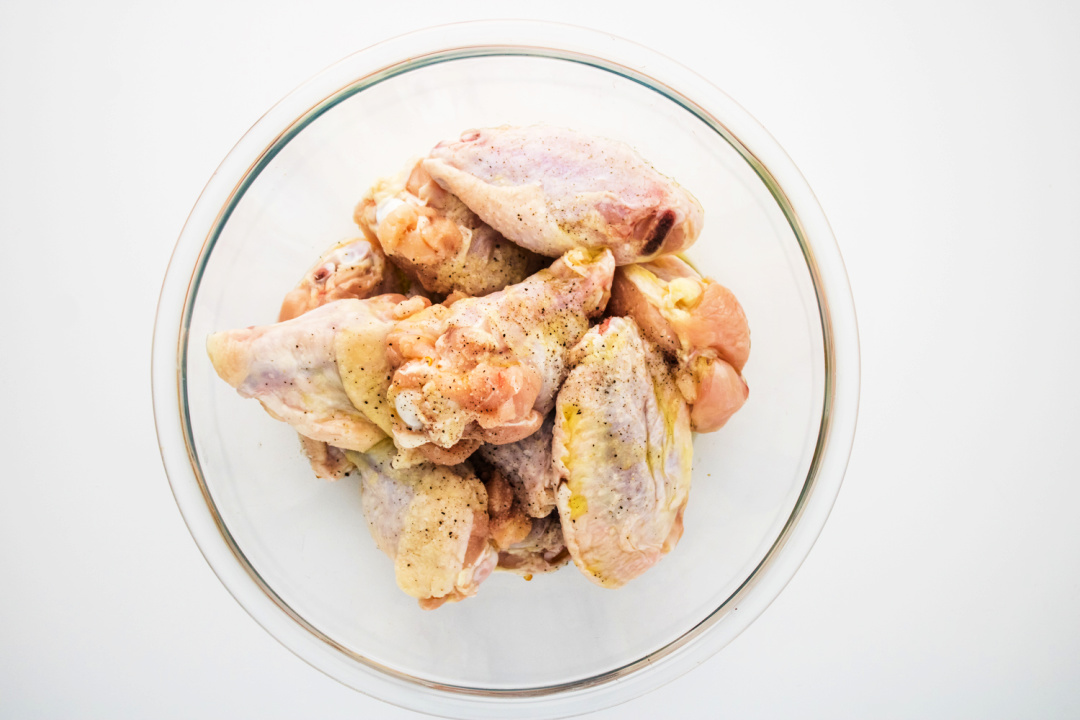
To get started, you’ll need some chicken wings, butter, Parmesan cheese, red pepper flakes, black pepper and olive oil, and a few other simple ingredients.
Making Copycat Buffalo Wild Wings Lemon Pepper Wings at home is an easy and delicious way to enjoy a restaurant-style meal right in your own kitchen.
Savor the Flavor: Crafting the Perfect Lemon Pepper Wings
Are you ready to elevate your game night with a zesty twist?
Today, we’re diving into the world of tantalizing flavors and crispy textures, showcasing a dish that’s sure to awaken your taste buds: Buffalo Wild Wings Lemon Pepper Wings.
This isn’t just any wing recipe; it’s a copycat masterpiece that brings the iconic B-dubs lemon pepper food hack right into your kitchen.
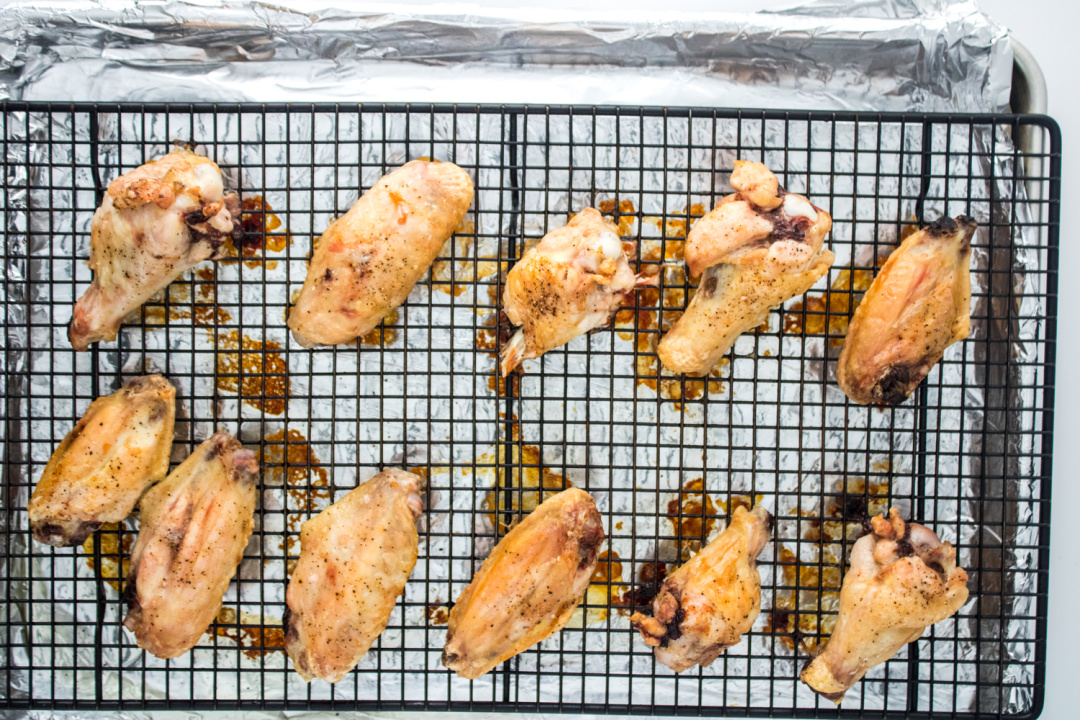
The Crispy Chicken Wings Magic
Imagine biting into perfectly crispy wings, their golden brown exterior crackling with every bite.
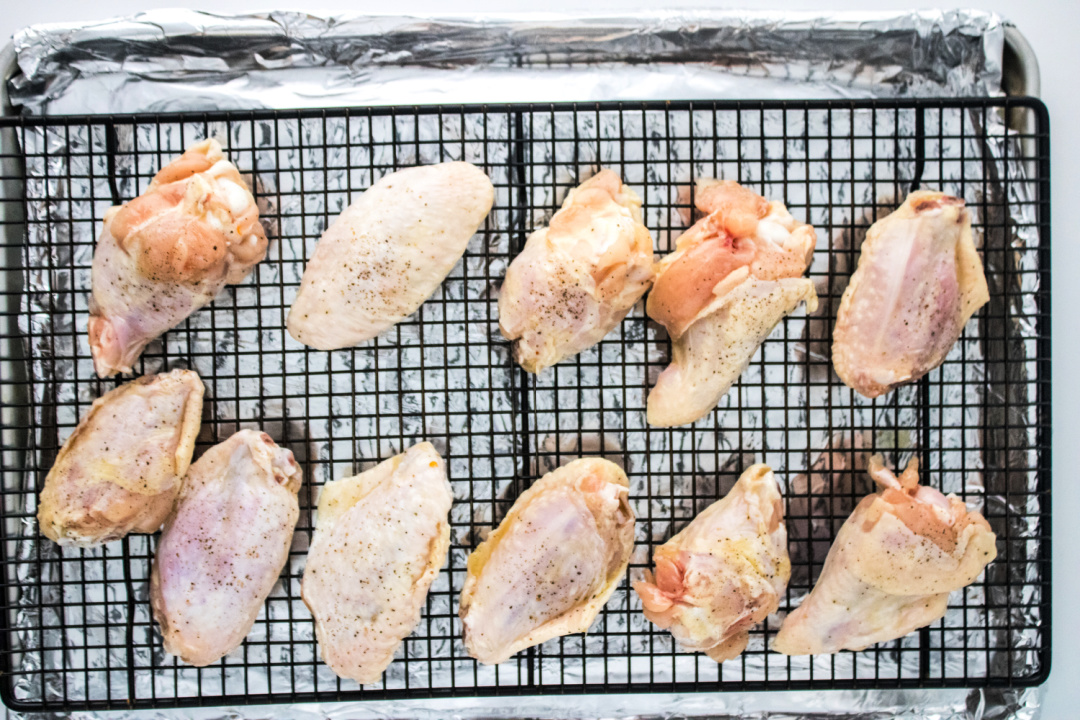
Achieving this crispy perfection is easier than you think, whether you’re using a deep fryer or an air fryer basket.
The secret?
Pat your chicken dry with paper towels before cooking to ensure that hot oil transforms them into crispy lemon pepper buffalo chicken wings.
What sets these wings apart is the lemon pepper sauce, a delicious sweet-spicy flavor blend that’s both tangy and irresistible.
This easy sauce mixture, made with clarified butter, lemon zest, and just the right amount of lemon pepper seasoning, coats each wing with a layer of savory goodness.
For those who love an extra kick, a splash of hot sauce or a sprinkle of extra lemon pepper seasoning can create effects that dance on the palate.
The Art of Cooking: Techniques for the Best Results
Whether you’re opting for the traditional method or trying out air fryer lemon pepper wings, the key is to cook them in a single layer for optimal heat distribution.
An instant-read thermometer is your best friend here, ensuring your wings reach the perfect degrees F for that ideal texture.
Beyond the Wing: Additional Nutrition Information
While indulging in these wings, it’s always good to consider general nutrition advice.
Pairing these wings with healthier sides or opting for olive oil instead of vegetable oil can balance your meal.
Remember, moderation is key!
Customizing Your Wings
Every palette is unique, and that’s why this recipe is so fantastic.
Prefer a dry rub?
Mix garlic powder, onion powder, and black pepper for a rub that’s full of flavor.
Or, if you’re a fan of a more lemony punch, increase the fresh lemon juice or add extra lemony flavor with lemon zest.
Want to add a cheesy twist? Parmesan cheese can be a delightful addition.
Serving and Storing
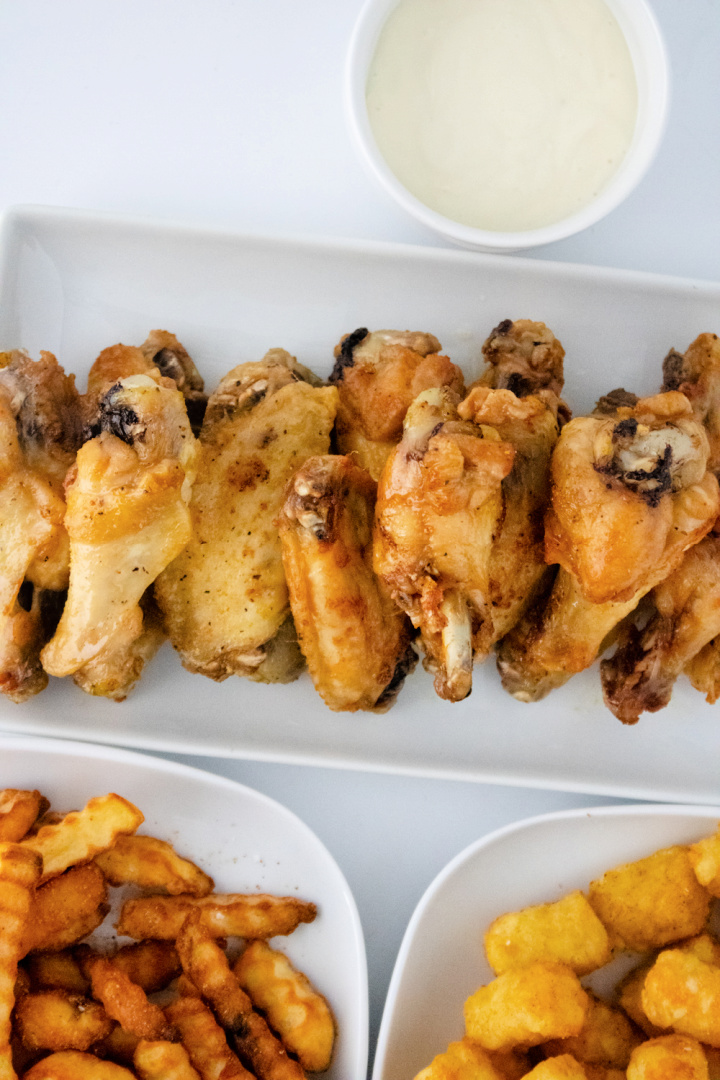
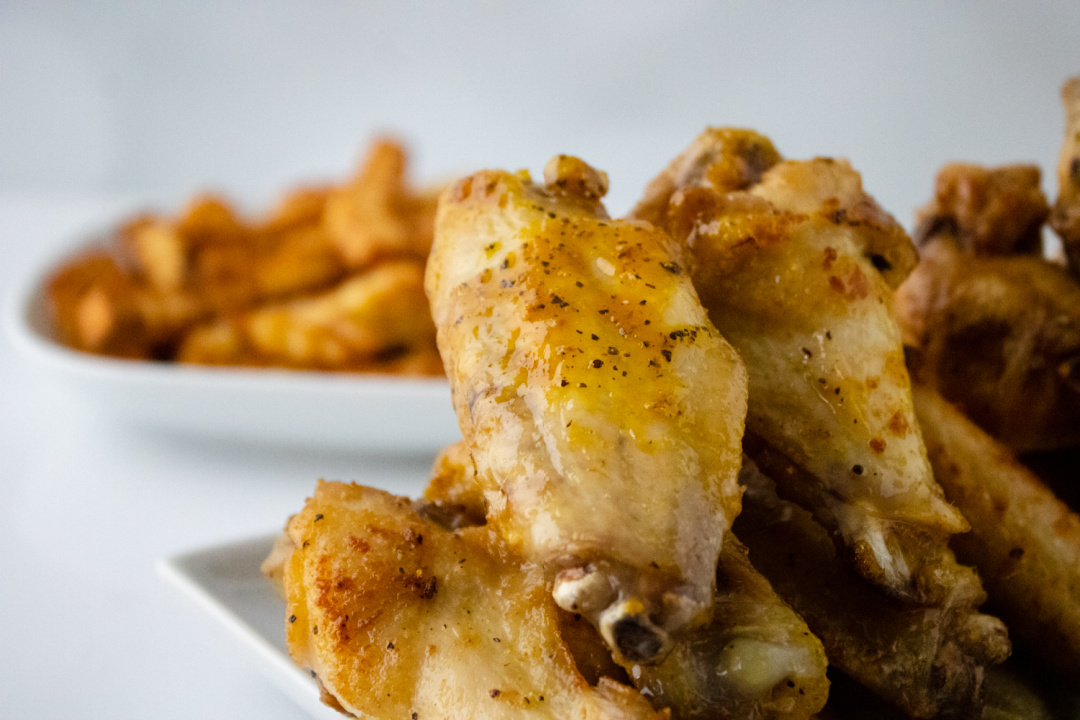
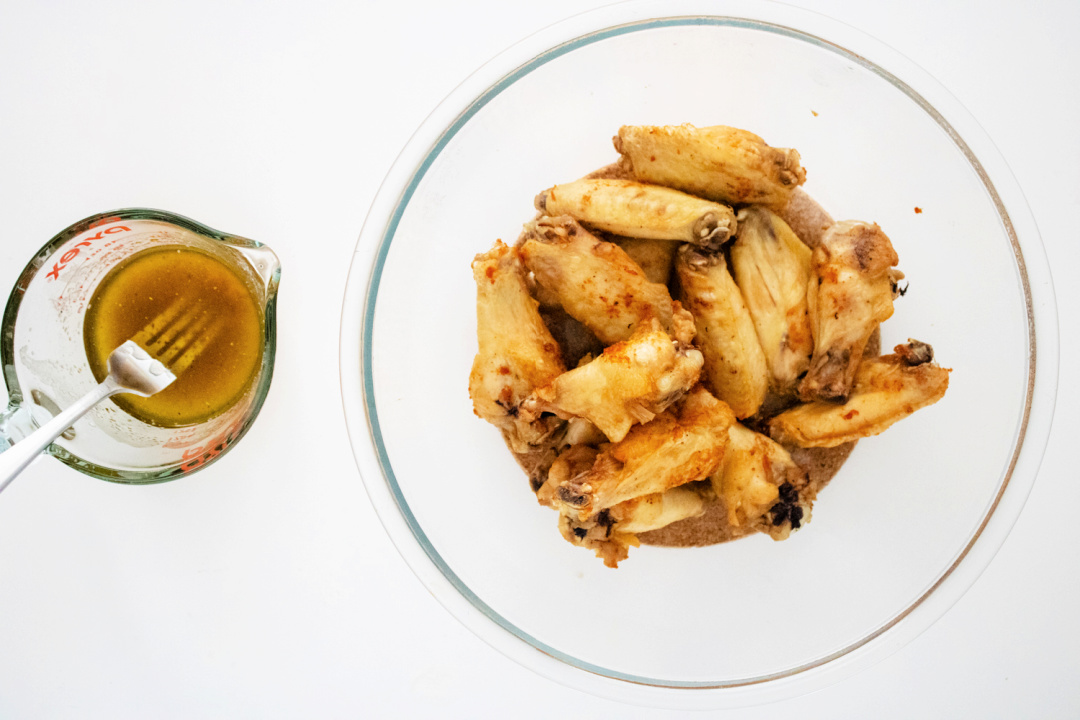
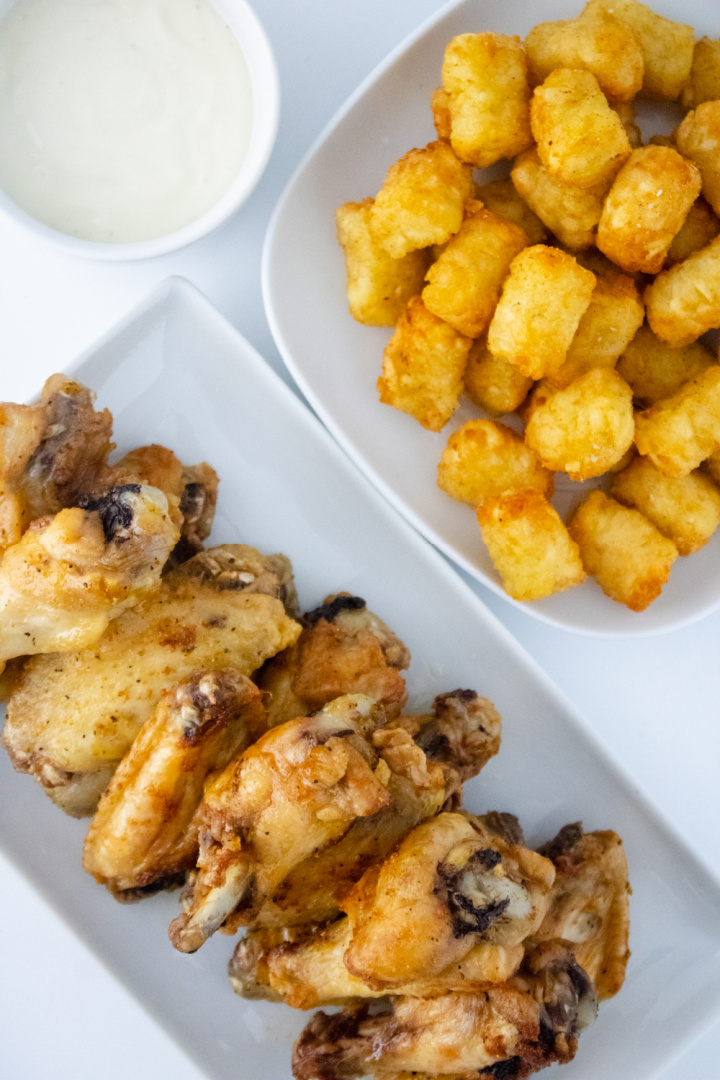
Once your wings are cooked to a crispy perfection, toss them in the large mixing bowl with your lemon pepper sauce.
Serve them hot as the perfect game day appetizer, accompanied by your favorite dipping sauces and sides.
And if you have leftovers, store them in an airtight container in the fridge.
Making It Your Own
For this recipe, consider using an air fryer for a healthier version or a Dutch oven for deep frying.
Don’t forget to use a wire rack for draining excess oil and keeping your wings perfectly crispy.
Wrapping Up with a Savory Twist
As you embark on making these delicious lemon pepper chicken wings, remember that cooking is an art.
Experiment with the lemon pepper blend, adjust the heat with hot sauce, and maybe even create your own lemon pepper seasoning.
Each batch of wings is a chance to perfect your technique and flavor balance.
Get ready to enjoy a plate of awesome wings, and don’t forget to share this delicious recipe with your friends.
Happy cooking, and here’s to many more game nights filled with the best lemon pepper wings!
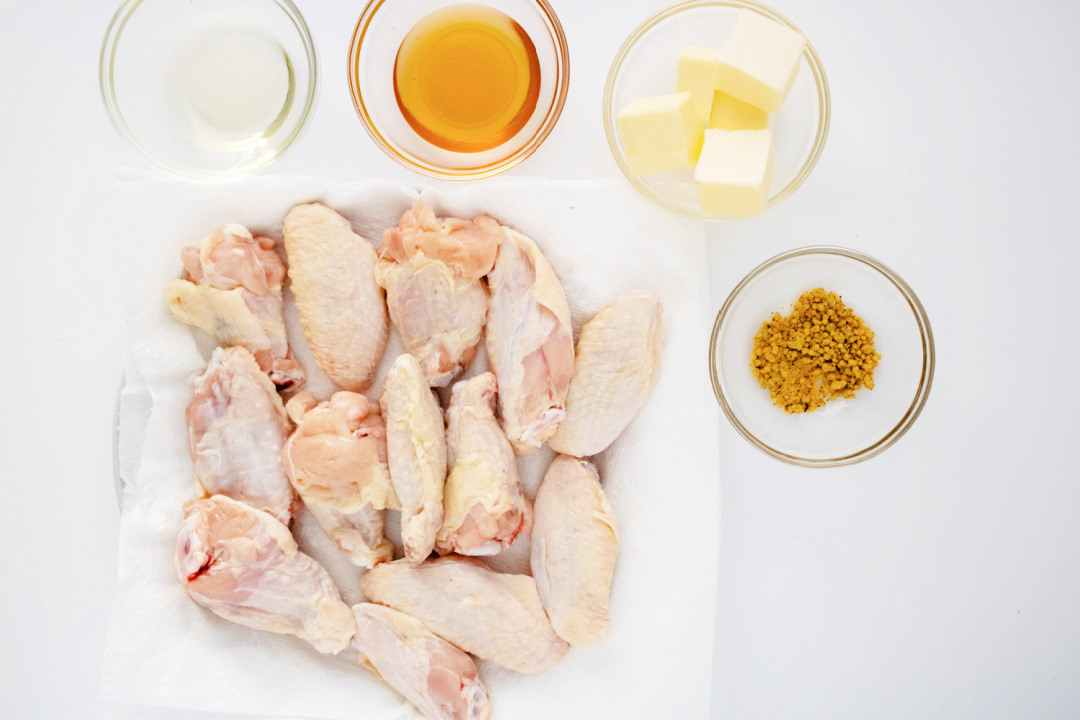
Copycat Buffalo Wild Wings Lemon Pepper Wings
Ingredients:
1/2 cup unsalted butter (1 stick)
1/4 cup honey (optional*) see notes
2 tbsp. oil (canola or vegetable)
1 1/2-2 tsp. lemon pepper seasoning
1/8 tsp. salt
vegetable oil for frying
20 chicken wings (separated)
extra lemon pepper
Directions:
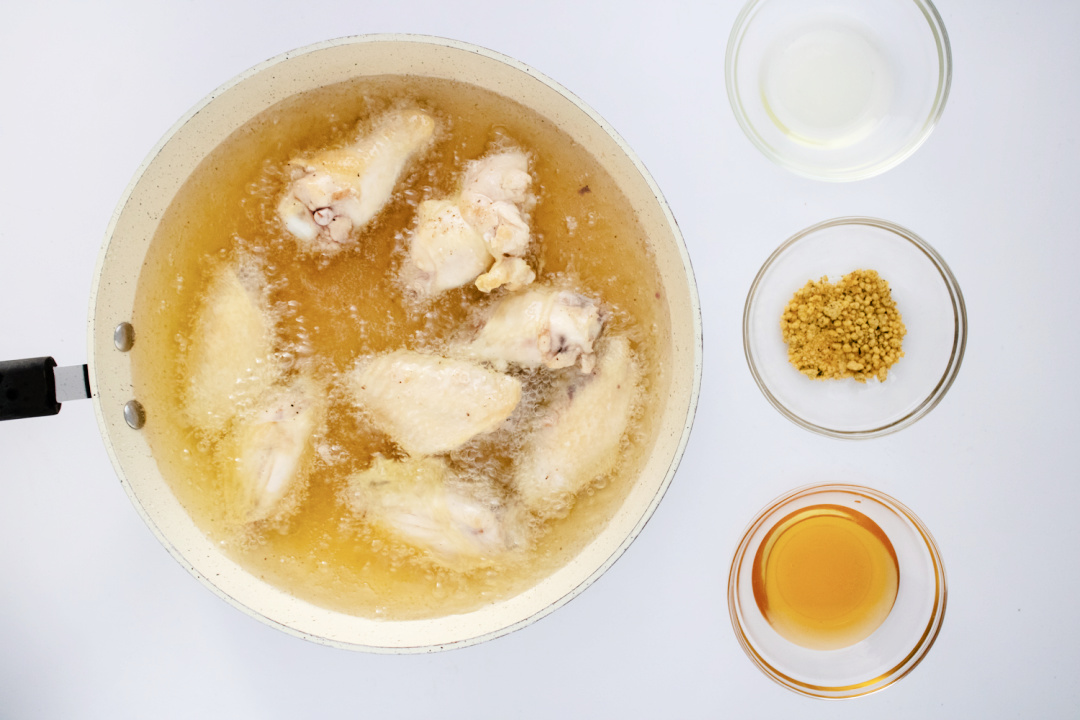
Begin heating up your oil.
Pat all of your chicken dry. *See Notes
Once the oil is hot begin frying your first batch (don’t overcrowd the pan).
Each batch takes about 12-15 mins, turning the wings half way through.
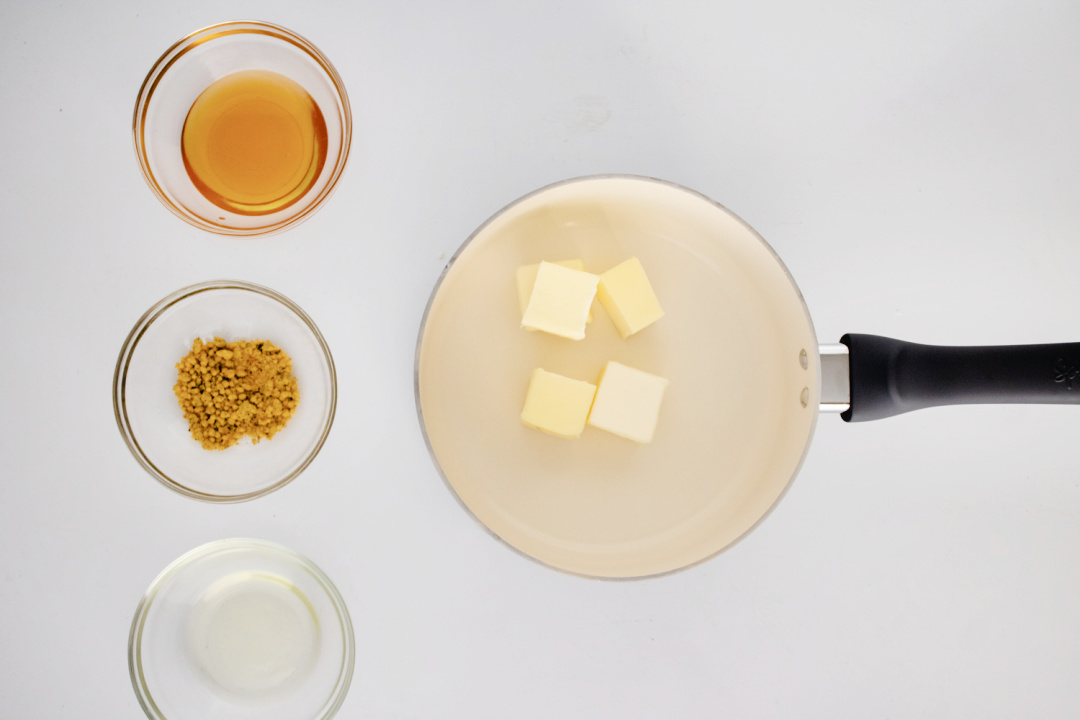
While the first batch is cooking start making the clarified butter for our sauce.
Make clarified butter:
Start by placing the butter in a pot and melting over medium heat.
Once it melts, remove from heat and scrape the foam from the top of the butter.
After getting as much as you can out, pour the clarified butter into a measuring glass.
Scoop out any foam that floats to the top.
Add in the oil and lemon pepper (and honey if want to cut the tang).
Place in the fridge for 5 mins, it will begin to thicken.
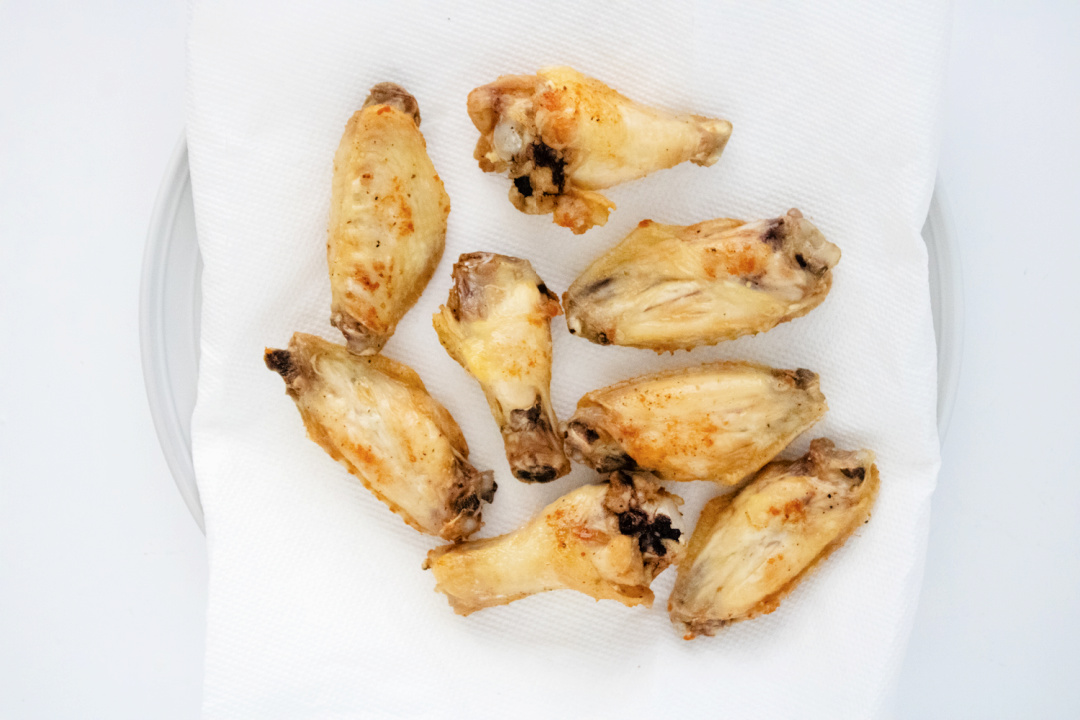
Drain the chicken on paper towels after it is done and place into a large bowl after 2-3 mins.
Fry off all the wings and then add to the bowl.
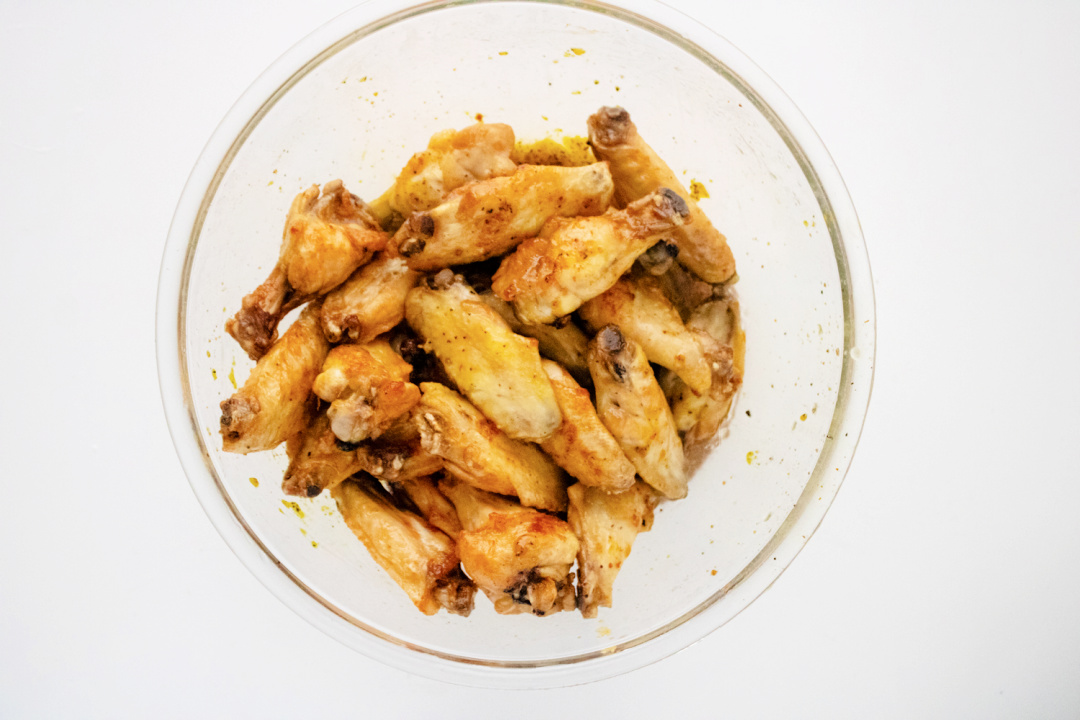
Give the lemon pepper sauce a good mix and pour over the hot chicken.
Place the top on the bowl and toss the chicken to make sure its all fully coated.
Sprinkle on extra lemon pepper seasoning or honey depending on if you prefer it tangy or a little sweeter and enjoy!
Notes:
Not patting the chicken dry, increases your chances of being popped by hot oil and decreases the likely hood of crispy skin.
If you have people eating the wings and they don’t like the overly tart lemon pepper wings, you can cut the tang by adding honey to the sauce or drizzling directly onto the chicken.
Copycat Buffalo Wild Wings Lemon Pepper Wings
Ingredients
1/2 cup unsalted butter (1 stick)
1/4 cup honey (optional*) see notes
2 tablespoons oil (canola or vegetable)
1 1/2-2 teaspoons lemon pepper seasoning
1/8 teaspoon salt
Vegetable oil for frying
20 chicken wings (separated)
Extra Lemon pepper
Instructions
Begin heating up your oil.
Pat all of your chicken dry * See Notes
Once the oil is hot begin frying your first batch (don’t overcrowd the pan).
Each batch takes about 12-15 mins, turning the wings half way through.
While the first batch is cooking start making the clarified butter for the sauce.
Make clarified butter:
Start by placing the butter in a pot and melting over medium heat.
Once it melts, remove from heat and scrape the foam from the top of the butter.
After getting as much as you can out, pour the clarified butter into a measuring glass (scoop out any foam that floats to the top).
Add in the oil and lemon pepper (and honey if want to cut the tang).
Place in the fridge for 5 mins, it will begin to thicken.
Drain the chicken on paper towels after it is done and place into a large bowl after 2-3 mins.
Fry off all the wings and then add to the bowl.
Give the lemon pepper sauce a good mix and pour over the hot chicken.
Place the top on the bowl and toss the chicken to make sure it’s all fully coated.
Sprinkle on extra lemon pepper seasoning or honey depending on if you prefer it tangy or a little sweeter and enjoy.
Notes
Not patting the chicken dry, increases your chances of being popped by hot oil and decreases the likely hood of crispy skin.
If you have people eating the wings and they don't like the overly tart lemon pepper wings, you can cut the tang by adding honey to the sauce or drizzling directly onto the chicken.
Frequently Asked Questions About Lemon Pepper Wings
Can I make these wings in an air fryer?
Air fryer lemon pepper wings are a great alternative if you’re looking for a healthier option. Just place them in the air fryer basket in a single layer and cook according to your air fryer’s instructions. Remember to use cooking spray to prevent sticking and achieve that golden brown perfection.
How do I get my wings extra crispy?
For extra crispy wings, make sure you pat the chicken dry thoroughly with paper towels before cooking. This removes excess moisture, leading to a crispier texture. Also, frying them at the right temperature (use an instant-read thermometer to check) and not overcrowding the pan are key steps. In an air fryer, cooking them in a single layer helps as well.
What can I use if I don’t have lemon pepper seasoning?
You can create your own lemon pepper seasoning with a mix of black pepper, garlic powder, onion powder, and fresh lemon zest. This homemade blend can give your wings a unique and fresh flavor profile.
Is there a way to make the lemon pepper sauce less tangy?
If you find the lemon pepper sauce too tangy, you can balance it by adding honey to the sauce. This adds a delicious sweet-spicy flavor that complements the tangy lemon pepper perfectly.
Can I bake these wings instead of frying?
To bake them, preheat your oven and arrange the wings on a baking sheet in a single layer. Bake until they’re golden brown and crispy, turning halfway through. This method is a great alternative to frying and still delivers delicious results.
How can I store and reheat leftover wings?
Store leftover wings in an airtight container in the refrigerator. When you’re ready to eat them, reheat them in the oven or air fryer to maintain their crispiness. Microwaving is not recommended as it can make them soggy.
What are some good dipping sauces and sides for these wings?
Classic dipping sauces like ranch, blue cheese, or even a honey mustard sauce pair wonderfully with these wings. As for sides, consider celery sticks, carrot sticks, or a light salad to balance the meal. Don’t forget to have plenty of paper towels on hand – things might get messy!
Can these wings be made ahead of time for a party?
You can fry or bake the wings ahead of time and then simply reheat them in the oven before serving. The sauce can also be prepared in advance and refrigerated in a small bowl or airtight container.
What’s the best way to coat the wings in sauce?
After cooking, place the wings in a large mixing bowl and pour the lemon pepper wing sauce over them. Put a lid on the bowl and give it a good shake to evenly coat the wings. This method ensures each wing is fully covered in that delicious sauce.
Any tips for reducing mess and splatter when frying?
To reduce splattering, make sure your wings are dry (use paper towels) before adding them to the hot oil. Also, avoid overcrowding the pan and fry in batches. Using a deep fryer or a Dutch oven can also help contain the oil.
By keeping these tips in mind, you’re all set to enjoy some of the best lemon pepper wings right at home, perfect for any game night or gathering!