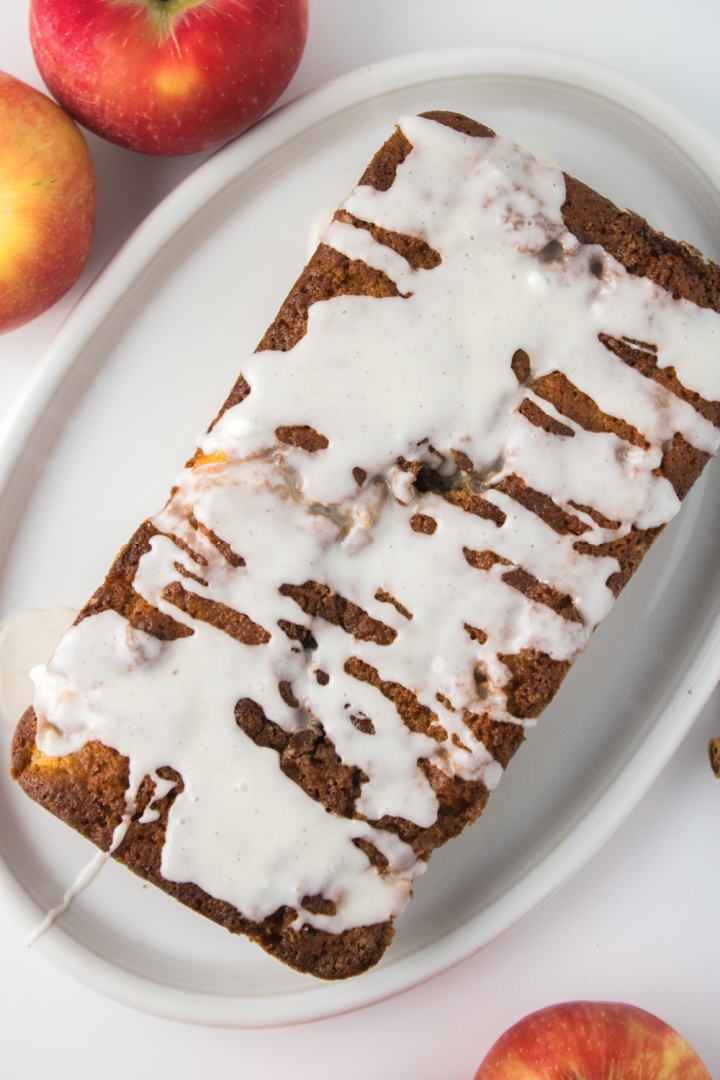
Apple Fritter Loaf Cake: A Cozy, Crowd-Pleasing Southern Favorite
If you’re the kind of person who looks forward to apple season, crisp mornings, and cozy baking projects that make the house smell like a dream, this apple fritter loaf cake recipe was made for you.
It’s one of those baked goods that fits just right into a Saturday morning routine or a lazy Sunday afternoon, especially when served warm with a mug of coffee or cold glass of milk.
A Fall Favorite That Works Year-Round
Even though this cake leans into those classic fall flavors with chopped apples and warm apple pie spice, don’t box it into one season.
This loaf can be made any time of year—whether you’re using fresh-picked apples from the orchard or the ones you’ve had in the fridge for a bit too long.
It’s perfect for anyone searching for a quick and easy apple bread with glaze that feels homemade and comforting without too much fuss.
This apple fritter loaf is ideal for folks who love old-fashioned southern baking recipes but don’t necessarily want to spend hours in the kitchen.
It’s great for busy parents wanting to surprise their kids with a sweet treat after school, retirees baking for a church potluck, or anyone craving the flavors of a classic apple fritter in a loaf cake form.
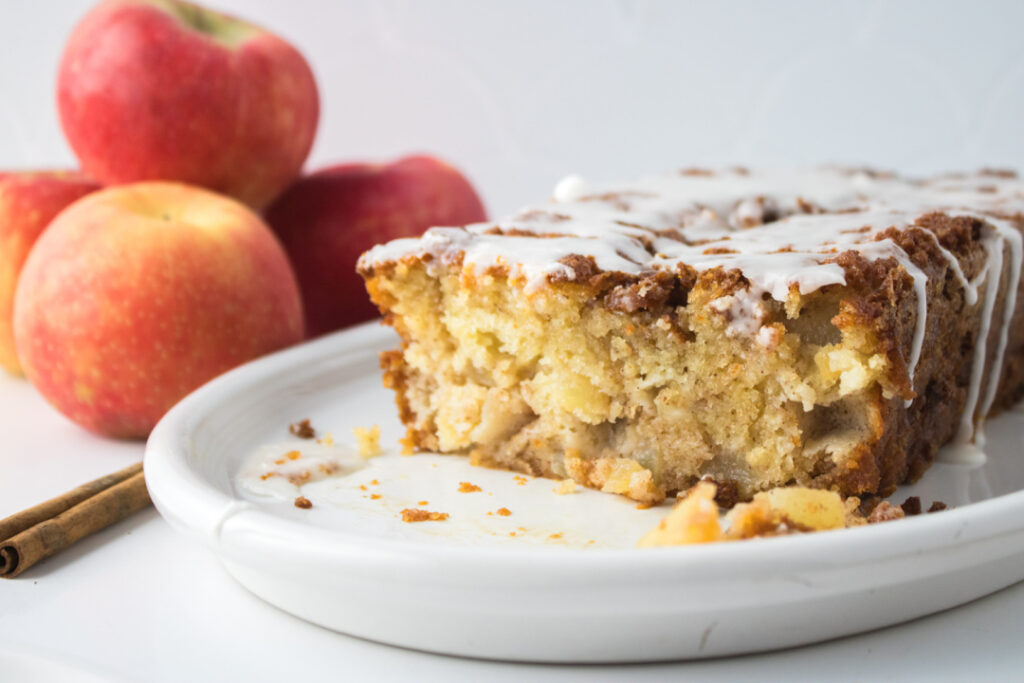
If you’ve ever typed “apple fritter bread recipe like grandma used to make” into Google, this one checks all the boxes. It’s buttery, tender, packed with juicy apples, and finished with a simple cinnamon glaze that brings it all together.
When and Where to Serve Apple Fritter Loaf Cake
This loaf cake shines at just about any occasion.
Serve it as a brunch centerpiece, bring it to a neighbor as a thoughtful gift, or slice it up for dessert at a casual family dinner. It holds up well at room temperature, so it’s also a solid option for picnics or road trips.
Hosting a fall gathering?
This is a fantastic addition to the table alongside hot cider or spiced tea. It’s also a great make-ahead option—bake it the night before, let it cool, and drizzle the glaze on right before serving for that fresh-from-the-oven look and taste.
How to Use This Recipe in Creative Ways
One of the best things about this easy glazed apple bread recipe is how versatile it is. You can:
Turn it into muffins: Pour the batter into a muffin tin for single-serve portions. Just cut down the bake time and keep an eye on them.
Add nuts or raisins: Fold in some chopped pecans or golden raisins for added texture.
Use it as French toast: Slice a leftover piece thick and turn it into decadent apple fritter French toast the next morning.
Pair it with ice cream: Serve a warm slice with a scoop of vanilla bean or cinnamon ice cream for an easy southern dessert.
Wrap it as a gift: This loaf makes a great homemade holiday or hostess gift. Wrap it in parchment paper and tie it with a little twine for a simple but thoughtful presentation.
A Must-Have Recipe for Your Southern Baking Rotation
Whether you’re looking for a moist apple loaf cake recipe, something to satisfy your sweet tooth, or just a simple way to use up a couple of apples, this one’s worth saving.
With just a few pantry staples and minimal prep, you’ll have a soft, cinnamon-swirled loaf that tastes just as good the next day (if there’s any left).
If you’re after a southern-style apple dessert that’s easy to make, comes together in about an hour and a half, and tastes like it came from a cozy little bakery down the road, this one’s a keeper.
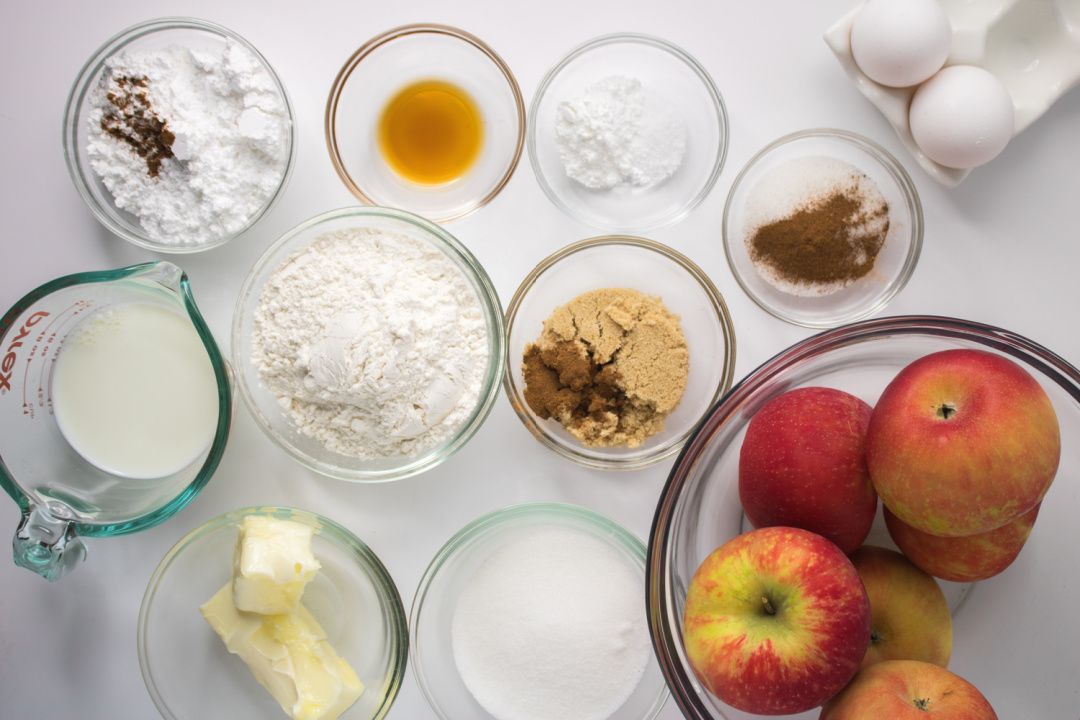
Apple Fritter Loaf Cake
Ingredients:
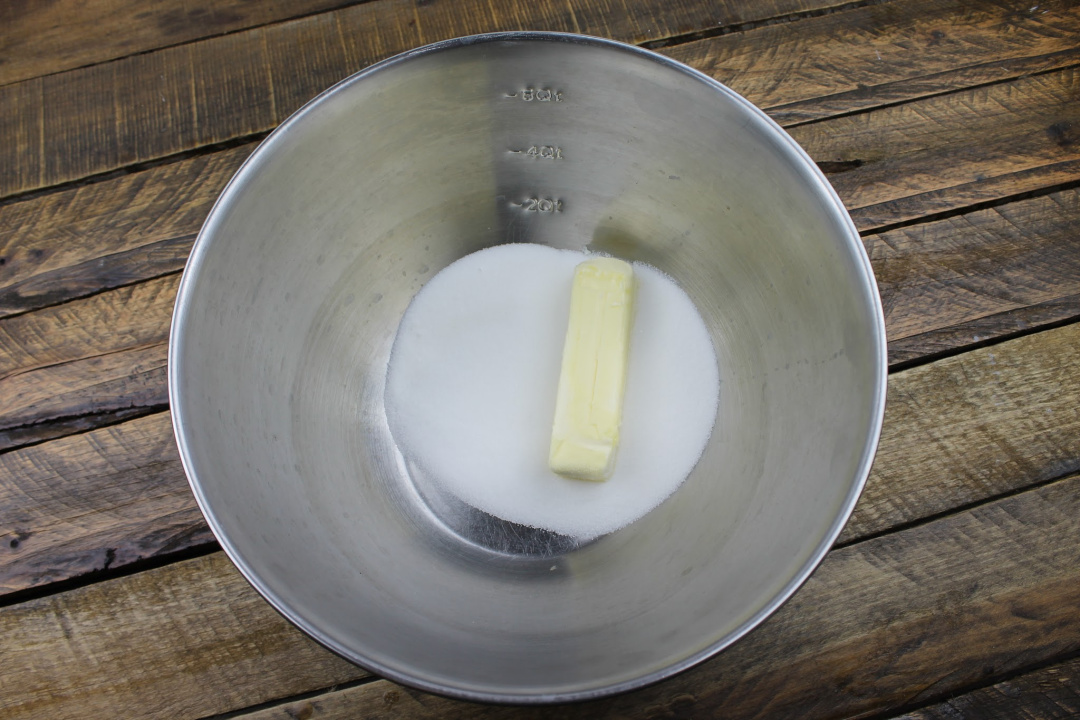
1/2 cup butter, softened
2/3 cup granulated sugar
2 eggs
1 1/2 tsp vanilla extract
1 1/2 cups all-purpose flour
2 tsp baking powder
1 tsp salt
1/2 cup milk
Apple Mixture:
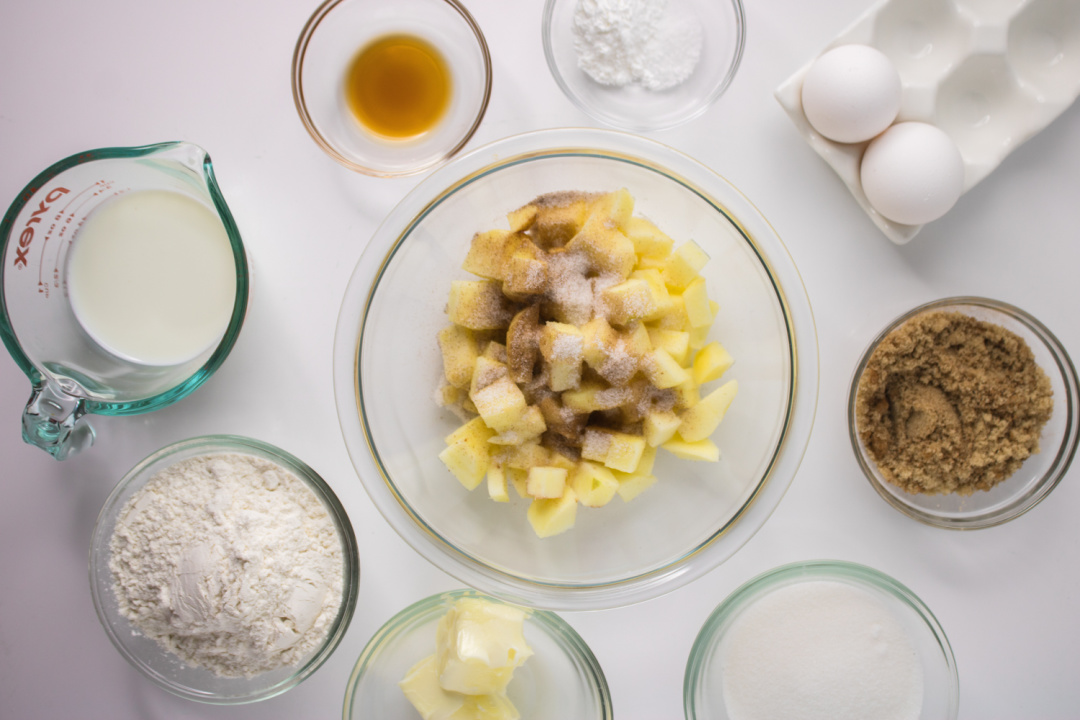
2 apples, chopped (peeled if desired)
2 tbsp granulated sugar + 1 tsp apple pie spice
Spiced Sugar Swirl:
1/3 cup brown sugar
1 tsp apple pie spice
Glaze:
1 cup powdered sugar
1 tsp apple pie spice
1-2 tbsp milk
Instructions:
Preheat oven to 350F.
Grease and flour a standard 9×5” loaf pan (or liberally spray with nonstick).
To a small bowl, mix together the brown sugar and apple pie spice and set aside.
In a separate medium bowl, toss the chopped apples with the granulated sugar and apple pie spice; set aside.
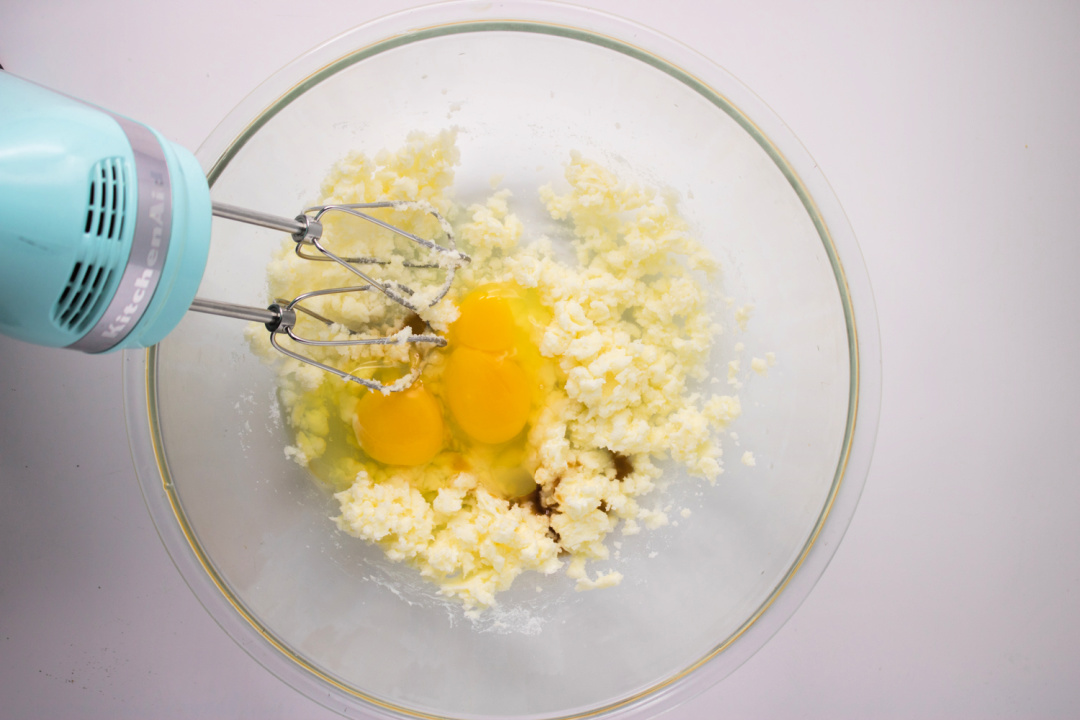
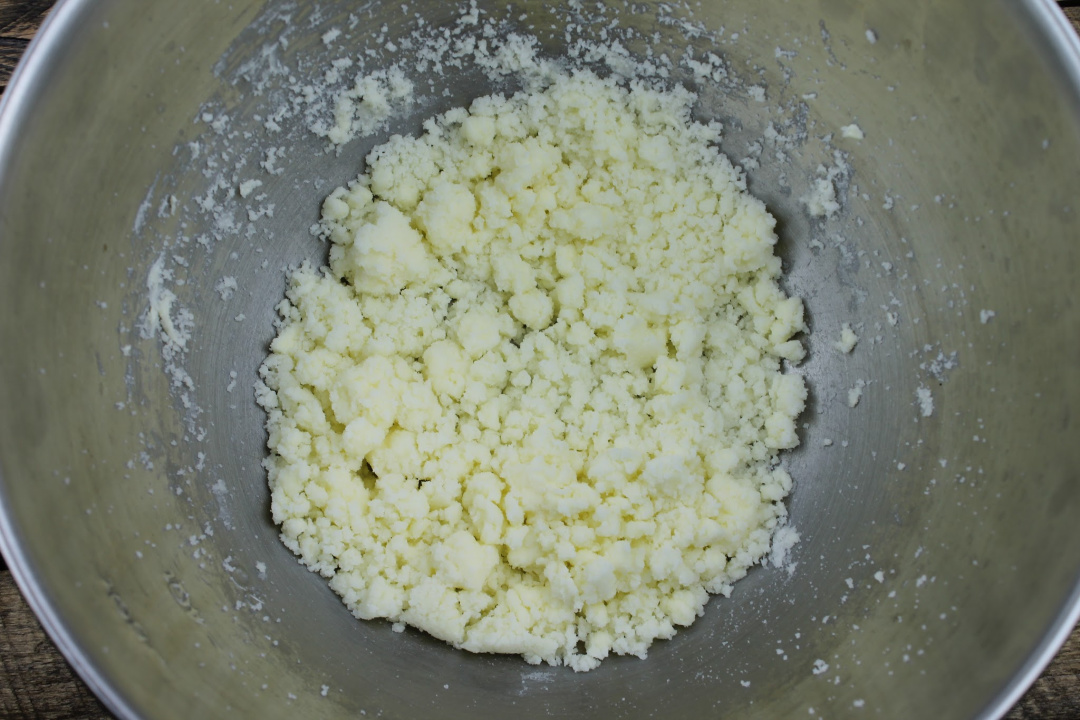
In a large bowl, beat the butter and granulated together until fluffy.
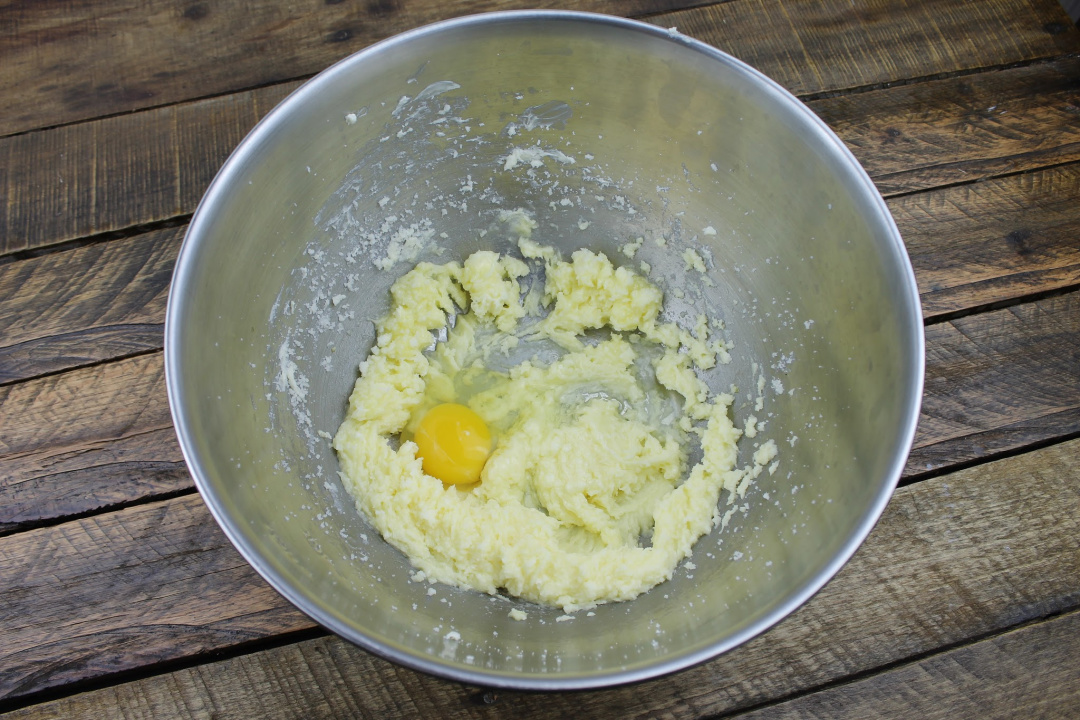
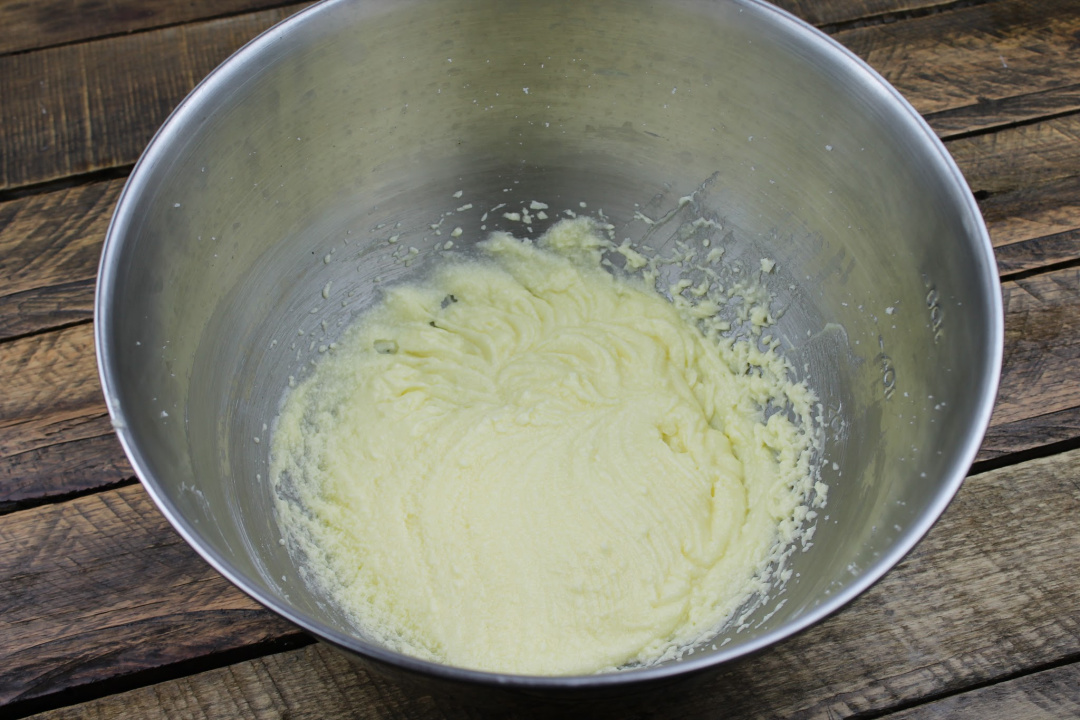
Beat in the eggs and add the vanilla extract.
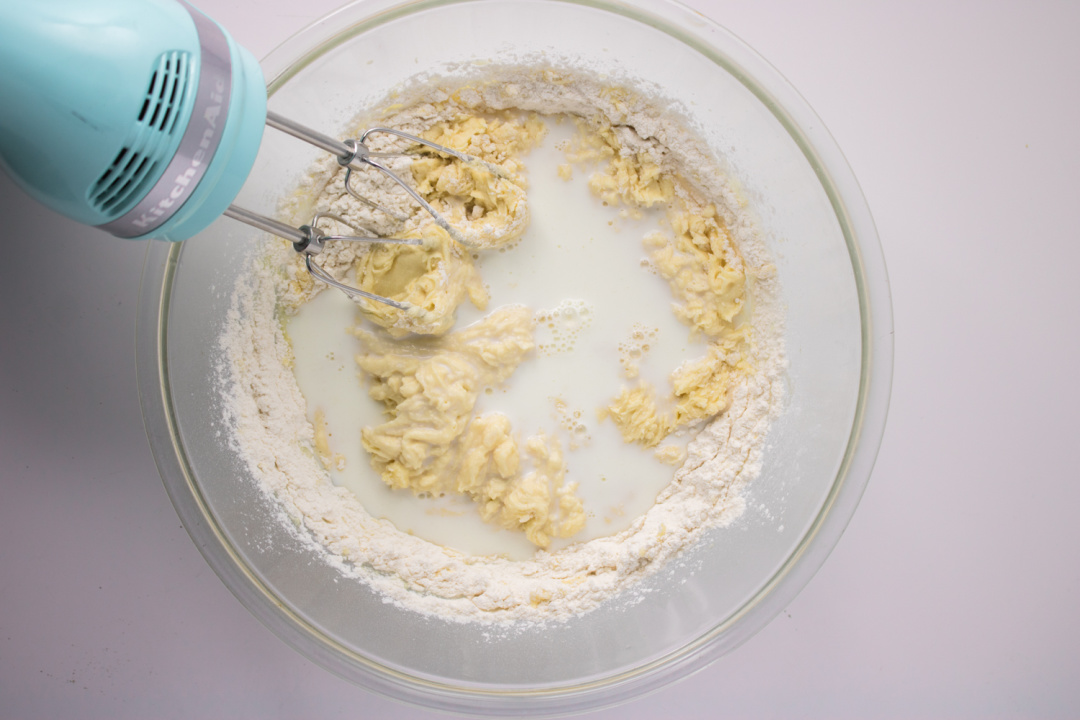
Whisk together the flour, baking powder, and salt in a separate medium bowl, then add to the wet mixture.
Beat until well combined.
Add in the milk and continue to beat until the batter is smooth.
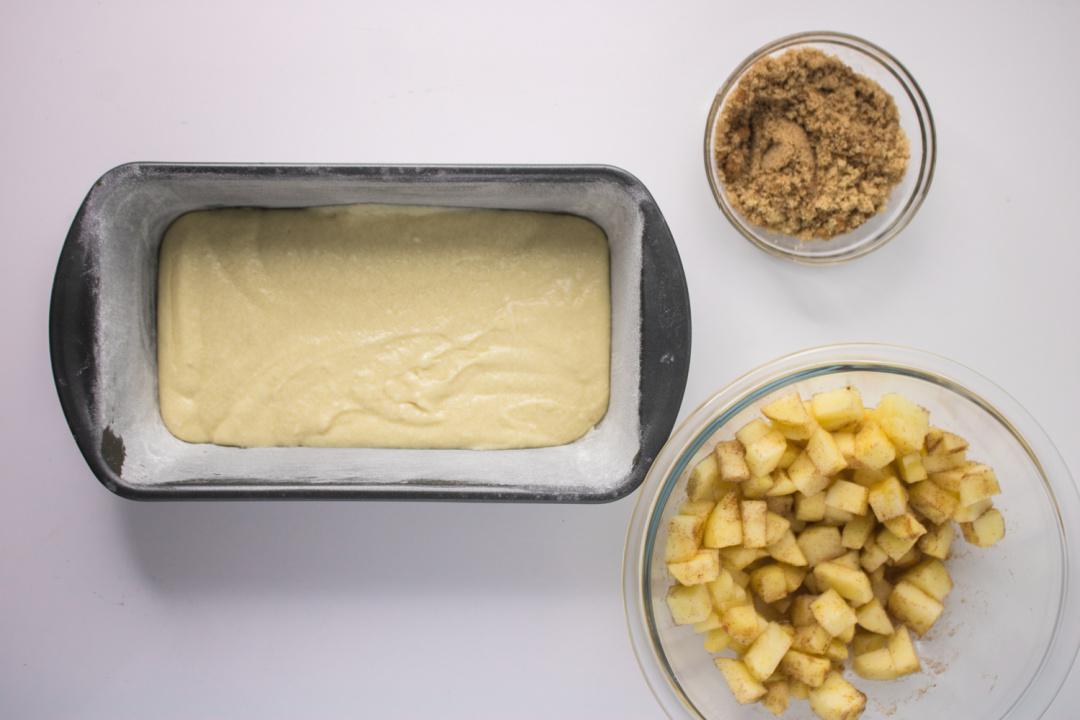
Pour half the batter into the prepared loaf pan.
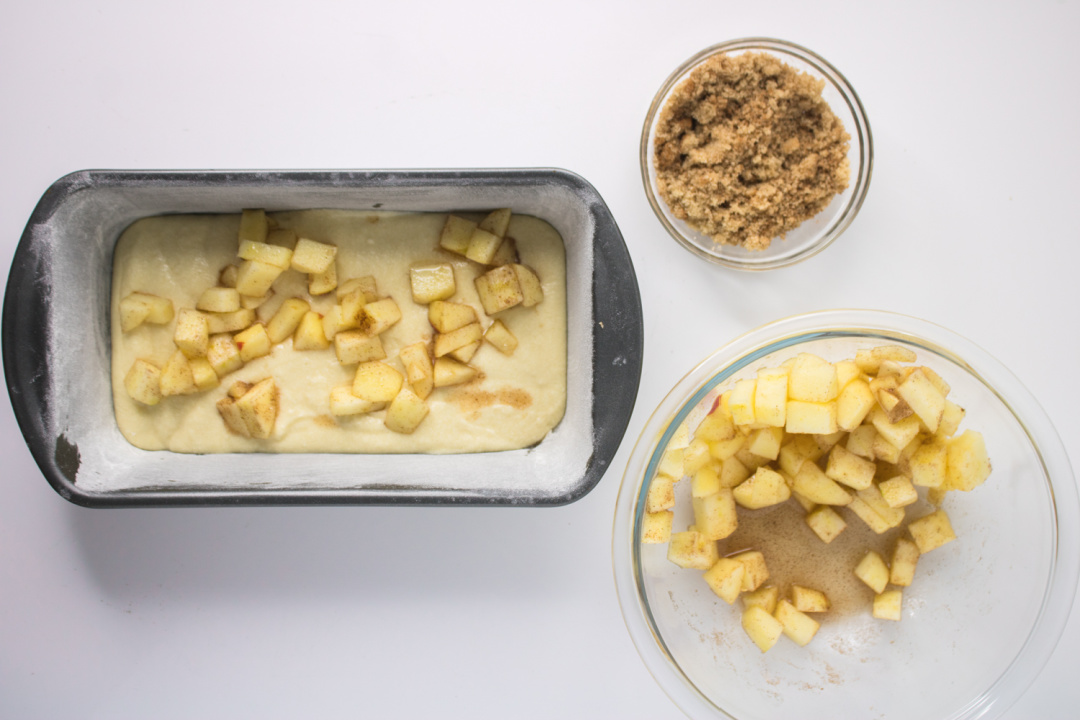
Add half of the chopped apple mixture.
Sprinkle half of the cinnamon and brown sugar mixture on top of the apple layer.
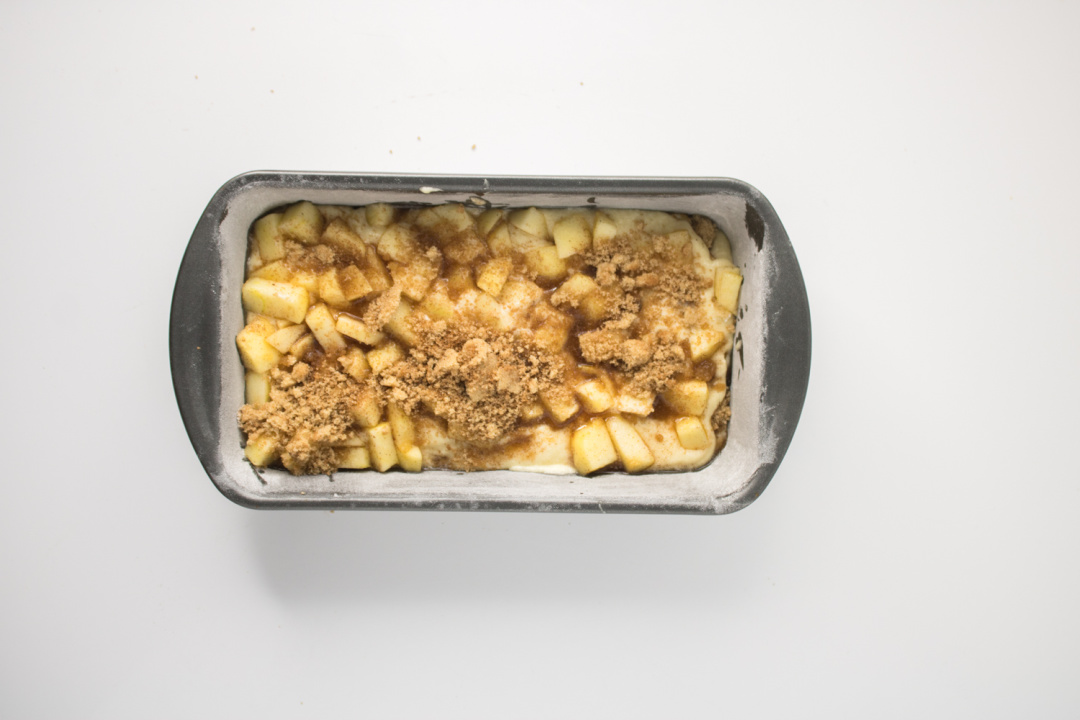
Pour the rest of the batter over the apple layer.
Add the remaining chopped apples.
Then sprinkle the remaining cinnamon and brown sugar mixture.
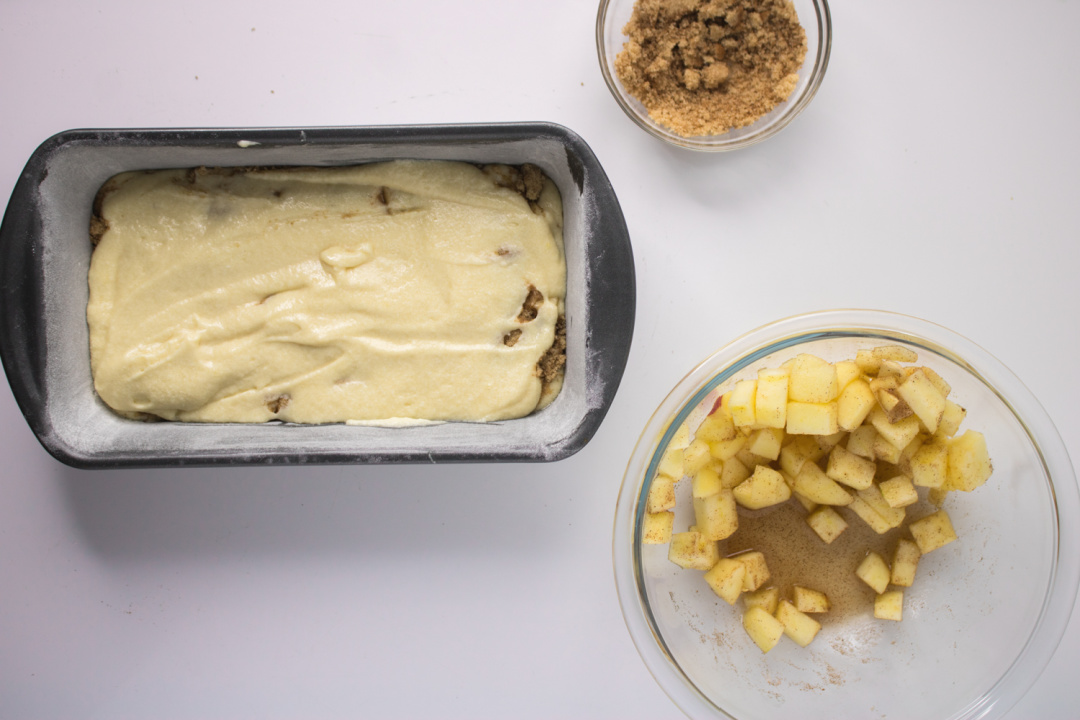
Lightly press the apples into the batter and gently swirl the brown sugar mixture through it, using a knife.
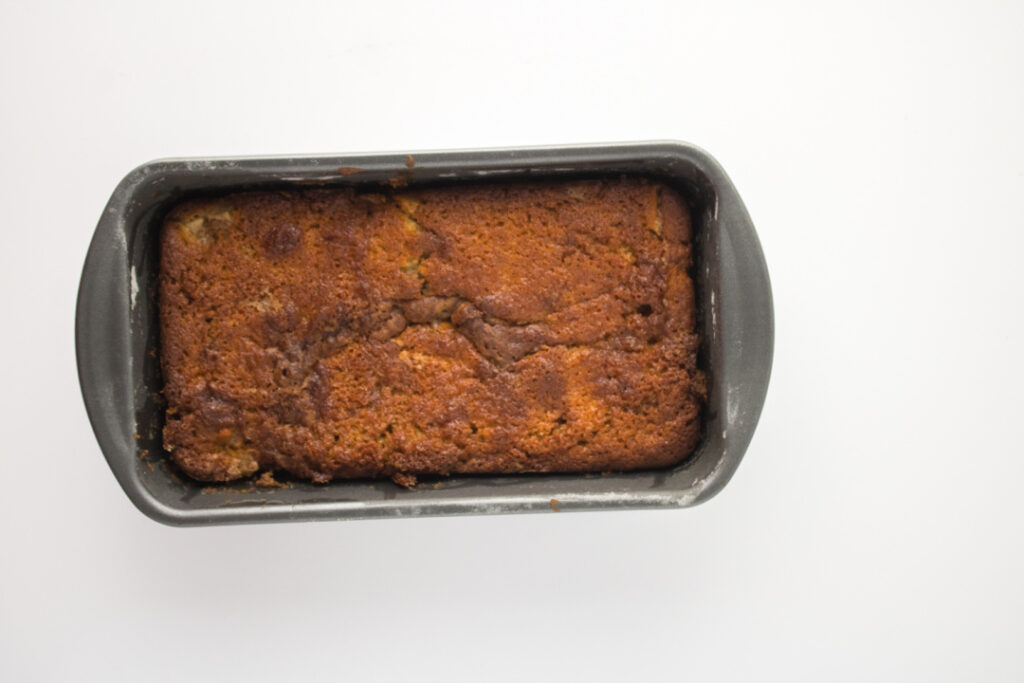
Bake at 350F for 50-60 minutes, or until a toothpick inserted into the middle comes out clean and the top is golden brown.
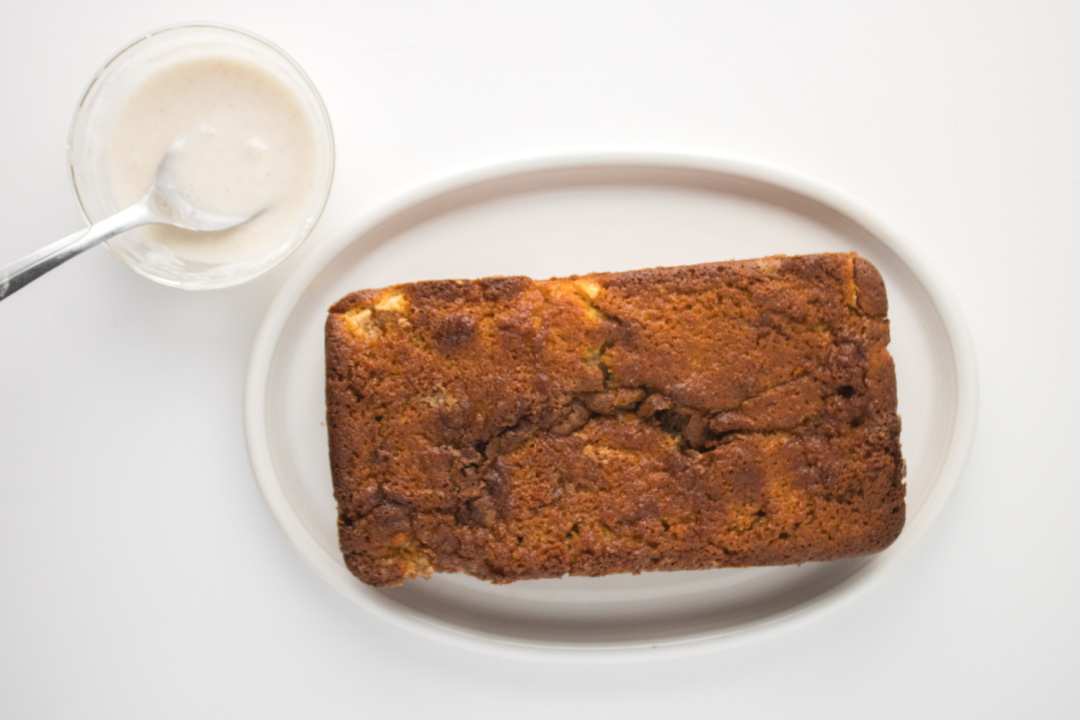
Let the loaf rest in the pan for 15 minutes, then remove and transfer to a wire cooling rack to cool completely.
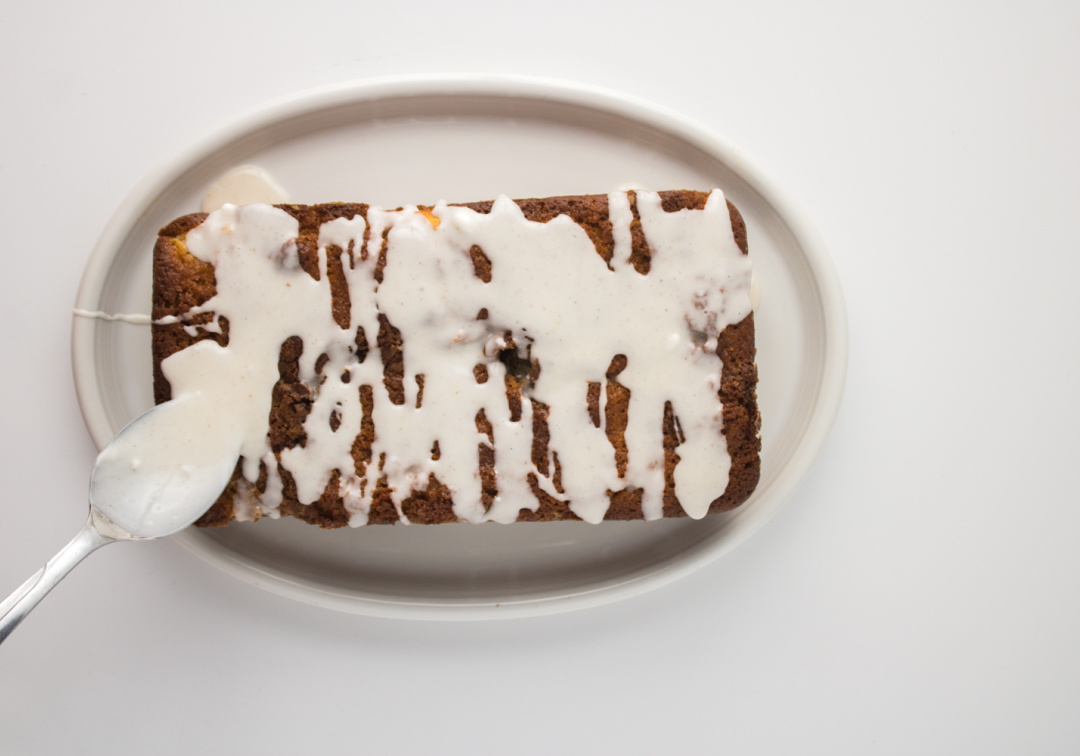
Whisk the ingredients for the cinnamon glaze together in a small bowl.
Once the loaf is completely cool, drizzle with glaze.
Frequently Asked Questions About Apple Fritter Loaf Cake
1. Can I use any type of apple in this apple fritter loaf cake? Yes, you can use your favorite variety of apple. Granny Smith apples are great for a tart bite, while Fuji, Honeycrisp, or Gala will give a sweeter, softer texture. A mix of tart and sweet apples works well too, especially if you’re after that homemade apple fritter flavor.
2. Can I make this recipe ahead of time? Absolutely. This loaf actually tastes even better the next day once all the flavors have had time to settle. Store it in an airtight container at room temperature for up to 2 days, or refrigerate it for up to 5 days.
3. Does this apple fritter bread freeze well? Yes, this is a great apple loaf cake to freeze. Just make sure it cools completely, then wrap it tightly in plastic wrap and aluminum foil. It can be frozen (without glaze) for up to 2 months. Thaw at room temperature and add the glaze once it’s fully defrosted.
4. How do I keep the loaf from becoming soggy? Let it cool completely on a wire rack before storing. If you store it while it’s still warm, condensation can make the loaf soggy. Also, don’t overdo it with the apple chunks—too many can release extra moisture.
5. Can I make this apple fritter loaf without a glaze? Yes, the glaze is optional. If you’re trying to cut back on sugar or want something a little more breakfast-style, you can skip it and still have a moist, flavorful loaf.
6. Can I turn this into an apple fritter bundt cake or muffins instead of a loaf? Sure can. For a bundt cake, double the recipe and bake a little longer—just be sure to test doneness with a toothpick. For muffins, divide the batter into a greased muffin tin and reduce the bake time to around 18–22 minutes.
7. Is this a good recipe to bring to a potluck or bake sale? Definitely. This easy apple fritter bread for potlucks or bake sales travels well, slices beautifully, and looks impressive with that golden swirl and simple glaze. Just be ready to share the recipe!
8. How do I make the swirl look pretty in the middle of the loaf? Use a butter knife to gently swirl the brown sugar mixture into the batter—don’t overmix it. Just a few figure-eights through the top and middle layers will give you that signature swirl look.
9. Can I add a streusel topping instead of the glaze? Yes! A cinnamon streusel topping made with butter, brown sugar, and flour adds a nice crunchy texture. Just sprinkle it over the top of the batter before baking.
10. What makes this loaf cake different from traditional apple bread? The difference is in the flavor and texture—this one mimics the taste of a bakery-style apple fritter, complete with a soft crumb, cinnamon-spiced apples, and a sweet glaze that ties it all together. It’s not quite a cake, not quite a quick bread—just the best of both worlds.
Apple Fritter Loaf Cake
Ingredients
1/2 cup butter, softened
2/3 cup granulated sugar
2 eggs
1 1/2 tsp vanilla extract
1 1/2 cups all-purpose flour
2 tsp baking powder
1 tsp salt
1/2 cup milk
Apple Mixture:
2 apples, chopped (peeled if desired)
2 tbsp granulated sugar + 1 tsp apple pie spice
Spiced Sugar Swirl:
1/3 cup brown sugar
1 tsp apple pie spice
Glaze:
1 cup powdered sugar
1 tsp apple pie spice
1-2 tbsp milk
Instructions
Preheat oven to 350F.
Grease and flour a standard 9×5” loaf pan (or liberally spray with nonstick).
To a small bowl, mix together the brown sugar and apple pie spice and set aside.
In a separate medium bowl, toss the chopped apples with the granulated sugar and apple pie spice; set aside.
In a large bowl, beat the butter and granulated together until fluffy.
Beat in the eggs and add the vanilla extract.
Whisk together the flour, baking powder, and salt in a separate medium bowl, then add to the wet mixture.
Beat until well combined.
Add in the milk and continue to beat until the batter is smooth.
Pour half the batter into the prepared loaf pan.
Add half of the chopped apple mixture.
Sprinkle half of the cinnamon and brown sugar mixture on top of the apple layer.
Pour the rest of the batter over the apple layer.
Add the remaining chopped apples.
Then sprinkle the remaining cinnamon and brown sugar mixture.
Lightly press the apples into the batter and gently swirl the brown sugar mixture through it, using a knife.
Bake at 350F for 50-60 minutes, or until a toothpick inserted into the middle comes out clean and the top is golden brown.
Let the loaf rest in the pan for 15 minutes, then remove and transfer to a wire cooling rack to cool completely.
Whisk the ingredients for the cinnamon glaze together in a small bowl.
Once the loaf is completely cool, drizzle with glaze.
Southern-Style Honey Butter Biscuits: A Comforting Breakfast Staple
If you’re looking for an easy southern breakfast idea that’s full of old-fashioned flavor, these Honey Butter Biscuits deserve a spot on your table.
They’re soft, flaky, and brushed with a warm honey butter glaze that takes them straight over the top.
While they’re simple enough for a weekday morning, they’re the kind of biscuit you’ll also want to serve when family is in town or when you just want something homemade to go with your coffee.
These buttermilk honey biscuits are for anyone who appreciates comfort food made from scratch.
They’re perfect for southern home cooks, busy families looking for a quick breakfast option, or anyone who wants a budget-friendly breakfast that feels special.
These biscuits don’t take much time or fuss, but the end result tastes like something straight from Grandma’s kitchen.
When to Serve Honey Butter Biscuits
You can serve these flaky honey biscuits just about any time of day, but they really shine in the morning.
Pair them with bacon and eggs for a full southern breakfast, or serve them warm with a cup of coffee as a simple start to the day.
They’re also a great addition to a weekend brunch spread or a cozy Sunday supper.
Planning a holiday meal? These biscuits make a perfect Thanksgiving or Christmas breakfast treat—especially when you’ve got family around the table.
They’re warm, filling, and nostalgic in all the right ways.
Where to Enjoy These Biscuits
Anywhere you’ve got a hungry crowd or a quiet kitchen is a good place to make a batch.
These biscuits are just as home on a farmhouse table in the country as they are in a small apartment kitchen in the city.
Bake them for a church potluck, bring them to a family picnic, or make a dozen just for yourself—because leftovers won’t last long.
Why You’ll Want This Recipe in Your Back Pocket
What sets this recipe apart is the combination of buttermilk and honey.
The buttermilk adds that classic tangy flavor and soft texture, while the honey adds just enough sweetness without making them taste like dessert.
The grated frozen butter is key—it gives the biscuits their light, flaky layers. And that honey butter glaze? It’s a game changer.
This recipe is a great way to stretch your pantry staples into something special. If you’re trying to save money but still feed your family well, homemade biscuits are always a smart move.
No mixes, no cans—just real ingredients and real flavor.
How to Serve Honey Butter Biscuits
These biscuits are versatile. Here are a few serving ideas:
Breakfast Sandwiches: Slice them in half and stuff them with fried chicken, bacon and egg, or even a sausage patty.
Sweet & Savory Combo: Serve them with ham and a dab of hot pepper jelly.
Southern Dessert Idea: Split one open, add fresh berries and a dollop of whipped cream for a quick take on shortcake.
Biscuits & Gravy: Pair them with sausage gravy for a southern classic that never goes out of style.
Honey Butter Biscuit Bake: Cube leftovers and turn them into a biscuit breakfast casserole.
Whether you’re making breakfast for your family or want something to impress guests, these buttermilk honey biscuits are a go-to recipe that won’t let you down.
Honey Butter Biscuits
Ingredients:
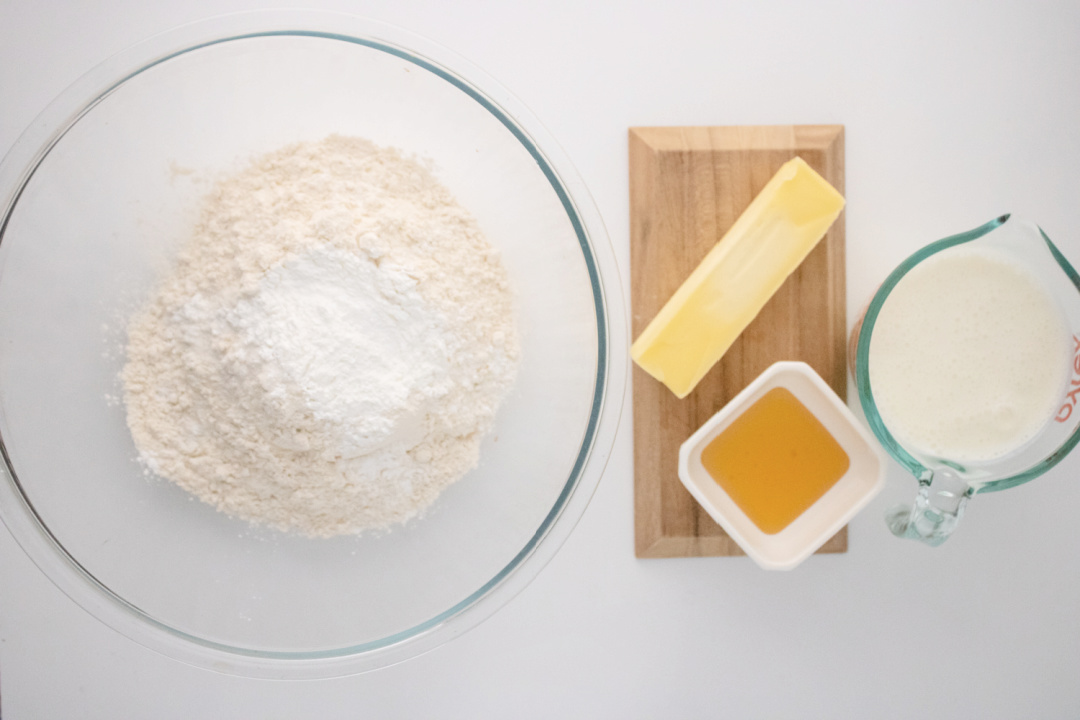
2 ½ cups all-purpose flour (scooped and leveled)
2 tablespoons baking Powder
1 teaspoon salt
2 teaspoons honey
½ cup (1 stick) frozen butter
1 1/3 cup Buttermilk
Topping
1 tablespoons honey + 1 tablespoon butter
Directions:
Preheat oven to 425°.
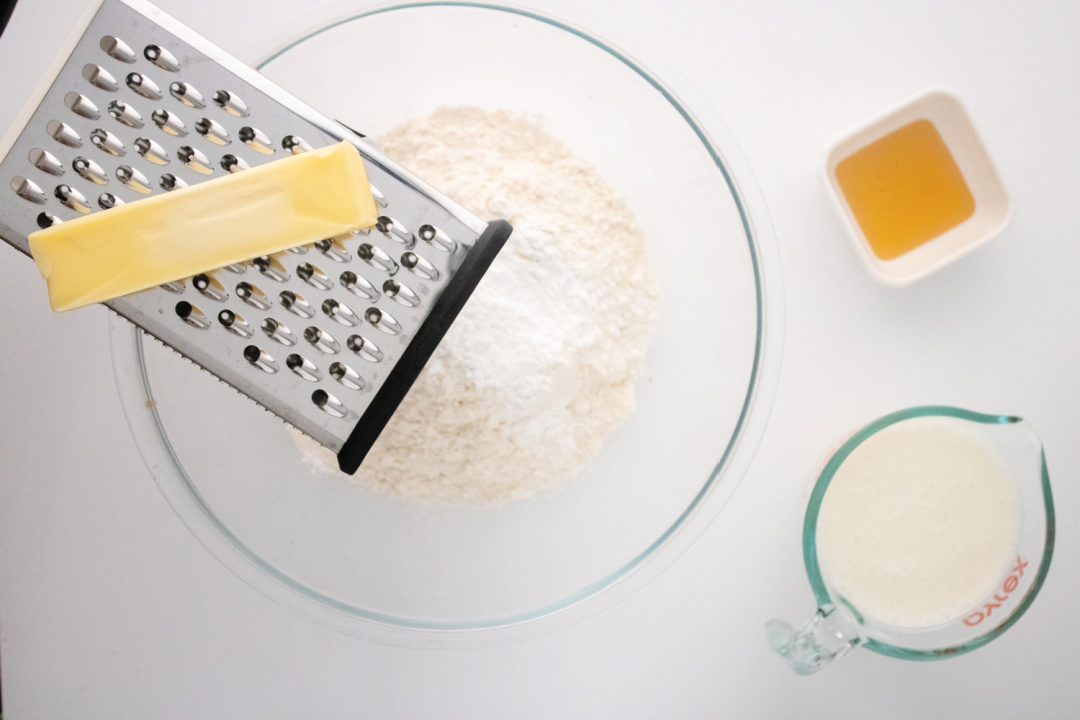
Add the flour, baking powder, and salt to a large mixing bowl.
Whisk or stir together.
Grate cold butter into the dry mixture.
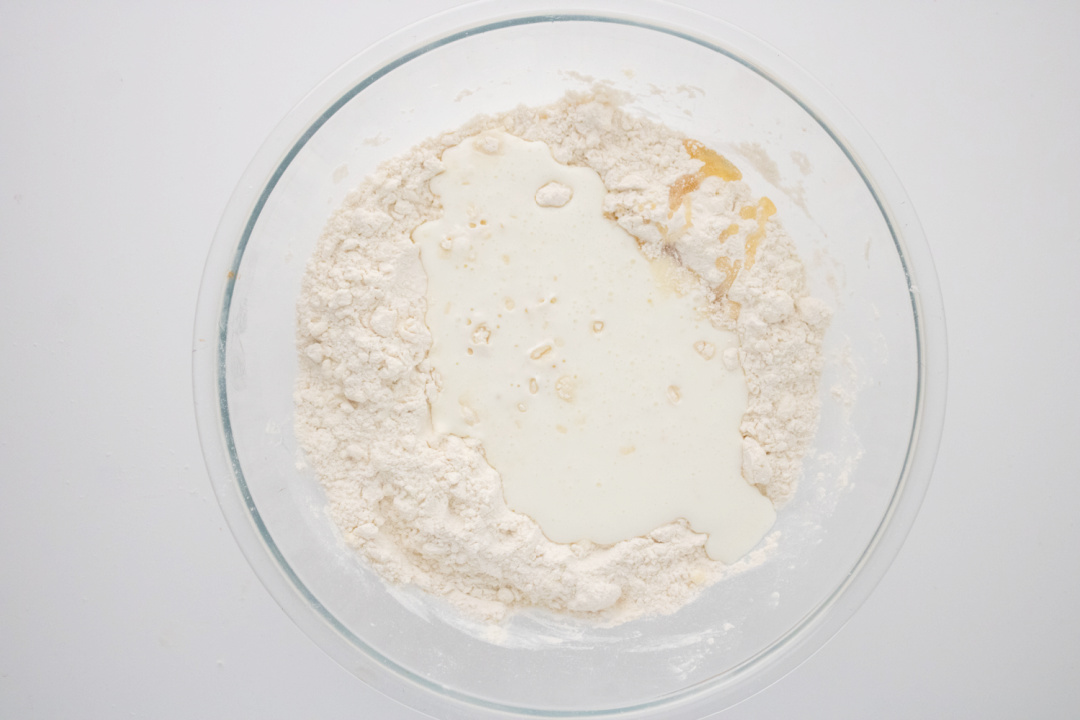
Create a well in the dry mixture and add the buttermilk and honey.
Using your hands or a rubber spatula, turn the bowl as you gently mix the ingredients.
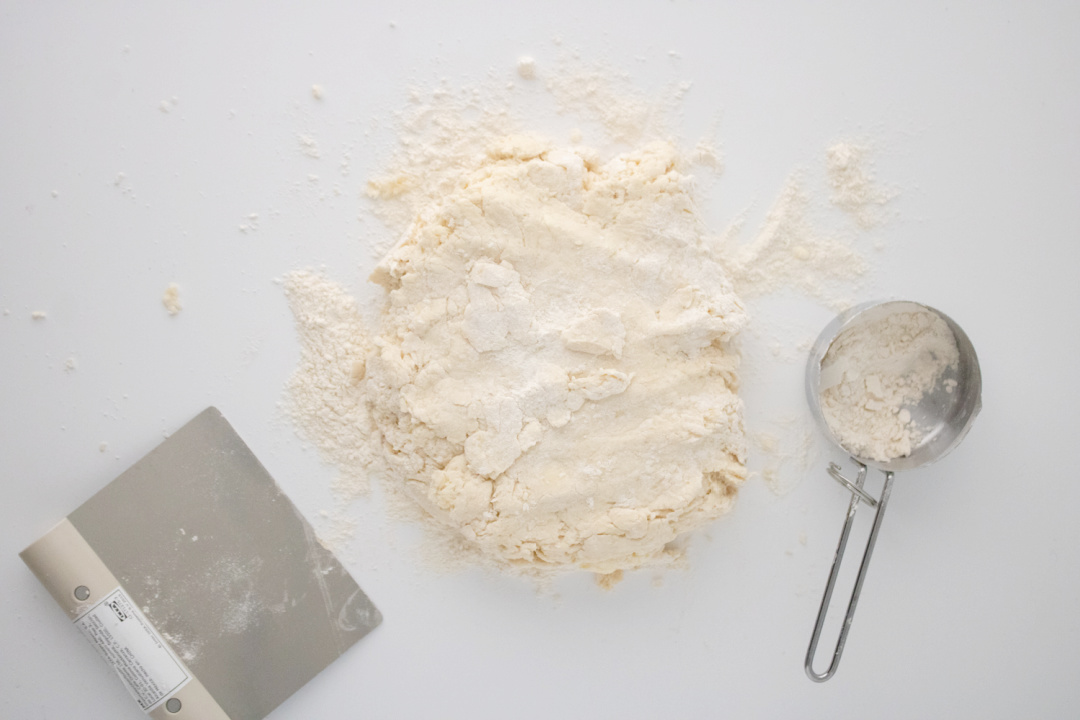
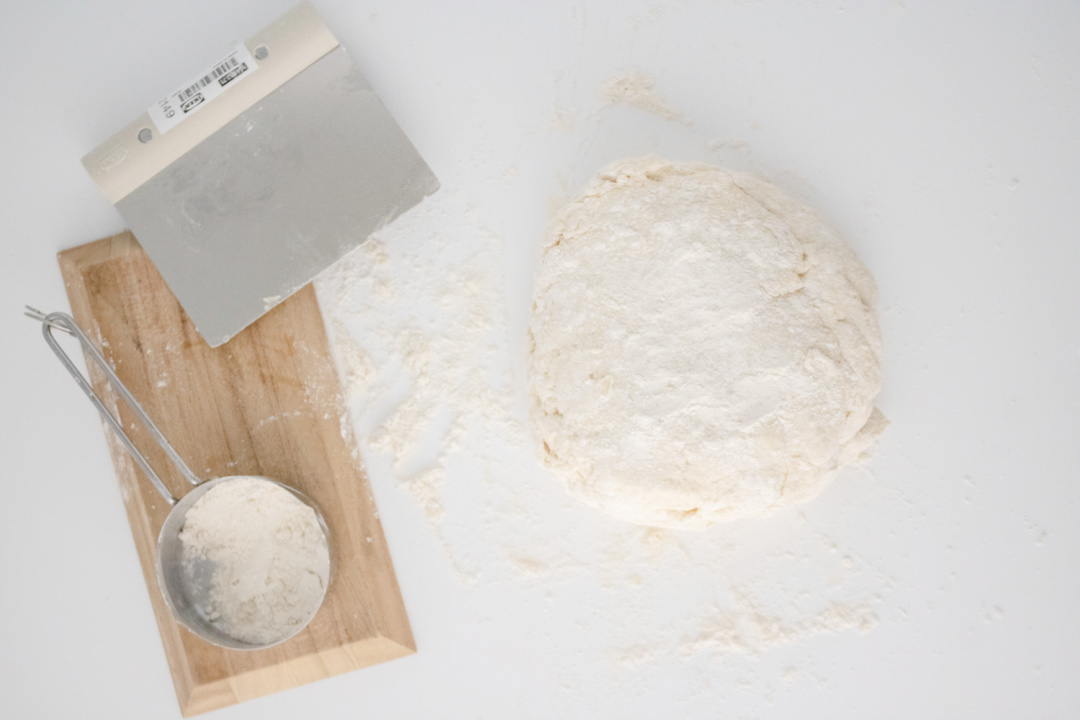
Once it comes together, turn the dough out onto a lightly floured surface.
Using a bench scraper, fold the dough over on itself, press it down lightly and then rotate the dough.
Continue this fold, press and rotate process until it is no longer sticky and several layers have been created. (about 3 rotations)
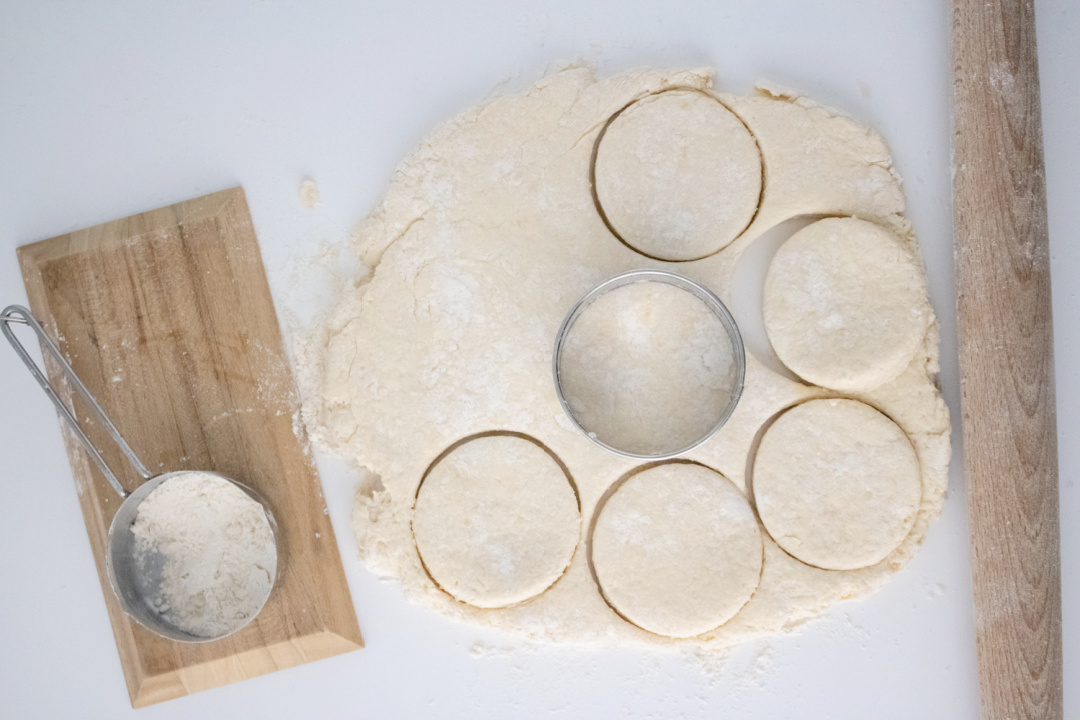
Use a 3-inch cookie cutter to cut out your circles. Important: Do not twist the cutter, it prevents the biscuits from rising.
Lightly flour the inside of the cutter in between cutting if it is sticking.
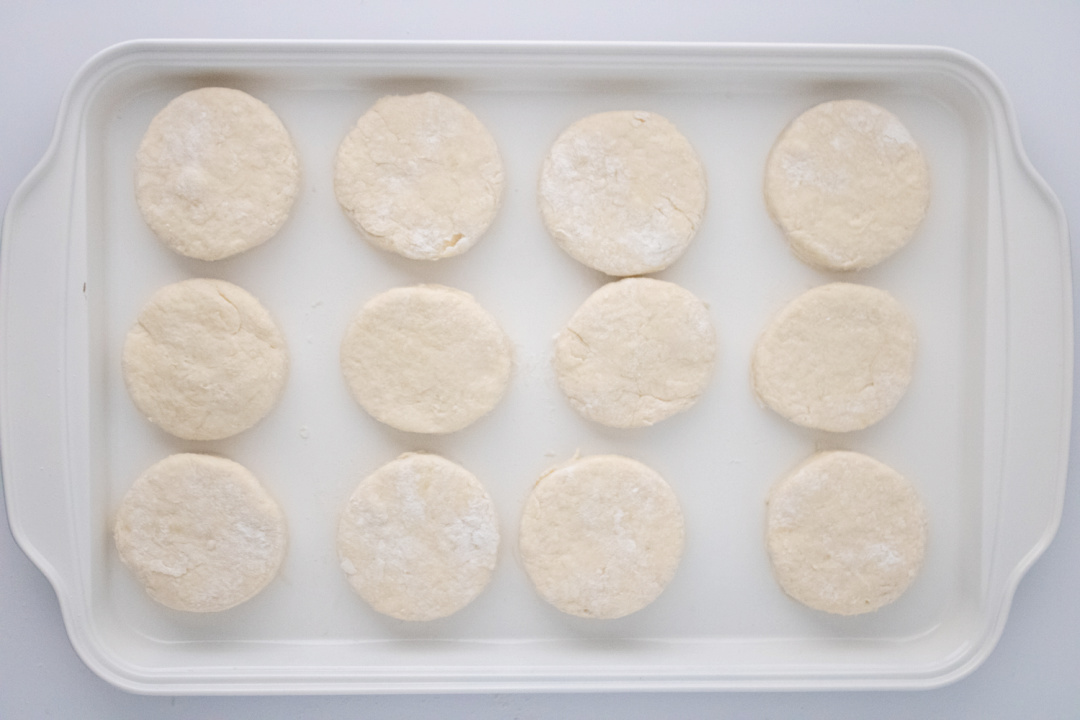
Place biscuits on baking sheet.
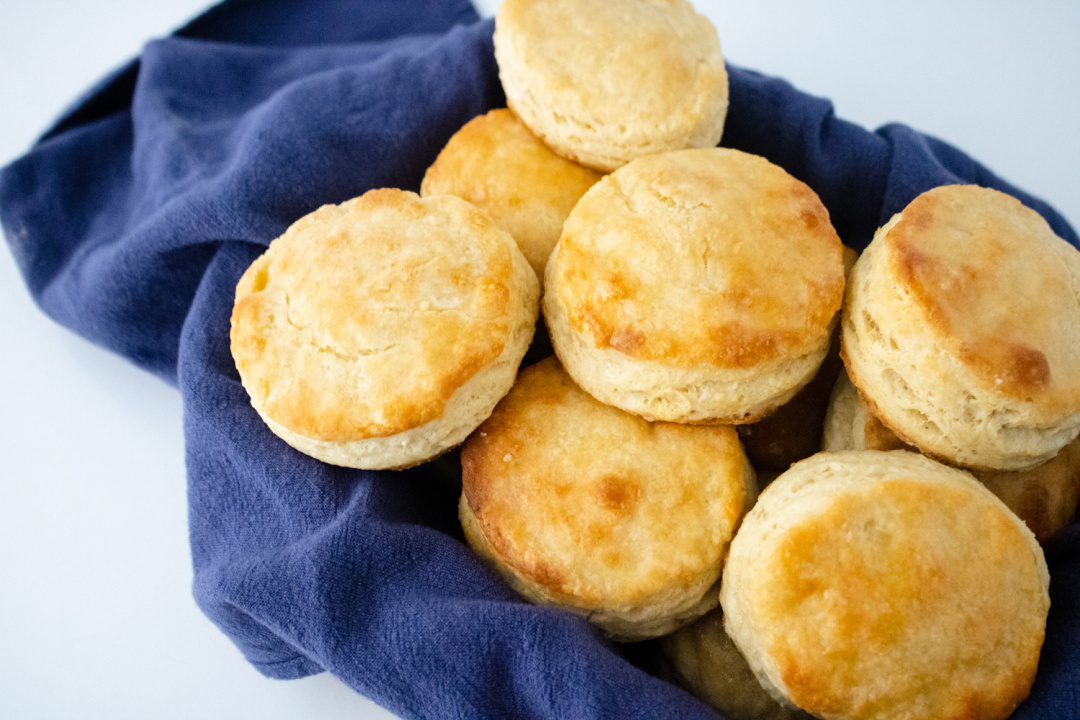
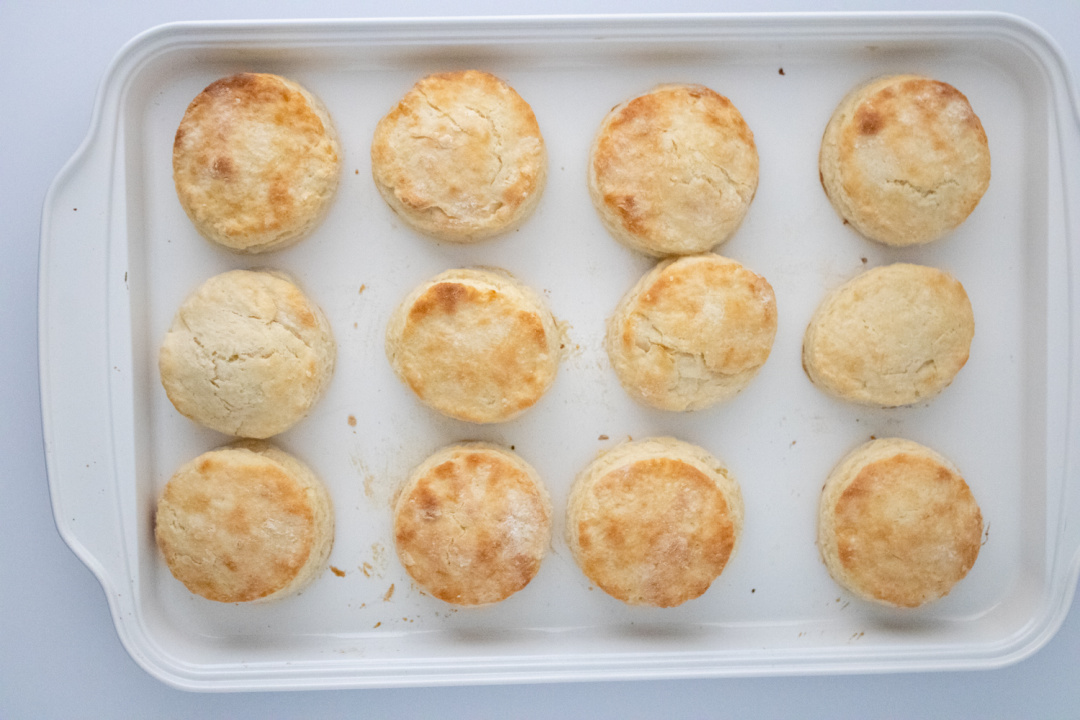
Bake for 13-15 minutes or until the tops are golden brown.
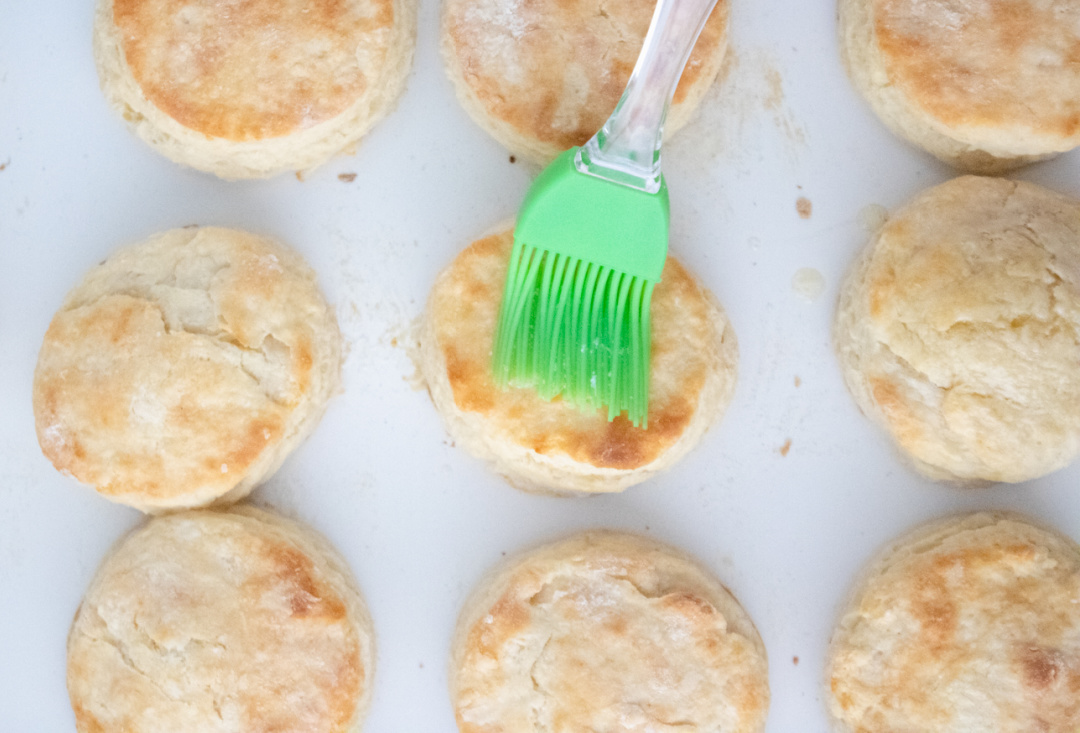
Melt the 1 tbsp honey and butter together and brush on top of freshly baked biscuits.
Frequently Asked Questions about Honey Butter Biscuits
1. Can I make honey butter biscuits without buttermilk? Yes, if you don’t have buttermilk, you can make a substitute by adding 1 tablespoon of white vinegar or lemon juice to 1 cup of milk. Let it sit for 5–10 minutes before using. This gives you the tang and acidity that helps with rise and flavor.
2. Why do I need to use frozen butter? Frozen butter creates flaky layers in your biscuits. As the butter melts in the hot oven, it releases steam, which helps the dough rise and puff up. Grating frozen butter into the dry ingredients ensures it’s evenly distributed without overworking the dough.
3. Can I freeze these biscuits for later? Yes, these biscuits freeze well. You can freeze the raw, cut-out biscuit dough on a baking sheet, then transfer to a freezer-safe bag once solid. Bake straight from frozen at 425°F, adding 2–3 minutes to the baking time.
4. How do I reheat leftover honey butter biscuits? To keep them soft and fresh-tasting, wrap biscuits in foil and warm in a 300°F oven for about 10 minutes. You can also microwave them for 15–20 seconds, but the texture will be a bit softer.
5. What’s the best way to serve honey butter biscuits? These biscuits are great with savory dishes like eggs and bacon, but they also work well with sweet toppings like jam, apple butter, or even a drizzle of extra honey. For a southern-style breakfast sandwich, slice one open and add fried chicken or sausage and egg.
6. Why do my biscuits come out flat or dense? Common reasons include overmixing the dough, not using cold butter, or twisting the cutter when cutting the biscuits. Always handle the dough gently and avoid twisting your cutter—it keeps the edges from sealing, which helps them rise.
7. Can I add cheese or herbs to this recipe? Absolutely. Shredded cheddar, rosemary, or chives can be added to the dry mix before the liquid ingredients. Just don’t overdo it—keep the add-ins to about ½ cup total.
8. What kind of honey works best in this recipe? Any pure, raw honey will work. If you prefer a milder flavor, go with clover honey. For deeper flavor, try wildflower or orange blossom honey. Just avoid using honey blends or syrups with added sugar.
9. Are these biscuits sweet enough to serve as a dessert? They’re lightly sweet with the honey, but not overly so. To turn them into a simple dessert, split one open and add whipped cream and fresh berries or a scoop of vanilla ice cream.
10. How long do homemade biscuits last? Stored in an airtight container at room temperature, they’ll stay fresh for 2–3 days. You can also refrigerate them for up to a week or freeze them for longer storage.
Honey Butter Biscuits
Ingredients
2 ½ cups all-purpose flour (scooped and leveled)
2 Tablespoons baking Powder
1 teaspoon salt
2 teaspoons honey
½ cup (1 stick) frozen butter
1 1/3 cup Buttermilk
Topping
1 Tablespoons honey + 1 Tablespoon butter
Instructions
Preheat oven to 425°.
Add the flour, baking powder, and salt to a large mixing bowl.
Whisk or stir together.
Grate cold butter into the dry mixture.
Create a well in the dry mixture and add the buttermilk and honey.
Using your hands or a rubber spatula, turn the bowl as you gently mix the ingredients.
Once it comes together, turn the dough out onto a lightly floured surface.
Using a bench scraper, fold the dough over on itself, press it down lightly and then rotate the dough.
Continue this fold, press and rotate process until it is no longer sticky and several layers have been created. (about 3 rotations)
Use a 3-inch cookie cutter to cut out your circles. Do not twist the cutter, it prevents the biscuits from rising.
Lightly flour the inside of the cutter in between cutting if it is sticking.
Place biscuits on baking sheet.
Bake for 13-15 minutes or until the tops are golden brown.
Melt the 1 tbsp honey and butter together and brush on top of freshly baked biscuits.
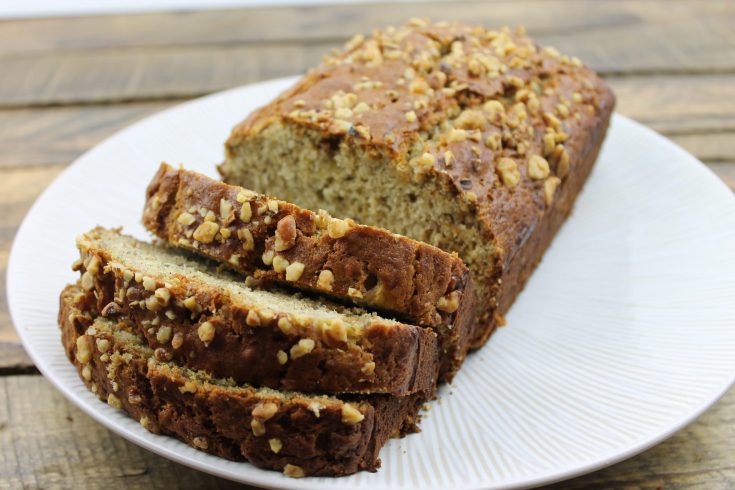
Do you have over-ripe bananas in your home that won’t get eaten? Make Banana Bread with Pecans and Walnuts using the bananas instead of throwing them out!
Banana bread is a great little snack to enjoy with coffee in the morning. It’s sweet, but not too sweet. It’s also a great way to use those bananas that didn’t get eaten. It’s a family friendly dessert that I like to get my children get involved with.
This recipe involves smashing bananas, measuring carefully, and then of course the pay-off of enjoying it later.
My wife was the one who brought this banana bread to our family. I had eaten banana bread before I was married, but it was often given as a gift by a family friend.
She started making banana bread about 10 years ago, mostly because we couldn’t eat all of the bananas we had in the house to feed our young children. It’s a lot of fun to make too!
This is your choice! You can add walnuts or pecans or add both to your banana bread based on your preference! Both provide an additional tasty crunch to your recipe.
Pecans are a bit sweeter and provide more of a crunch. Walnuts are a bit more ‘earthy’ tasting.
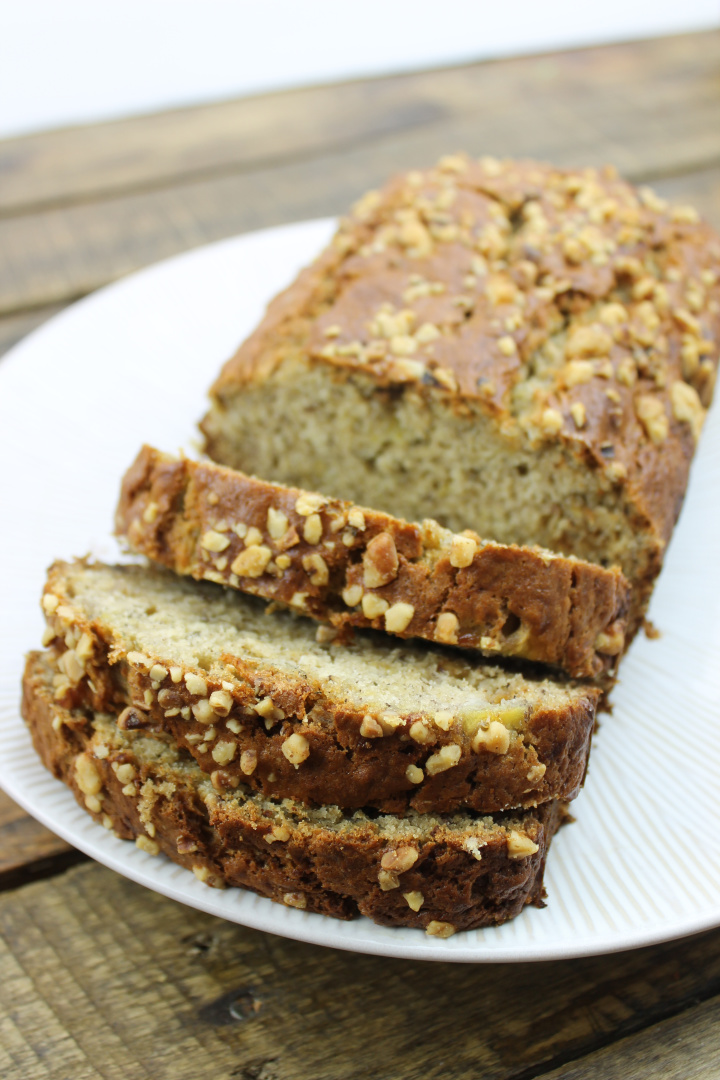
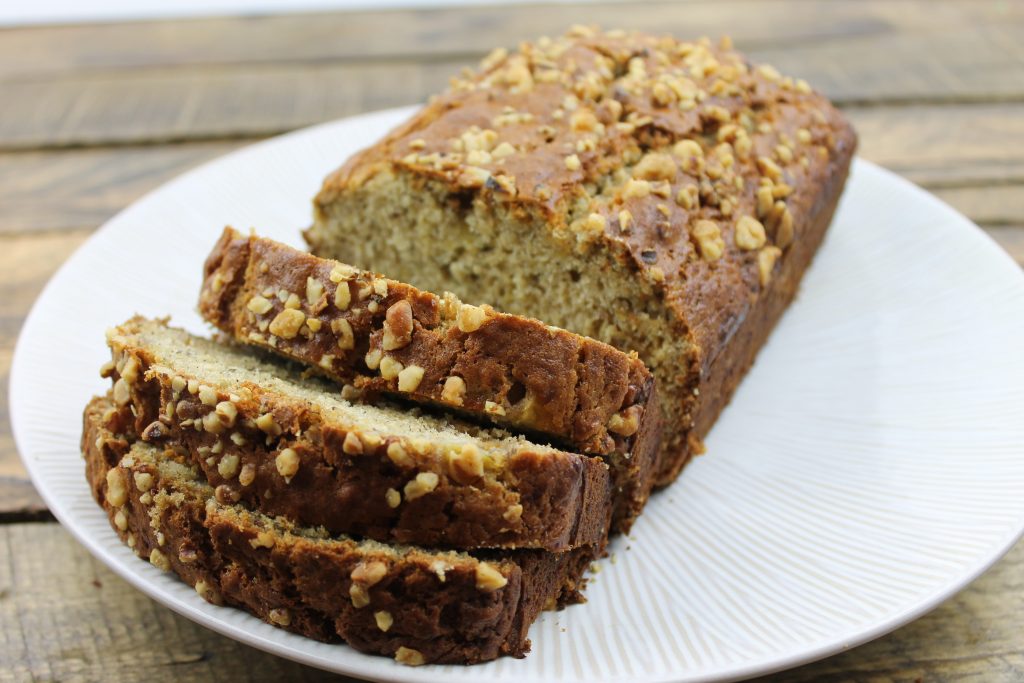
This recipe includes pecans and walnuts.
Banana Bread with Pecans and Walnuts
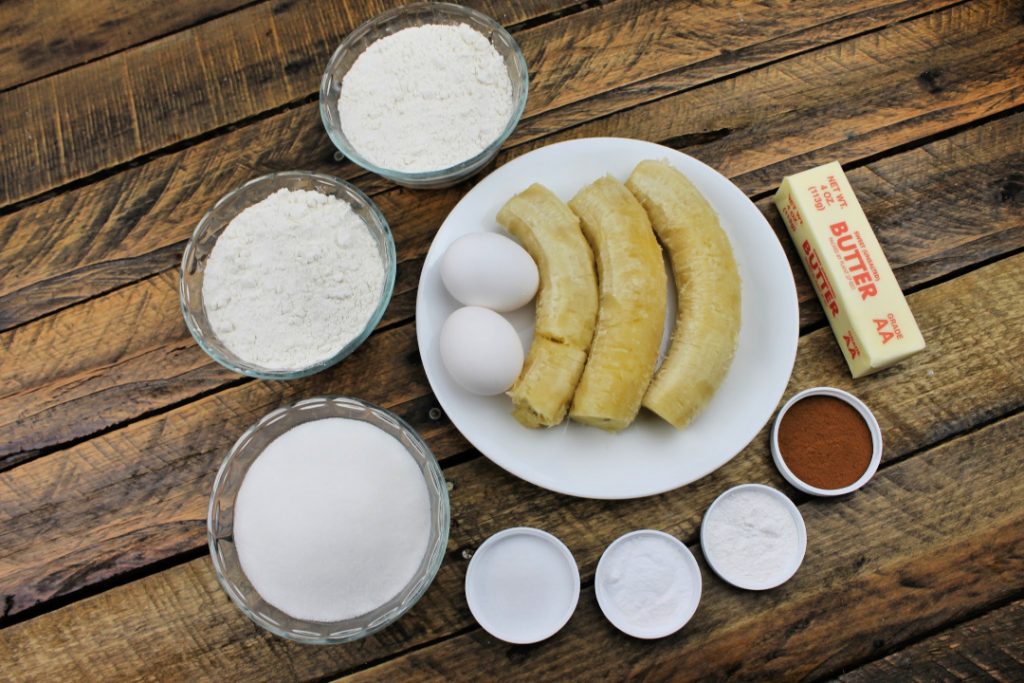
Ingredients:
3 ripe bananas
1 cup granulated sugar
1 stick unsalted butter
2 eggs
1 tbsp. half and half
1 tsp. cinnamon
2 cups flour
1 tsp. baking powder
1 tsp. baking soda
¼ tsp. vanilla extract
1 tsp. salt
¼ cup of pecans
½ cup of walnuts
Directions:
Pre heat an oven to 375 degrees.
First, combine the sugar and butter into a large mixing bowl.
Mix well.
Add the 2 eggs.
Using an electric hand mixer, mix eggs into the butter and sugar mixture.
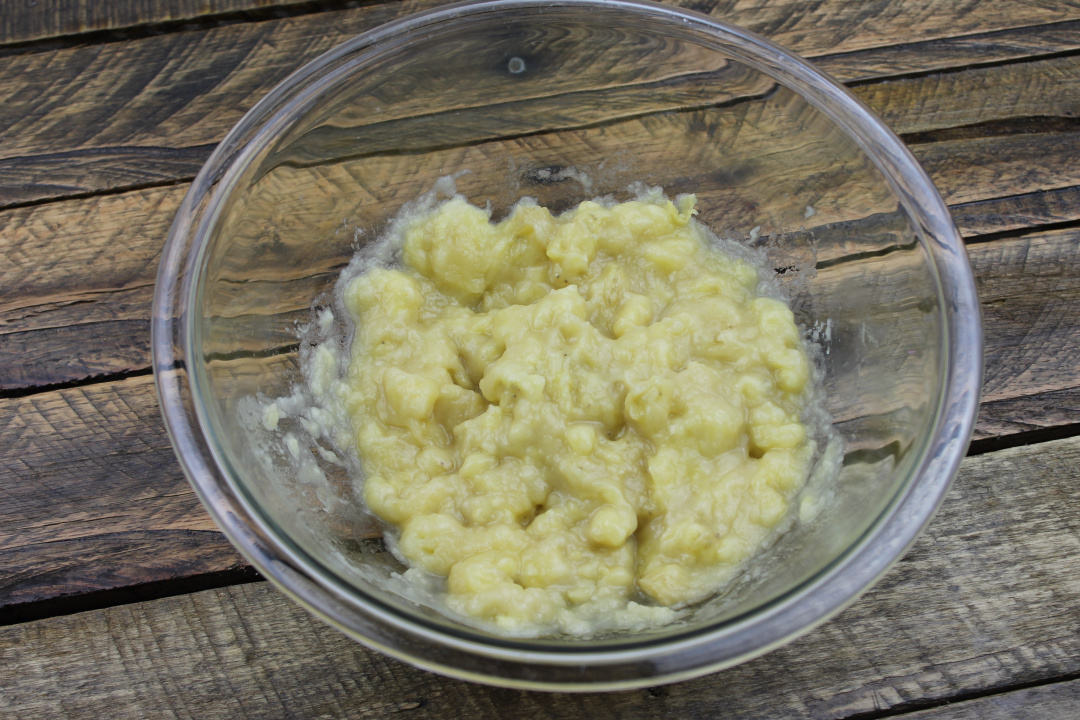
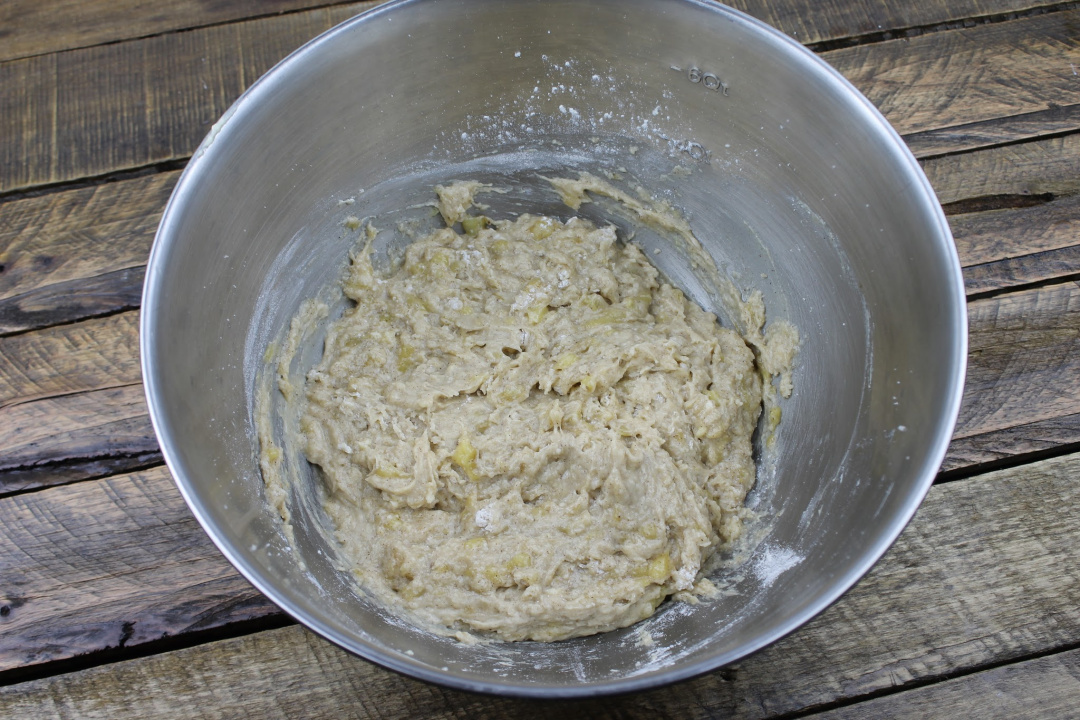
Next, mash up the 3 bananas.
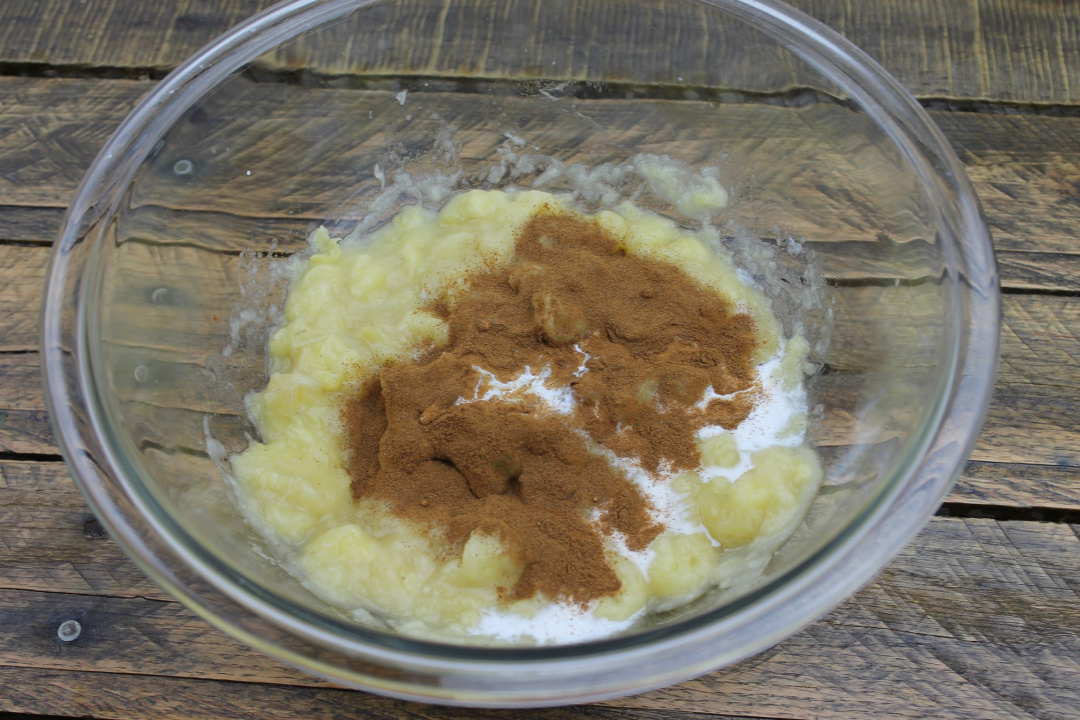
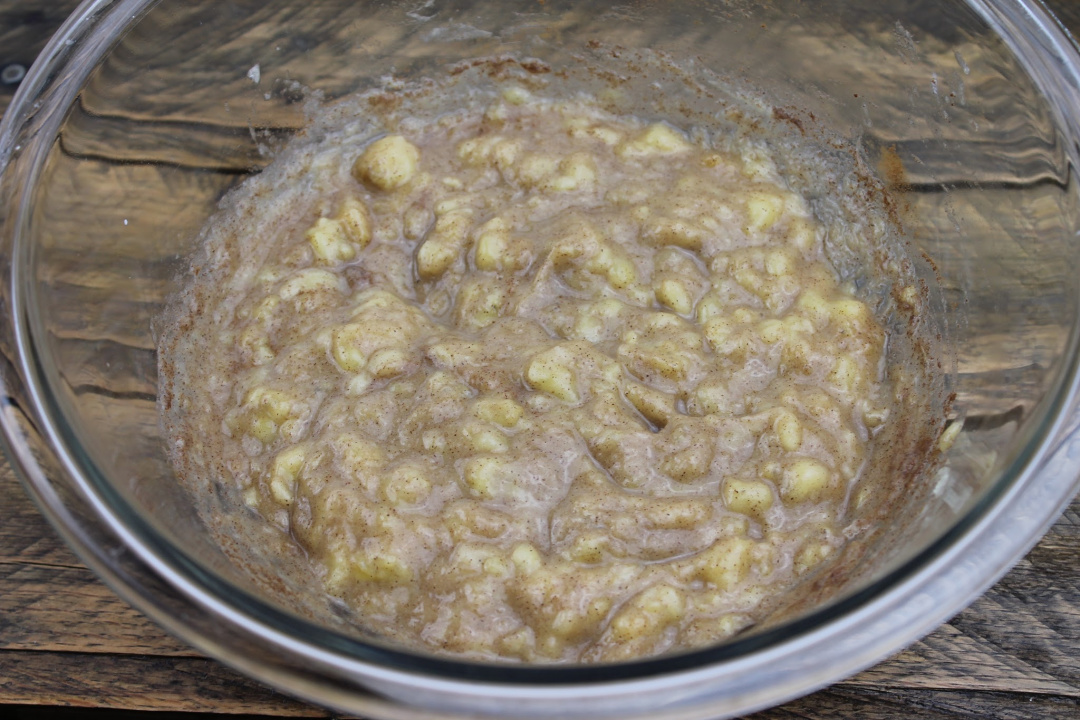
Once well mashed, add the cinnamon, milk, and vanilla.
Mix well.
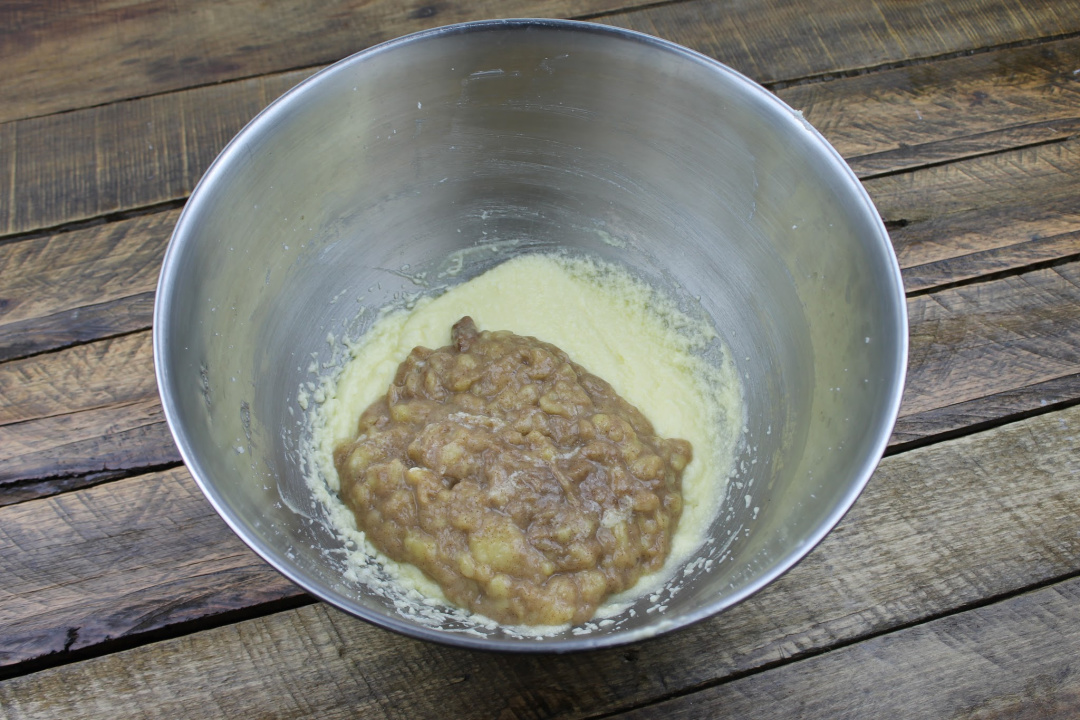
Then, add the banana mixture with the sugar, butter, and egg mixture.
Mix well.
Add all dry ingredients.
Mix the batter just enough until you don’t see any more raw flour. Do not over mix the batter!
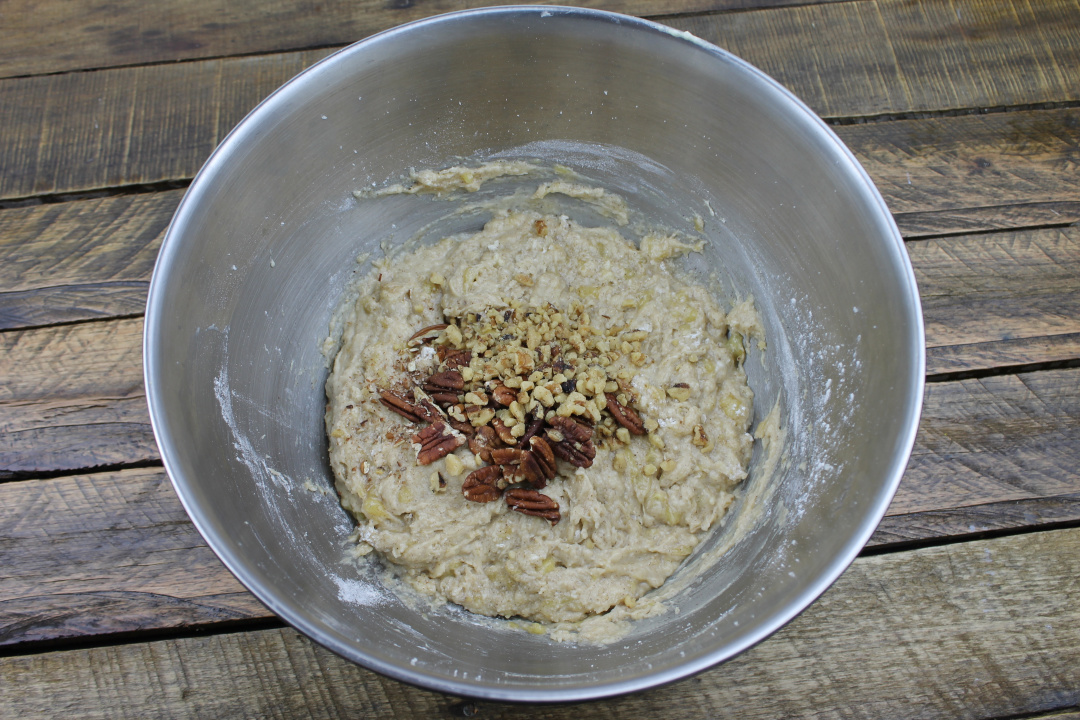
Finally, fold in ¼ cup of pecans and ¼ cup of walnuts (save the other ¼ cup of walnuts for a topping).
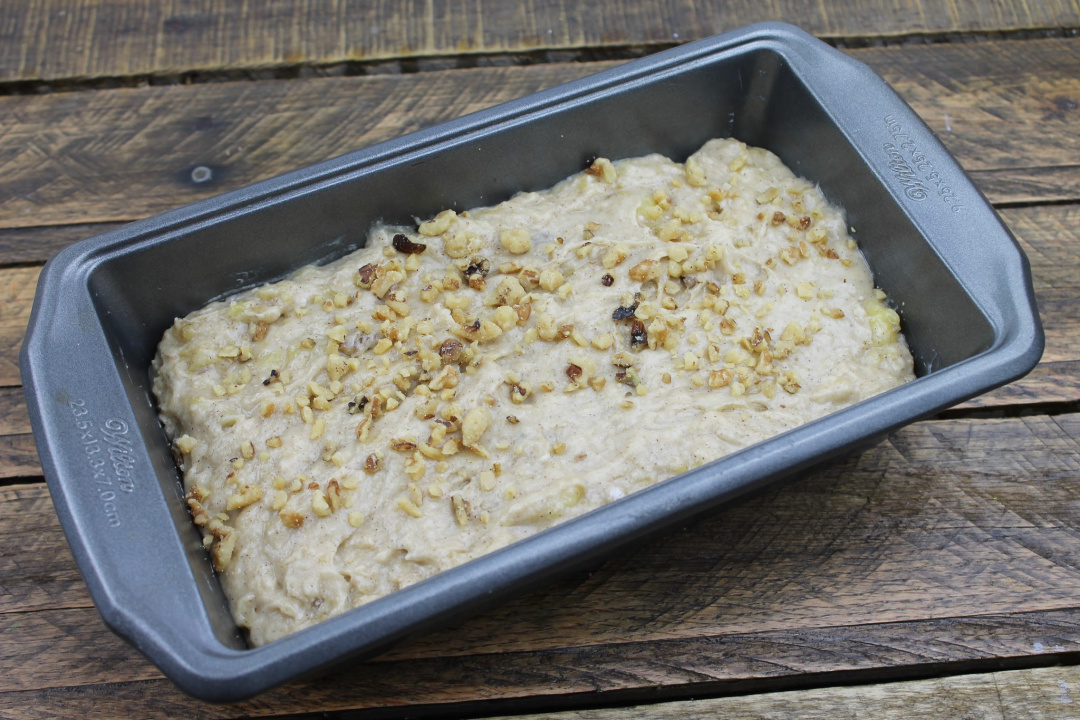
Pour the batter into a 9.25 X 5.25-inch non stick loaf pan, and sprinkle the other ¼ cup of walnuts over the banana bread batter.
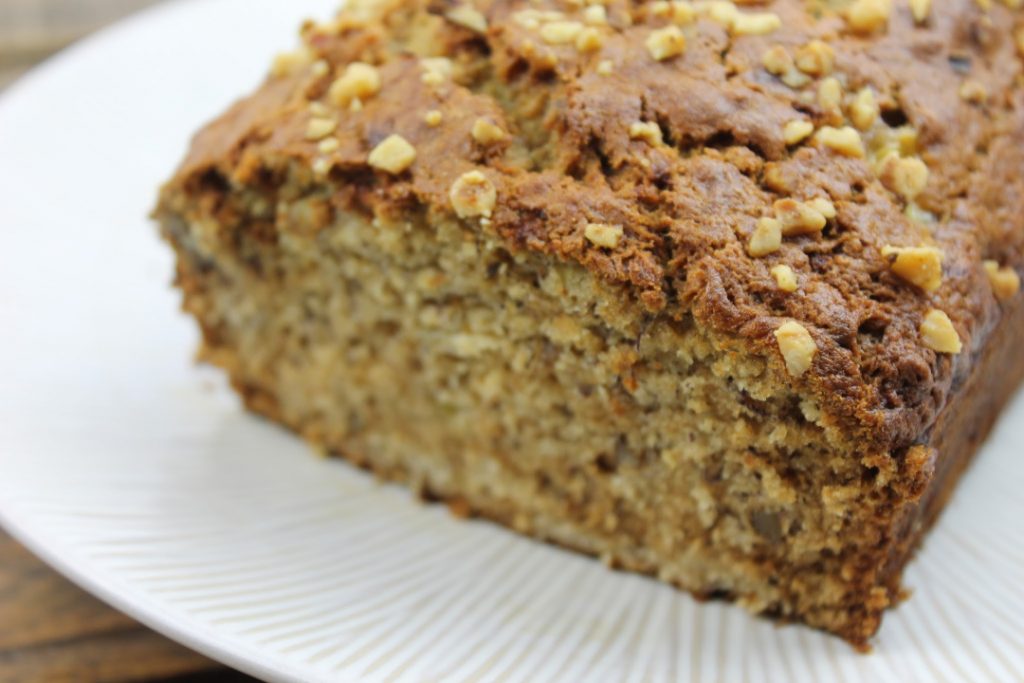
Place on the center rack of the oven for 40-50 minutes or until the bread is baked through.
Place on a wire rack for cooling.
Then, cut into slices and serve!
Banana Bread with Pecans and Walnuts
Ingredients
3 ripe bananas
1 cup granulated sugar
1 stick unsalted butter
2 eggs
1 tbsp of half and half
1 tsp cinnamon
2 cups flour
1 tsp baking powder
1 tsp baking soda
¼ tsp vanilla extract
1 tsp salt
¼ cup of pecans
½ cup of walnuts
Instructions
Pre heat an oven to 375 degrees.
First, combine the sugar and butter into a large mixing bowl.
Mix well, then add the 2 eggs, mix into the butter and sugar mixture.
Next, mash up the 3 bananas.
Once well mashed, add the cinnamon, milk, and vanilla. Mix well.
Then, add the banana mixture with the sugar, butter, and egg mixture.
Once well combined, add all dry ingredients.
Mix the batter just enough until you don’t see any more raw flour.
Finally, fold in ¼ cup of pecans and ¼ cup of walnuts (save the other ¼ cup of walnuts for a topping).
Pour the batter into a 9.25 X 5.25-inch bread loaf pan, and sprinkle the other ¼ cup of walnuts over the banana bread batter.
Place on the center rack of the oven for 40-50 minutes or until the bread is baked through.
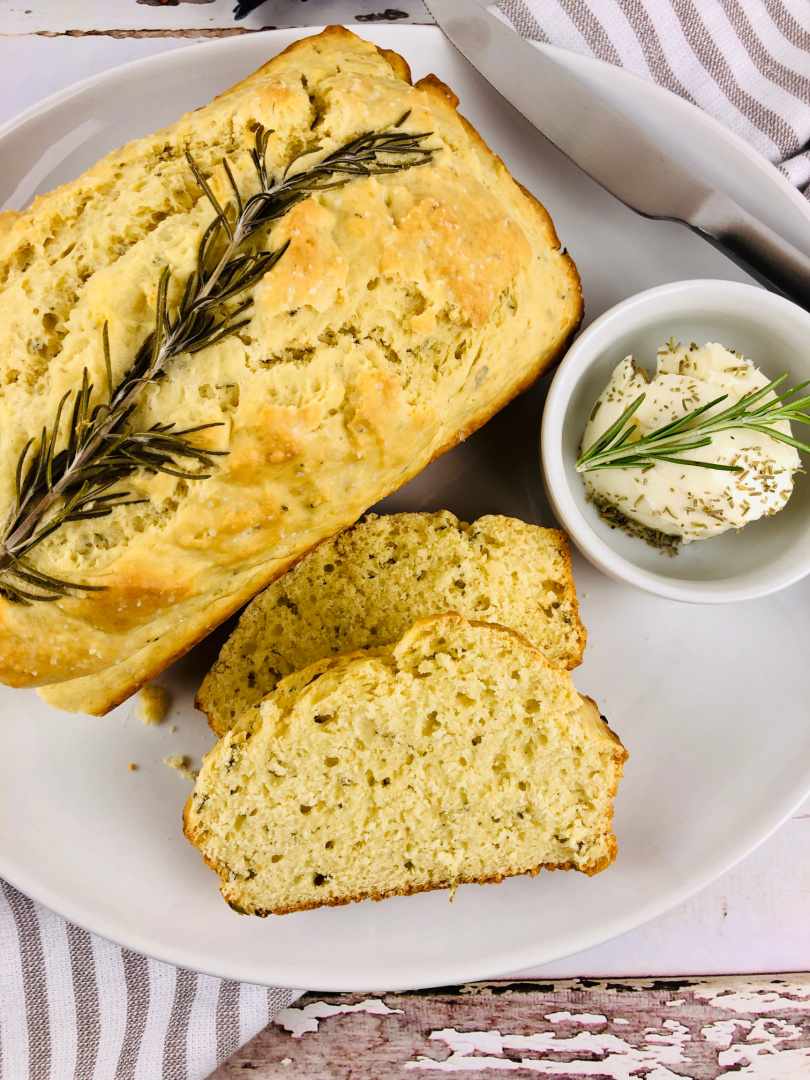
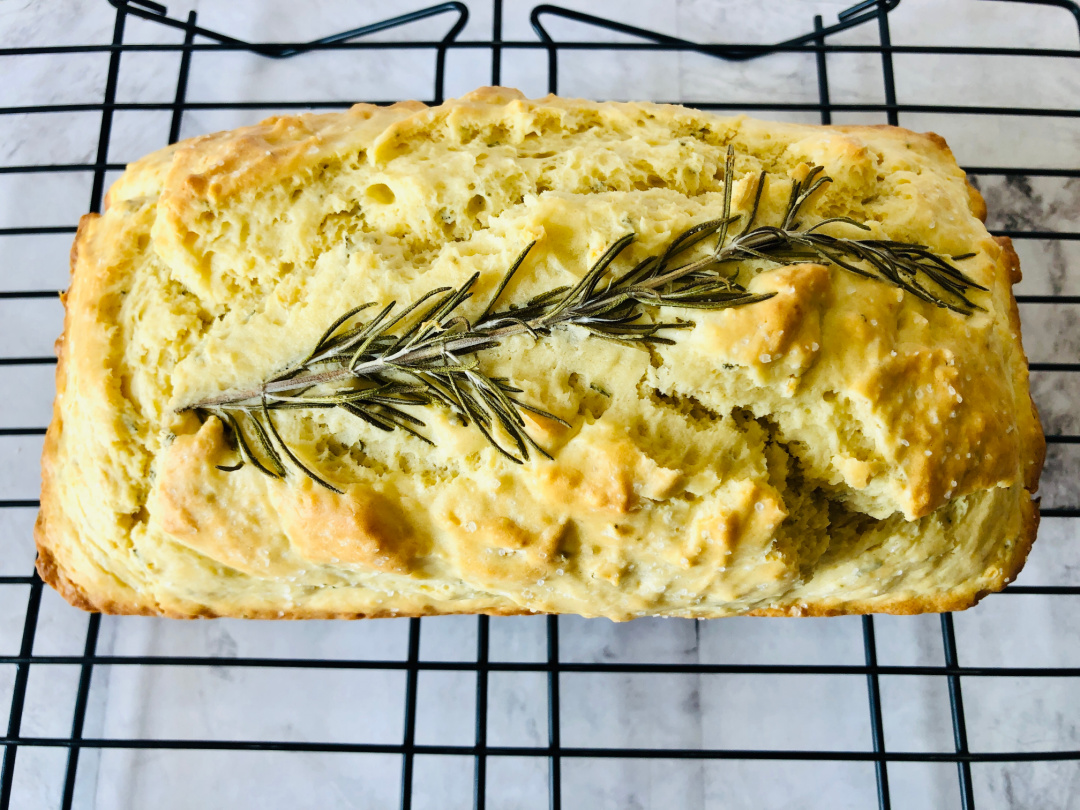
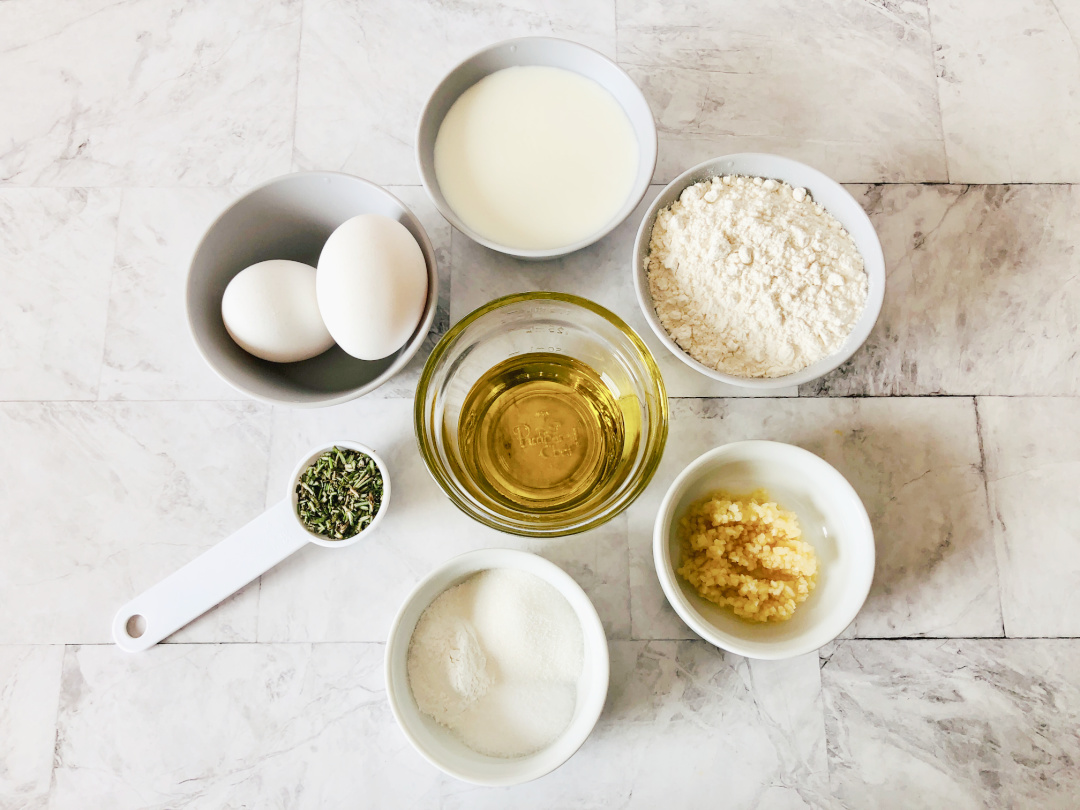
Try this Rosemary Olive Oil Bread with herb butter and pair a slice of this tasty bread with your favorite meal this week!
Do you love trying new bread recipes? If so, this recipe is for you!
This rosemary olive oil bread is filled with flavor. It requires a few basic ingredients!
Yes, you can bake with olive oil just like you bake with other oils! This bread recipe does use olive oil. The olive oil in this quick bread recipe gives this loaf of bread it’s nice texture.
Your house will smell amazing with a fresh batch of this baking in the oven. Enjoy!