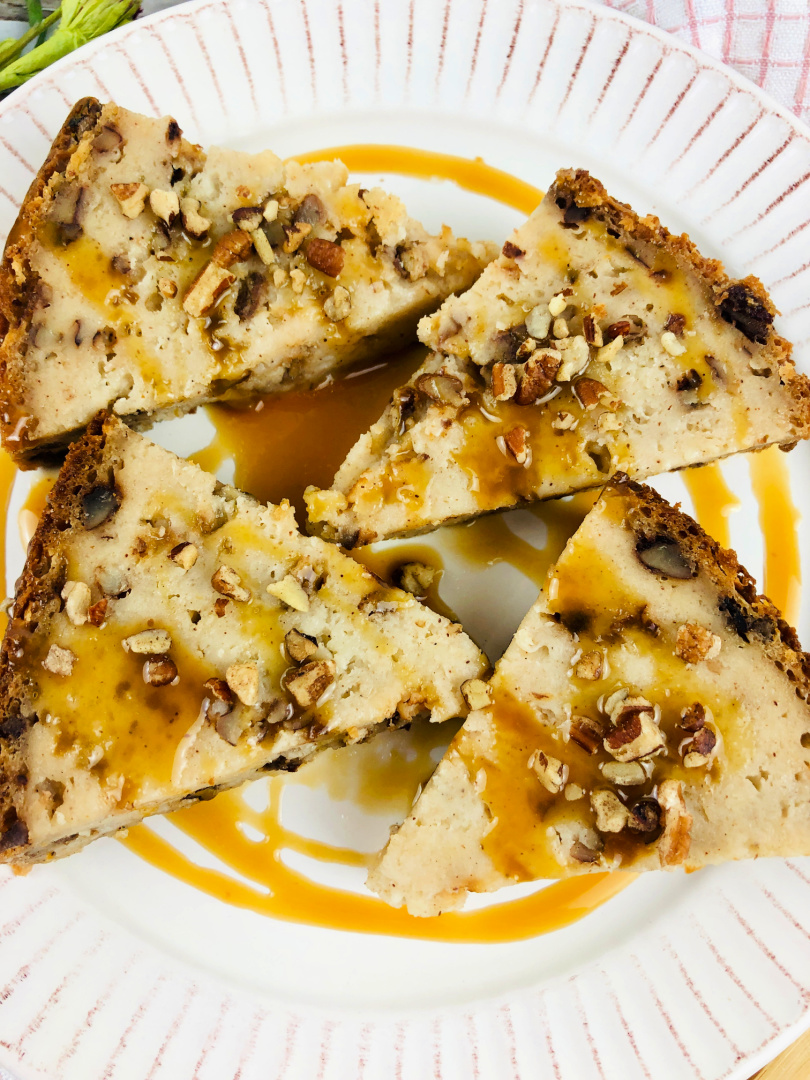
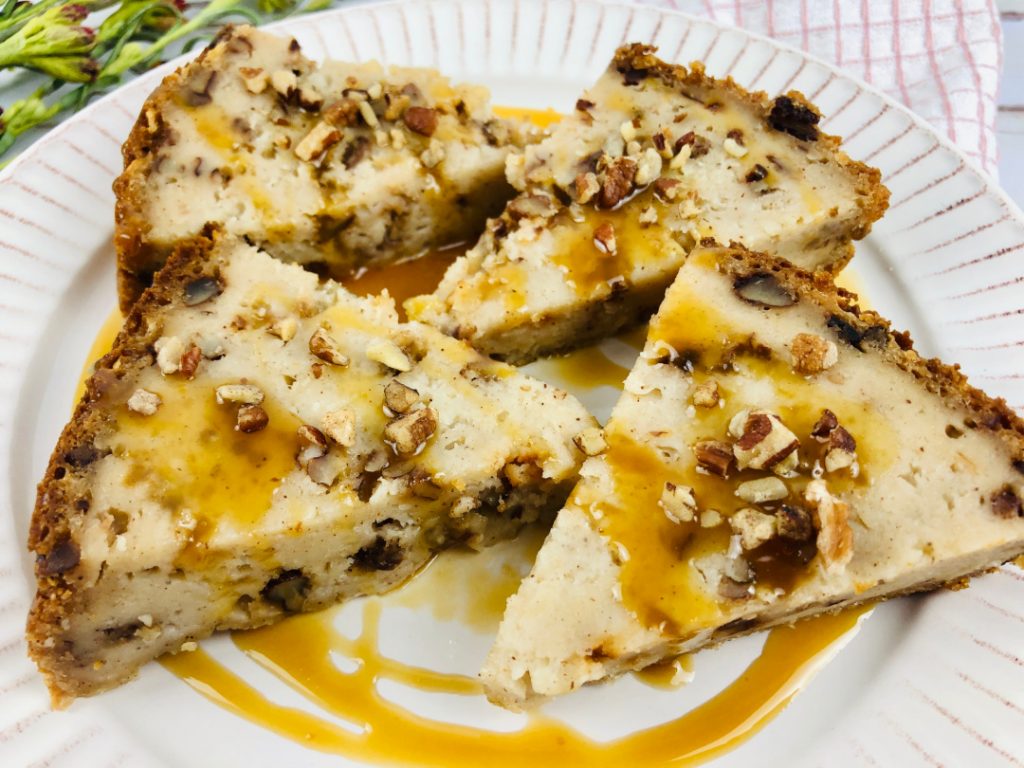
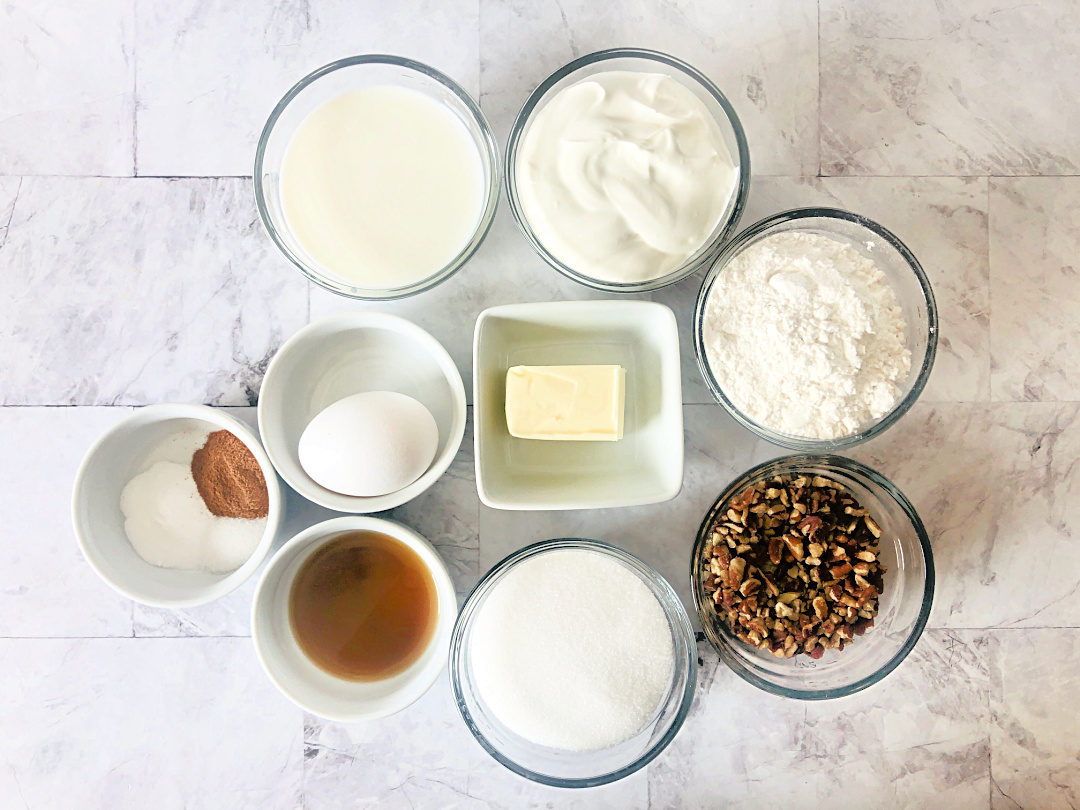
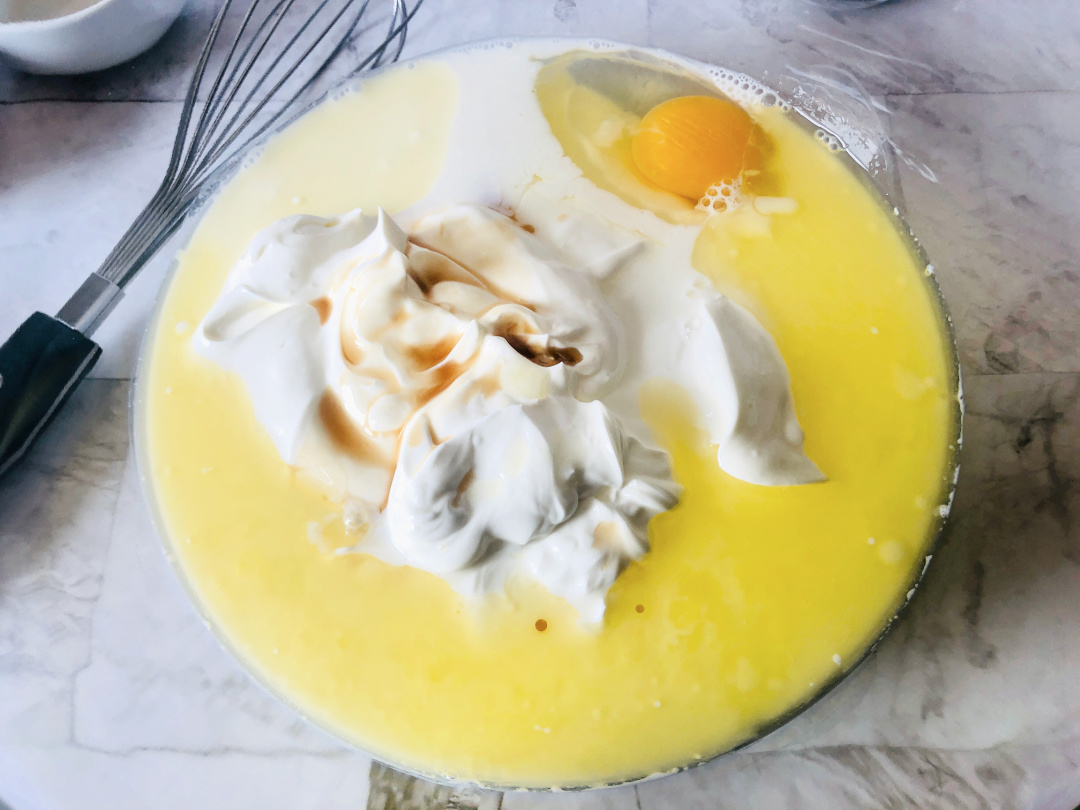
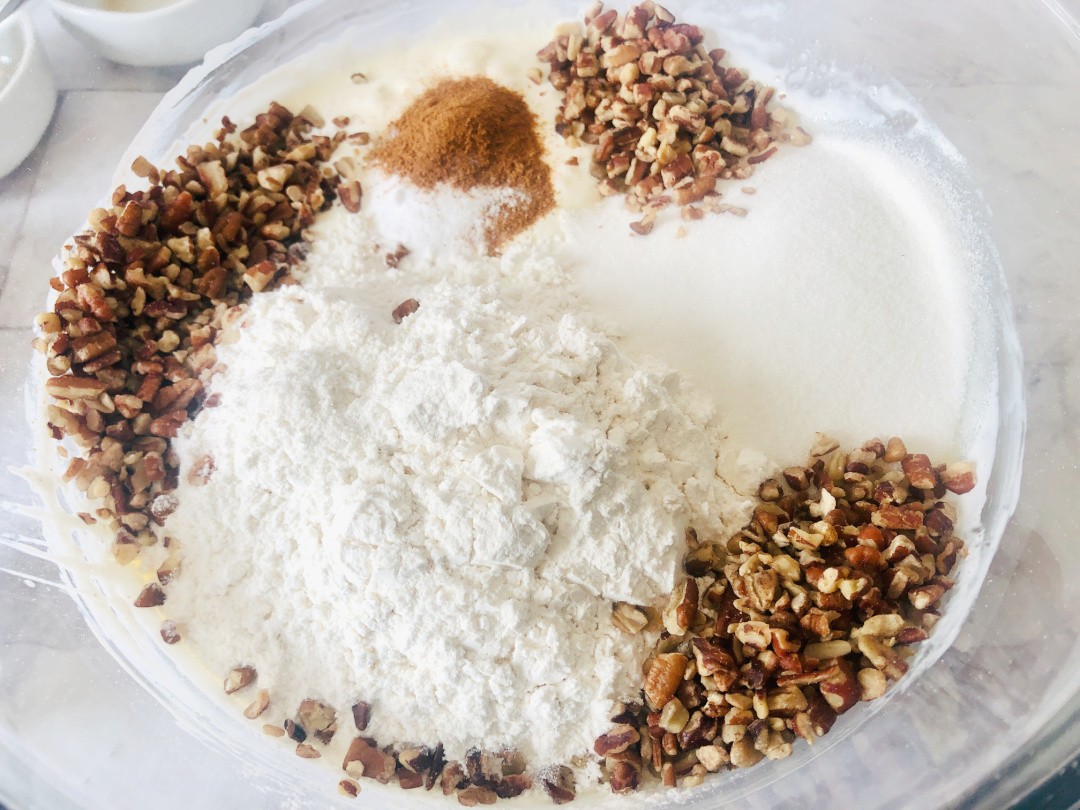
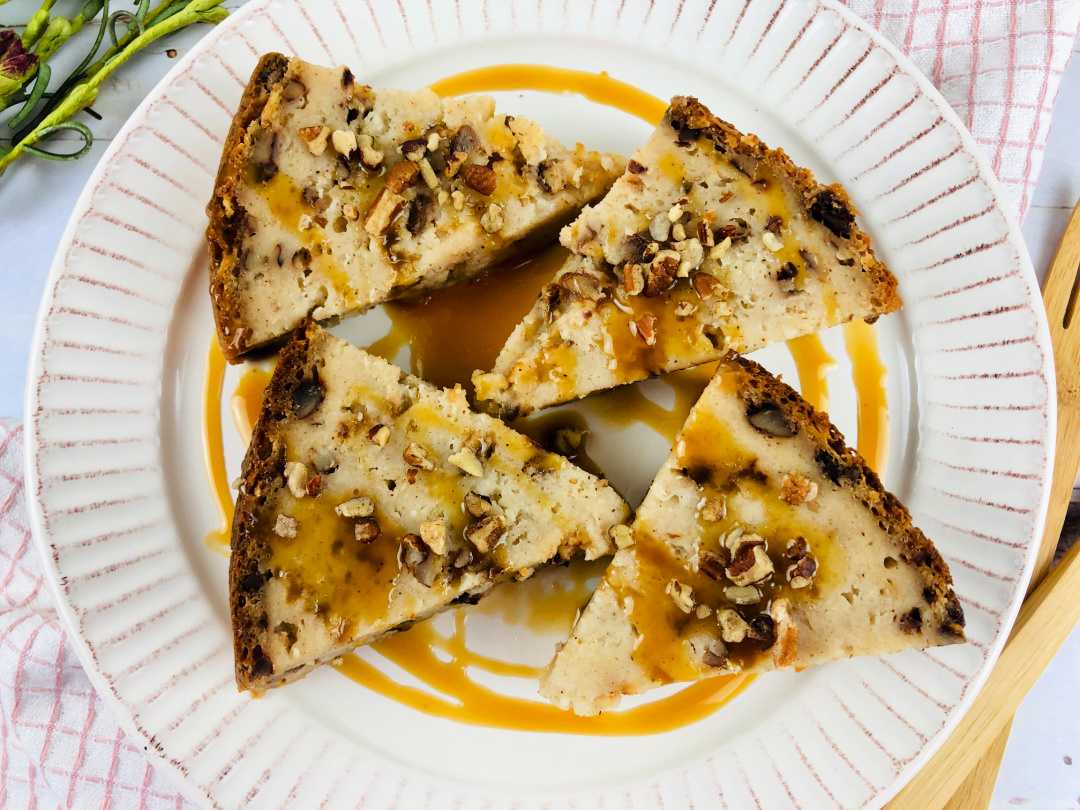
Introducing: slow cooker cinnamon pecan dump cake. Cinnamon pecan dump cake is a great dessert to make in the slow cooker.
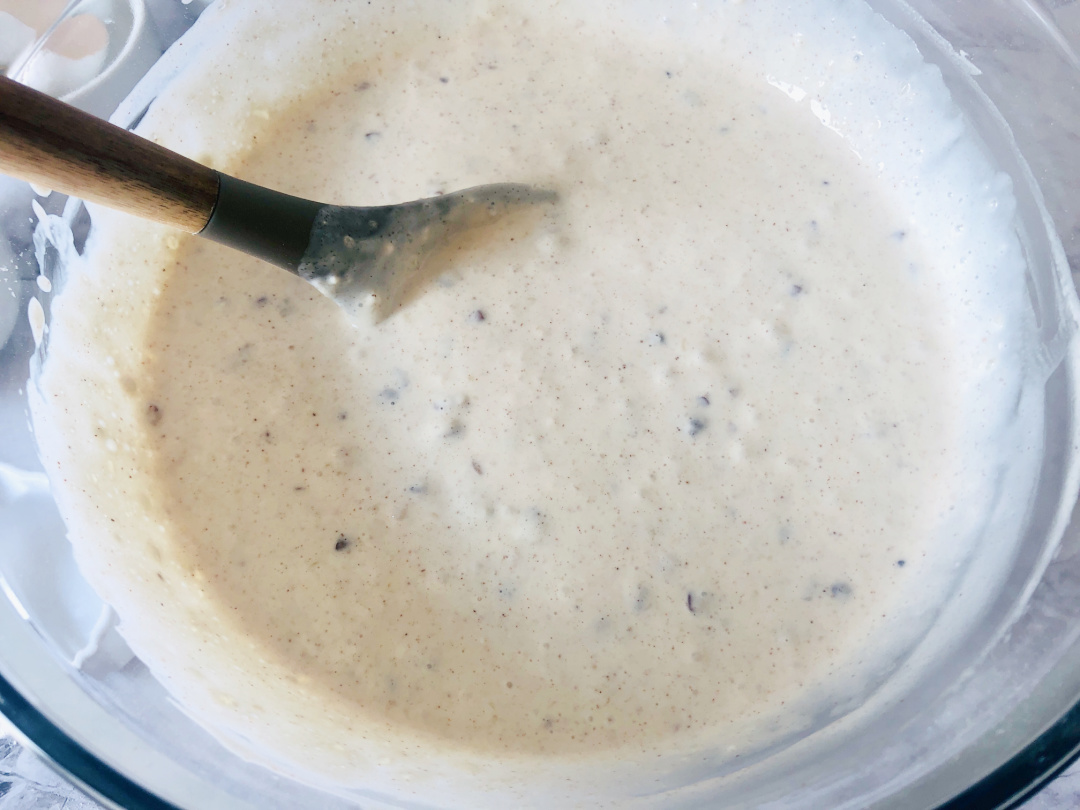
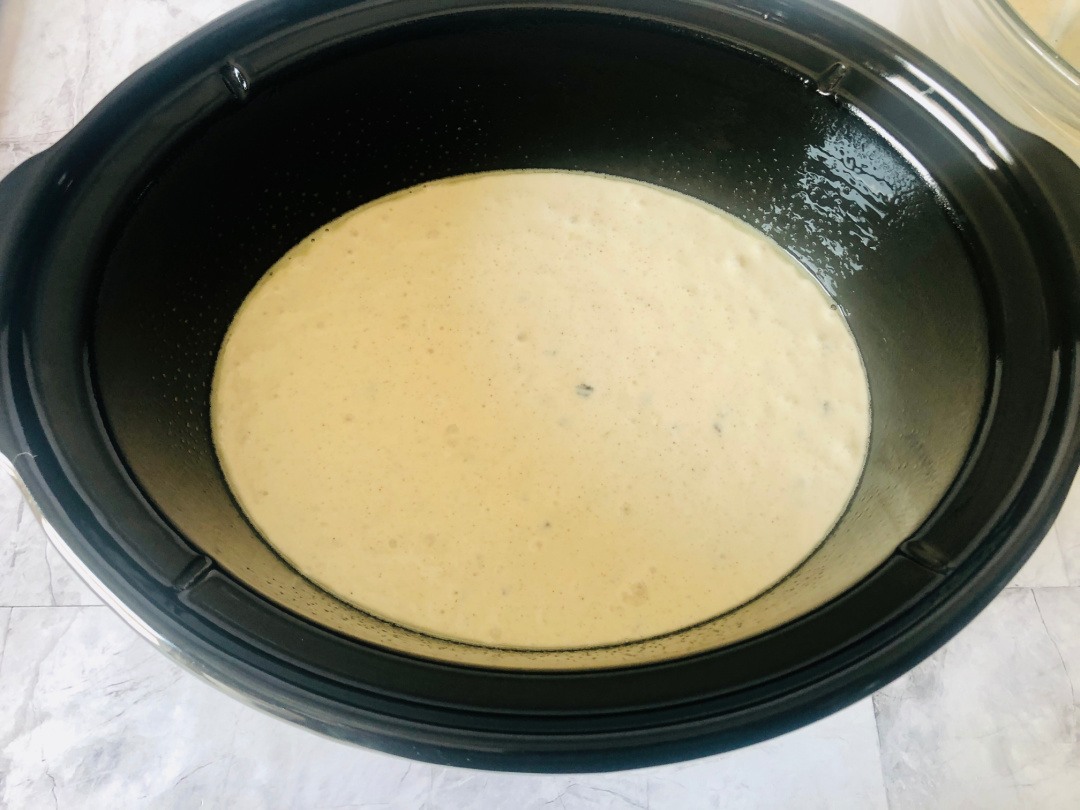
All of the ingredients go into one bowl, and then it goes in the slow cooker for 3 hours. This allows them to meld together into an irresistible moist cake that will be your new favorite fall treat!
There is no need for an oven, which means less dishes by the end of this recipe! Give this easy dessert recipe a try tonight!
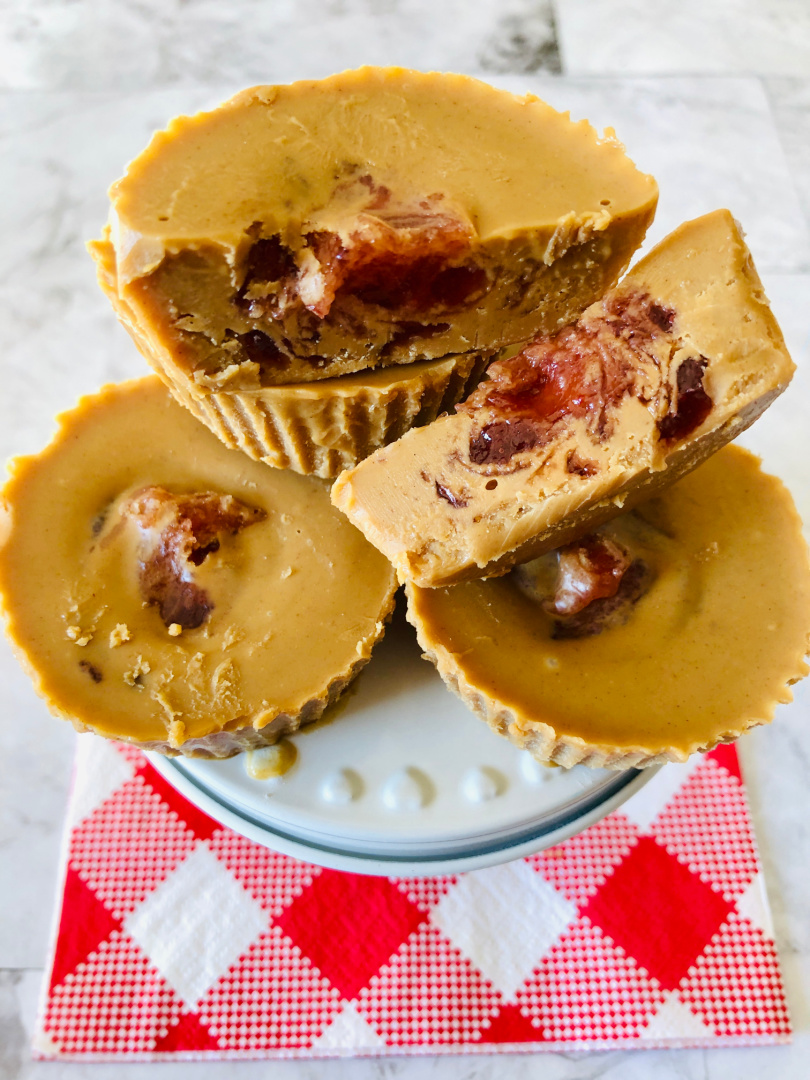
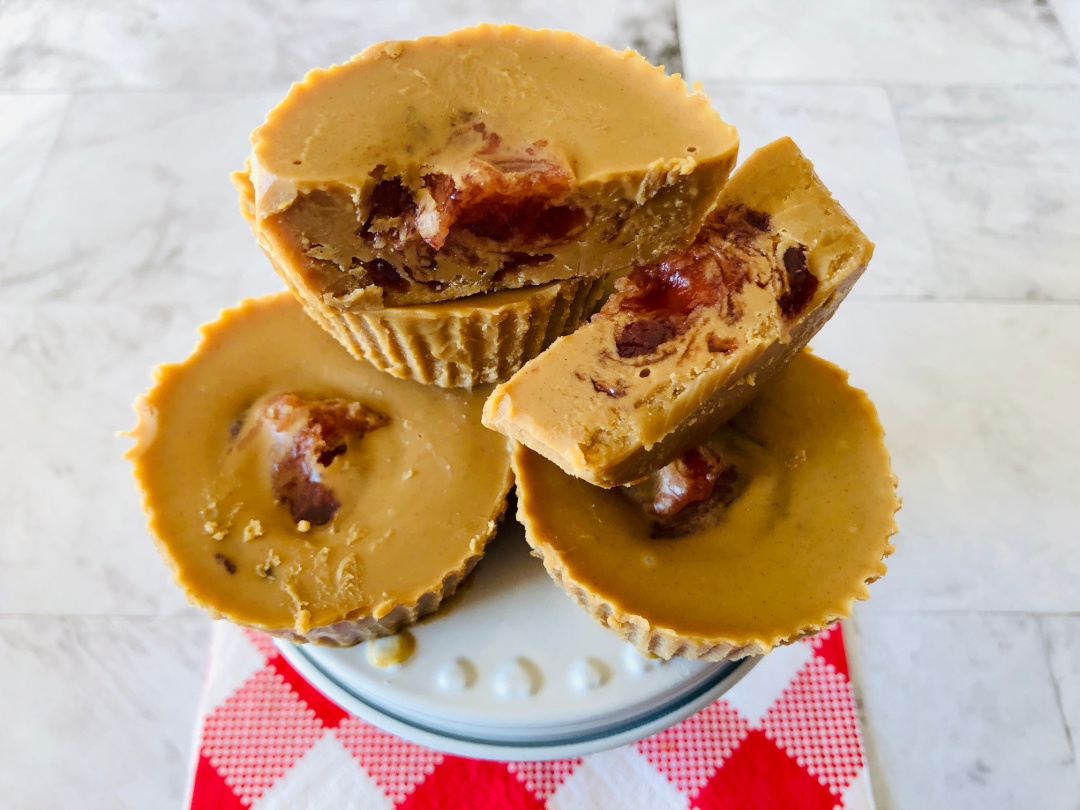
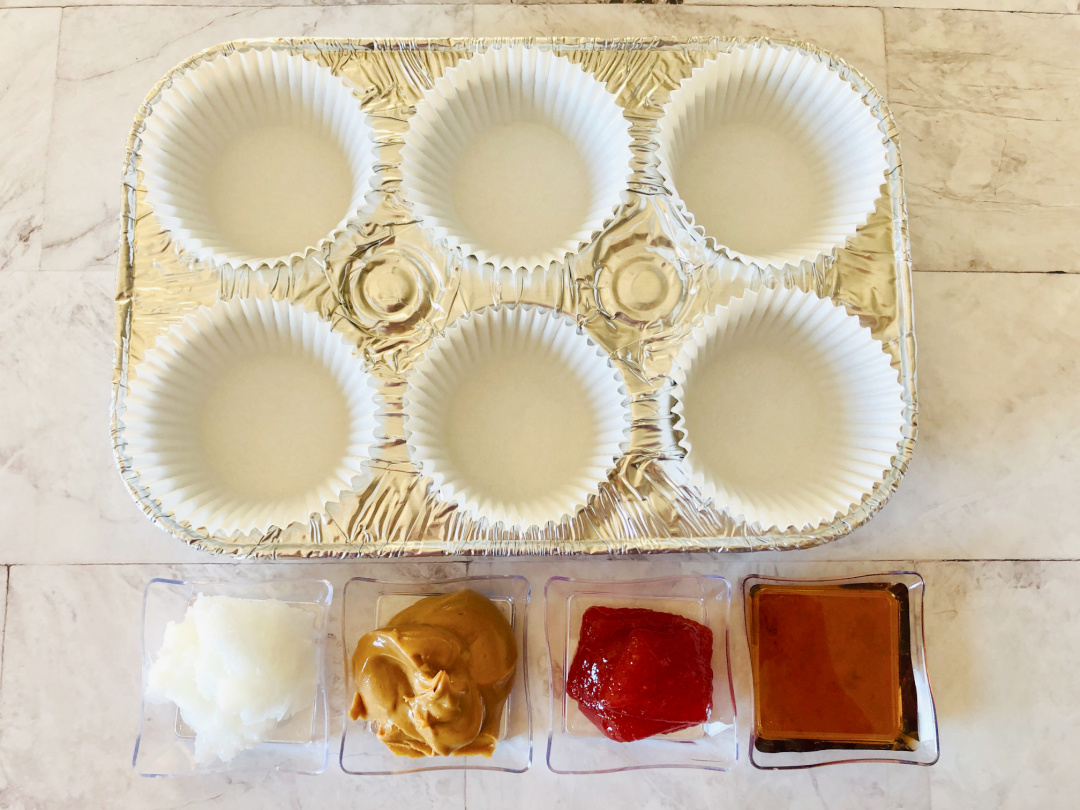
Kids and adults will enjoy these Peanut Butter and Jelly Cups! Serve these as a dessert or snack option and see how long they last!
Peanut butter and jelly is the perfect combination.
My kids LOVE peanut butter and jelly. When I need a quick and easy dessert to make for the kids to enjoy, this Peanut Butter and Jelly Cups recipe is IT!
These tasty treats can be enjoyed as a snack with a cold glass of milk. Enjoy!
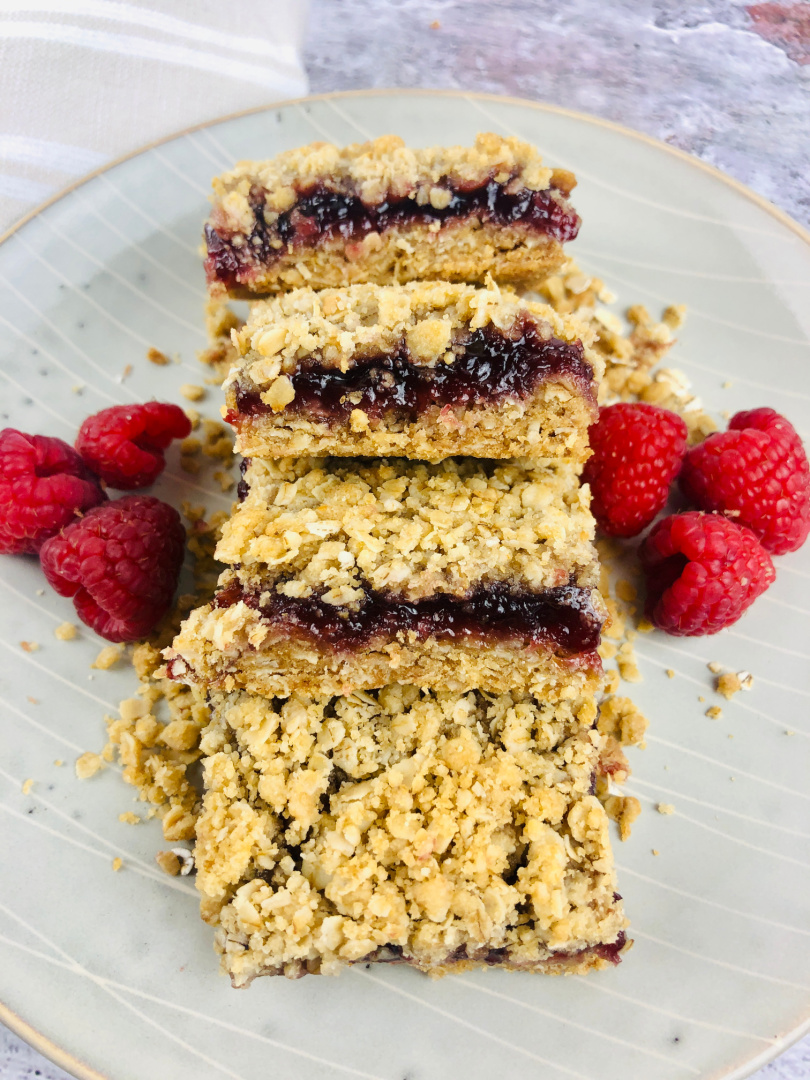
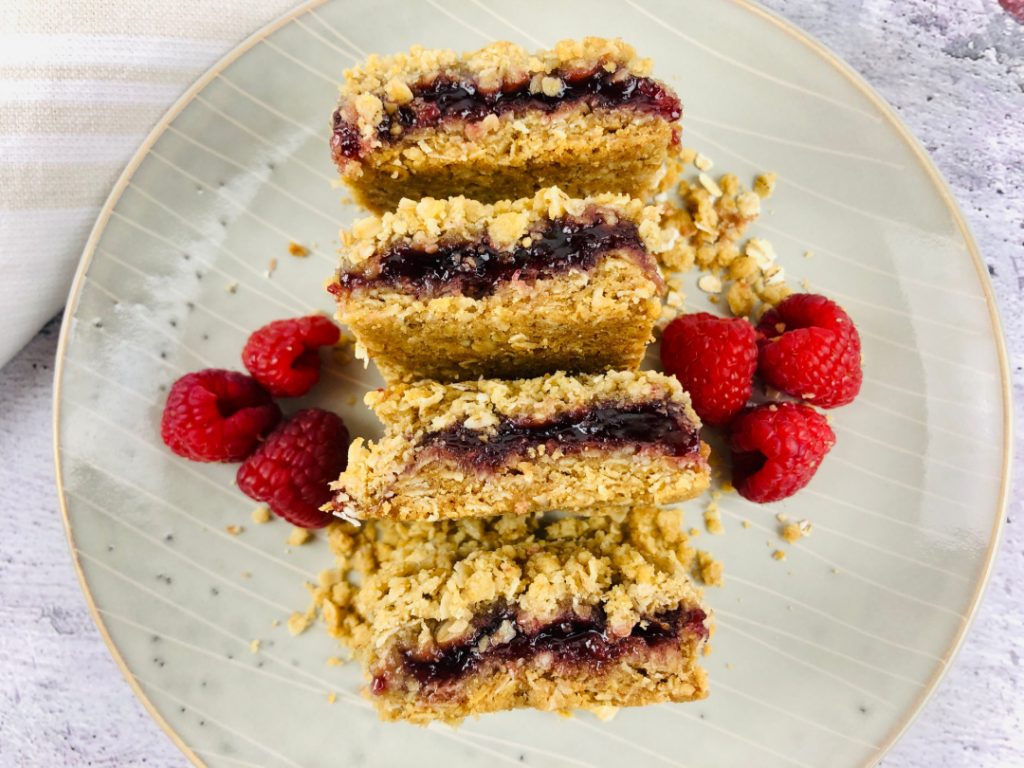
These tasty Raspberry Oatmeal Bars can be enjoyed for breakfast, snack, or dessert! Pair with fresh raspberries and a glass of milk or coffee.
This bar recipe is perfect to serve for your family or guests! Oatmeal bars are easy to make and require a few basic ingredients.
The raspberry filling paired with the oatmeal and brown sugar make these a popular choice for breakfast! Or, save them as a dessert to enjoy after your favorite meal.
There are a variety of oatmeal bar flavors to try. Make sure you try the following recipes below, too!
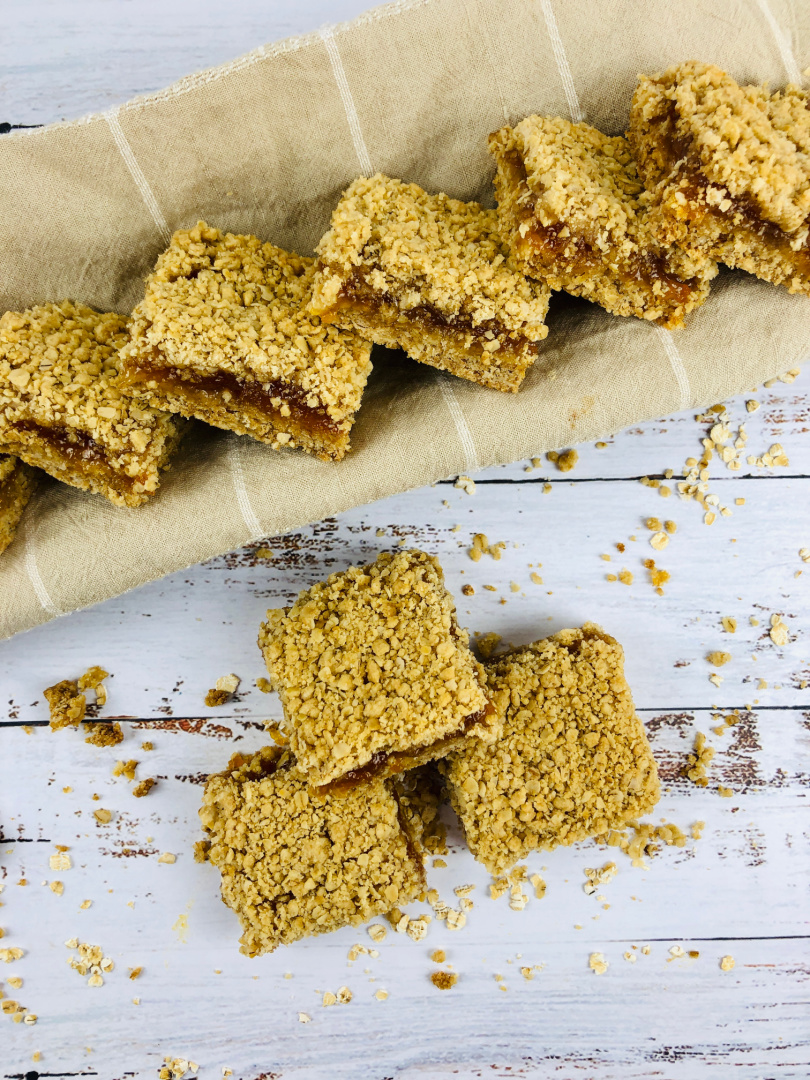
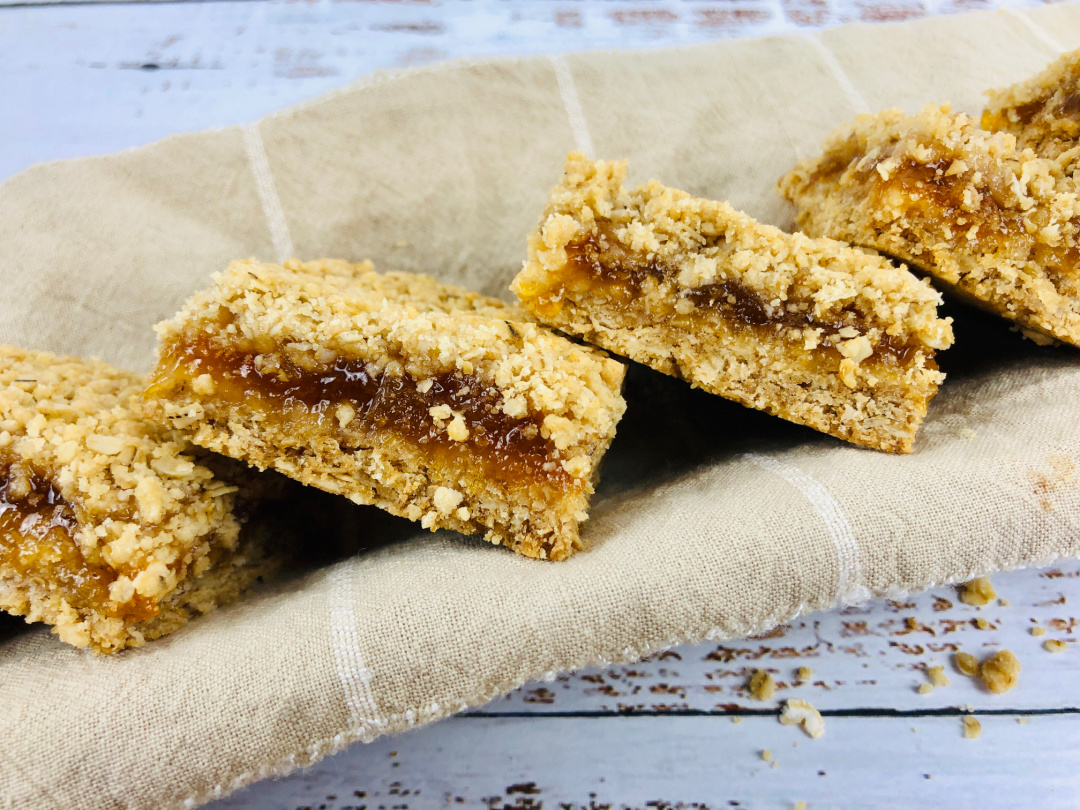
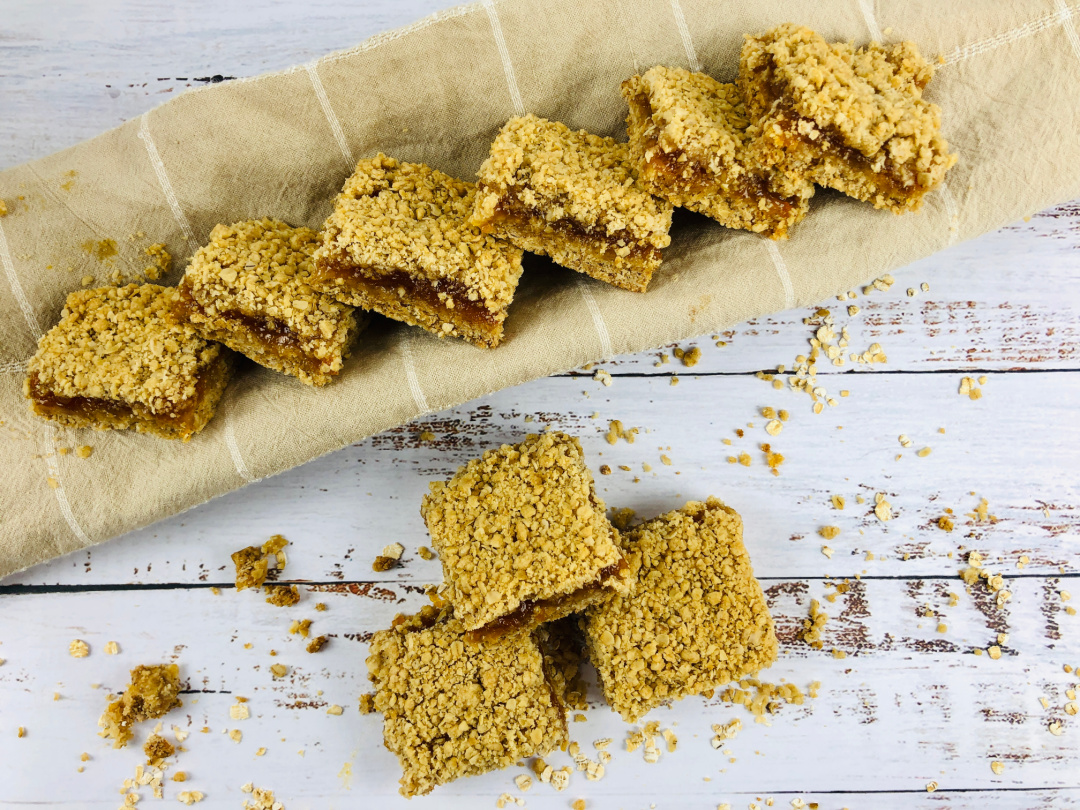
Serve these delicious Apricot Oatmeal Bars at your next gathering! These bars are an excellent choice for breakfast, snack, or dessert any time of year.
Apricot Oatmeal Bars: A Simple Treat with Southern Charm
If you’re looking for a simple homemade dessert that brings comfort, flavor, and a little old-fashioned charm to the table, these apricot oatmeal bars are the answer.
Whether you’re feeding a crowd at a church potluck, packing a sweet treat in the kids’ lunchboxes, or just want something to enjoy with your morning coffee, this is one of those easy fruit bar recipes with oats that checks all the boxes.
These apricot jam bars remind me of something you’d find cooling on grandma’s kitchen counter.
There’s something about the mix of buttery oat crumble and sweet, tangy jam that just feels like home.
They’re not overly fancy or fussy—just a solid, dependable recipe you’ll come back to again and again.
These easy apricot oatmeal bars are perfect for busy folks who want to throw together a quick dessert without pulling out every mixing bowl in the kitchen.
They’re great for parents who want a not-too-sugary snack for the kids, or anyone looking for a bake sale hit that stands out from the usual cookies and brownies.
They also work well for folks who like to make ahead and freeze their baked goods—these bars freeze like a charm.
When to Make Them
These old fashioned jam bar desserts are perfect any time of year, but they really shine in the spring and summer when lighter fruit-based desserts are more popular.
They’re also great during the holidays when you need something sweet on the dessert table that isn’t pie or cake.
Basically, if you need a make-ahead treat for a picnic, potluck, or Sunday supper, you’re in the right place.
What They’re Good For
These bars aren’t just tasty—they’re versatile. This is the kind of recipe that pulls double duty.
Serve them as a sweet afternoon snack with a cold glass of milk, or slice them into smaller squares and add them to a dessert tray alongside cookies and candies.
They’re also one of the best oatmeal jam bars for lunchboxes since they hold up well and aren’t overly messy.
Where to Serve ‘Em
Take a pan of these easy apricot oatmeal bars for potluck gatherings, school events, or family reunions.
They don’t need refrigeration, which makes them a great option when you’re baking ahead and traveling.
Set out a platter at a backyard BBQ or wrap a few up for a neighbor—this is one of those desserts that just makes folks feel welcome.
How to Get Creative with This Recipe
Here’s the fun part—this recipe can be changed up in all kinds of ways depending on what you’ve got in the pantry.
Try using raspberry, fig, or peach preserves if apricot isn’t your thing. Want to make these bars more breakfast-friendly?
Swap out half the flour for whole wheat and toss in a handful of chopped nuts.
Looking for a gluten-free dessert bar recipe? Just use a good gluten-free flour blend and certified gluten-free oats.
You can also cut them into small bites and drizzle with a glaze or powdered sugar for more of a “tea time” feel.
Or serve them warm with a scoop of vanilla ice cream for a down-home dessert that feels a little more special.
Whether you’re hosting a crowd or just need a quick and easy dessert to keep on hand, these apricot oatmeal bars are a dependable go-to.
They’re the kind of treat that doesn’t need to shout to be good—and that’s exactly what makes them a classic.
Let me know in the comments if you try a different jam combo or make them gluten-free—I love seeing how y’all make these recipes your own!
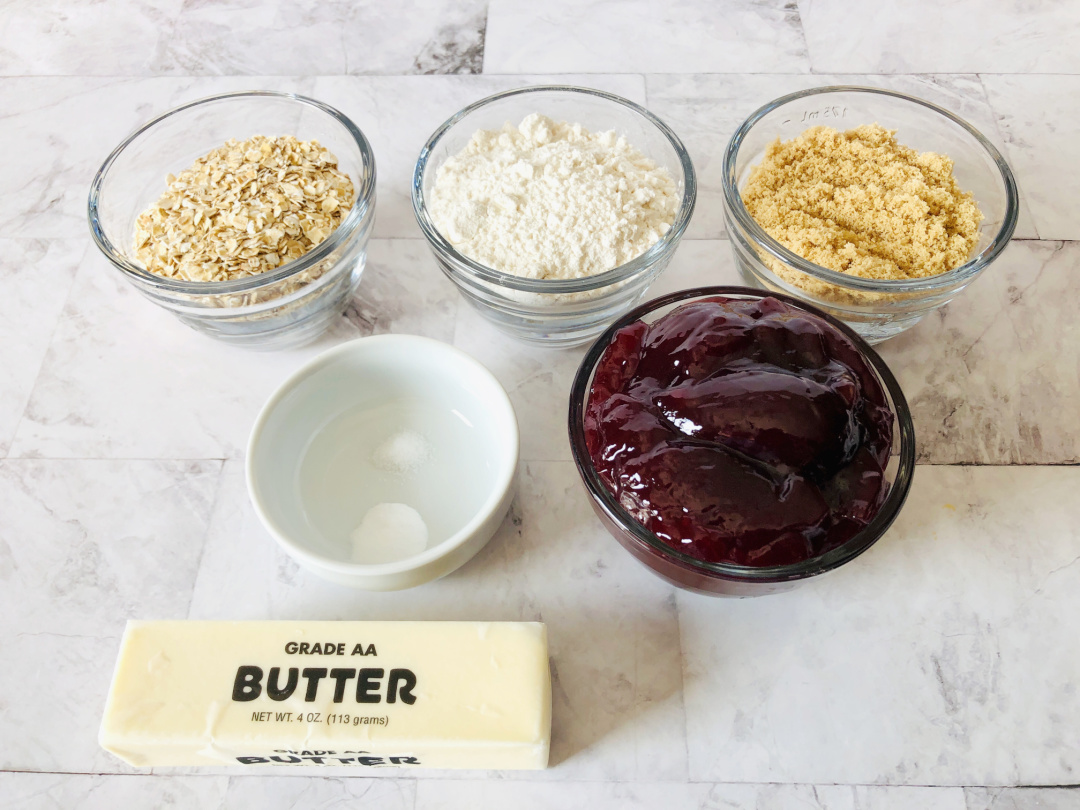
Apricot Oatmeal Bars
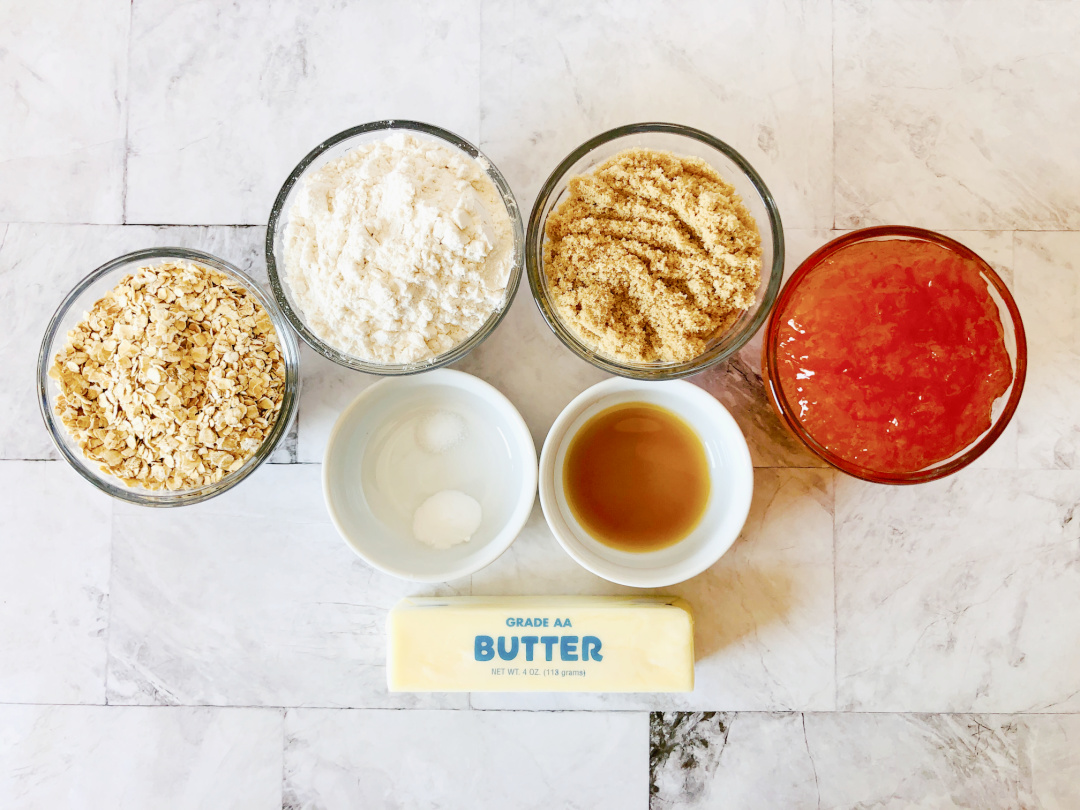
Ingredients:
½ cup light brown sugar or coconut sugar
1 cup flour or gluten free flour
¼ teaspoon baking soda
⅛ teaspoon salt
1 cup rolled oats
½ teaspoon vanilla extract
½ cup butter, softened
¾ cup apricot jam
Directions:
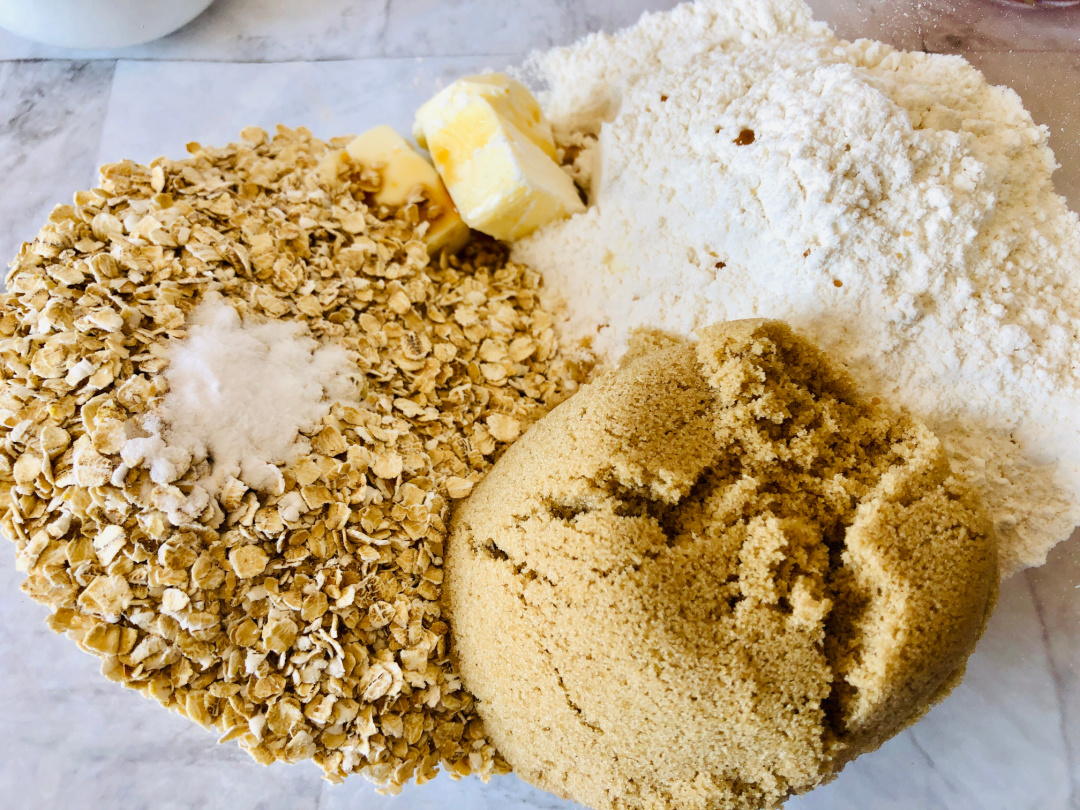
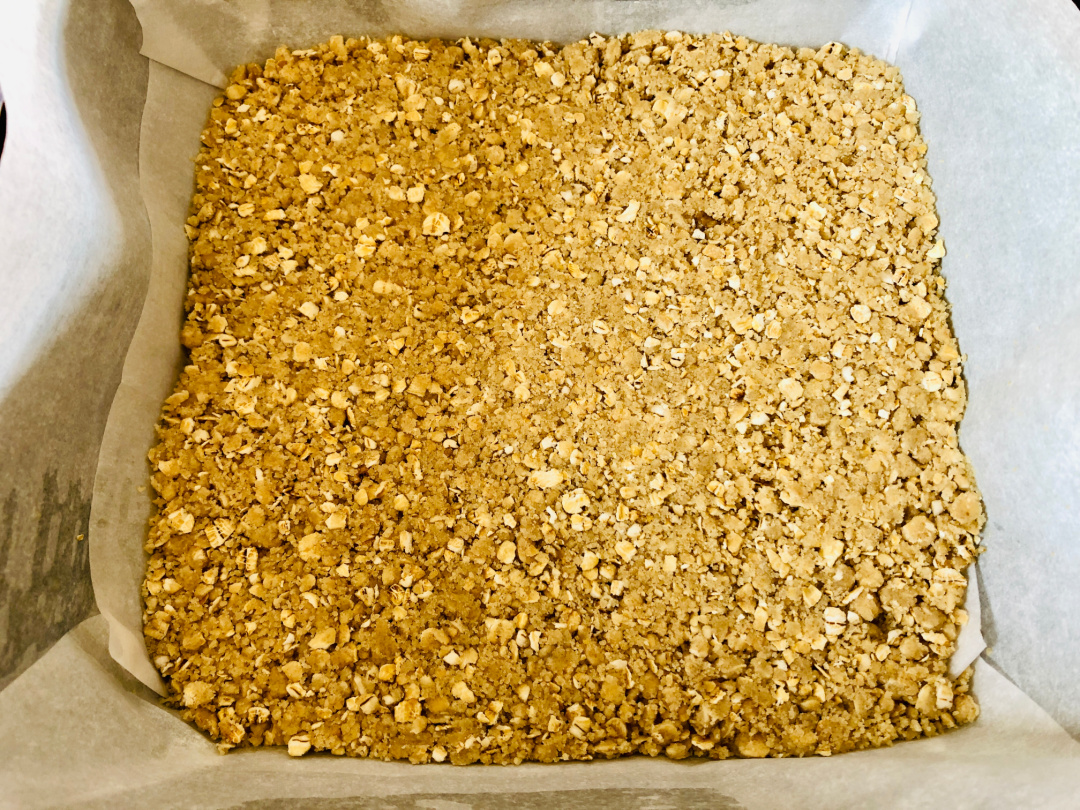
Preheat oven to 350 and line 8×8 square baking dish with parchment paper.
Combine brown sugar, flour, baking soda, salt, and oats.
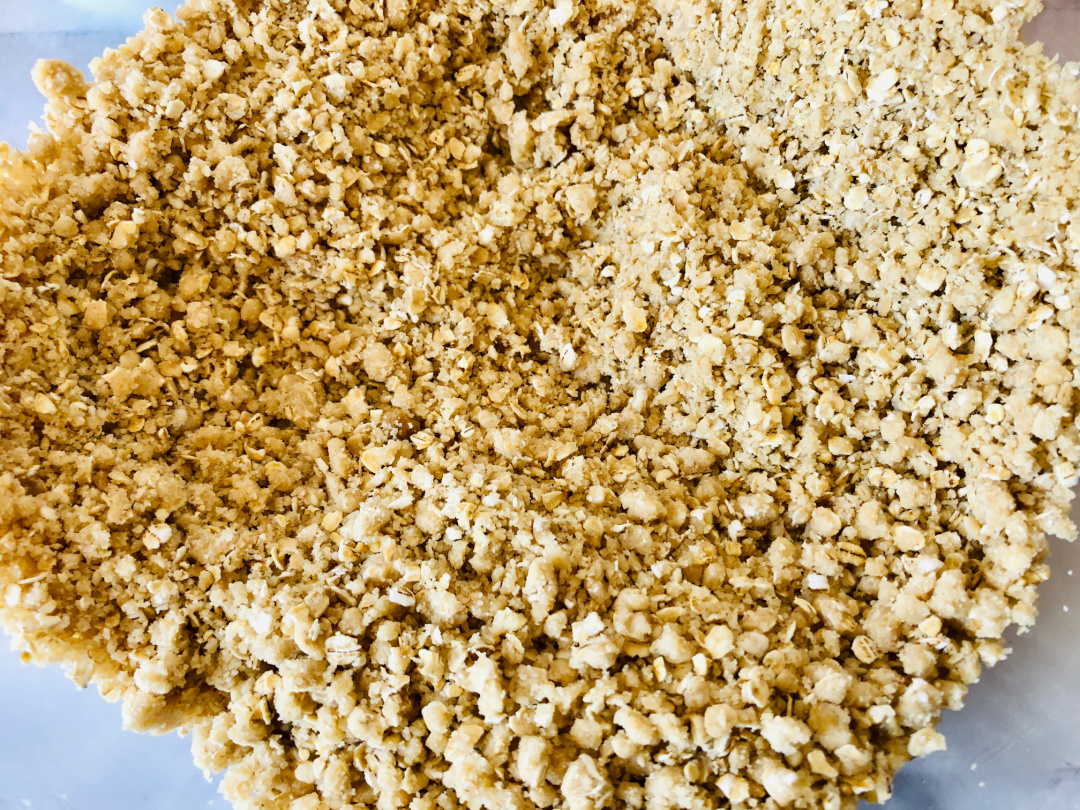
Stir or use hands to incorporate butter until the mixture is crumbly.
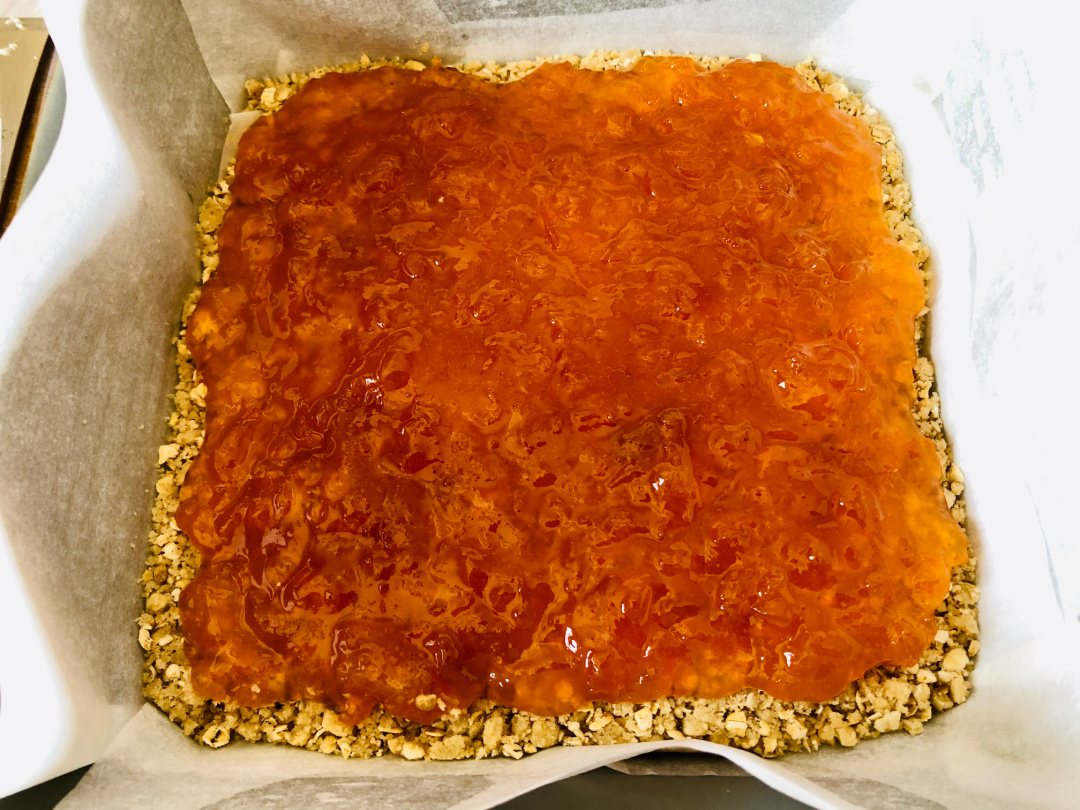
Press 2 cups into bottom of baking dish.
Next, evenly spread jam to ¼ inch from edge.
Sprinkle on remaining crumb mixture and lightly press into jam.
Bake 30-40 minutes until light brown.
Cool, cut into bars and serve.
Apricot Oatmeal Bars
Ingredients
½ cup light brown sugar or coconut sugar
1 cup flour or gluten free flour
¼ teaspoon baking soda
⅛ teaspoon salt
1 cup rolled oats
½ teaspoon vanilla extract
½ cup butter, softened
¾ cup apricot jam
Instructions
Preheat oven to 350 and line 8×8 square baking dish with parchment paper.
Combine brown sugar, flour, baking soda, salt, and oats.
Stir or use hands to incorporate butter until the mixture is crumbly.
Press 2 cups into bottom of baking dish.
Next, evenly spread jam to ¼ inch from edge.
Sprinkle on remaining crumb mixture and lightly press into jam.
Bake 30-40 minutes until light brown.
Cool, cut into bars and serve.
Frequently Asked Questions – Apricot Oatmeal Bars
1. Can I use a different kind of jam? Yes! While apricot jam gives these bars a sweet and slightly tart flavor, you can substitute it with peach, raspberry, strawberry, or even fig jam depending on your preference.
2. Can I make these bars gluten-free? Absolutely. Just use a gluten-free all-purpose flour and make sure your oats are certified gluten-free.
3. Do I have to use light brown sugar? No, you can substitute coconut sugar or even white granulated sugar. Brown sugar gives a richer, deeper flavor, but other sugars will still work.
4. What kind of oats should I use? Rolled oats are best for this recipe. Avoid instant or steel-cut oats, as they won’t provide the same texture.
5. Can I make these bars dairy-free? Yes, you can replace the butter with a dairy-free alternative like vegan butter or coconut oil (use refined if you want to avoid a coconut flavor).
6. How do I store these bars? Store them in an airtight container at room temperature for up to 3 days, or refrigerate them for up to a week. You can also freeze them for up to 3 months.
7. Can I double the recipe? Yes! Just bake it in a 9×13-inch pan and watch the baking time—it may need a few extra minutes in the oven.
8. The topping didn’t get very brown. What should I do? Oven temperatures vary. Try baking for an extra 5 minutes, or you can briefly broil the top (watch it closely!) for 1–2 minutes to add a golden finish.
9. Do these bars need to be refrigerated? They don’t need to be, but refrigerating them helps them hold their shape better, especially in warmer climates.
10. Can I use quick oats instead of rolled oats? Quick oats will work in a pinch, but the texture may be softer and less crumbly than with rolled oats.
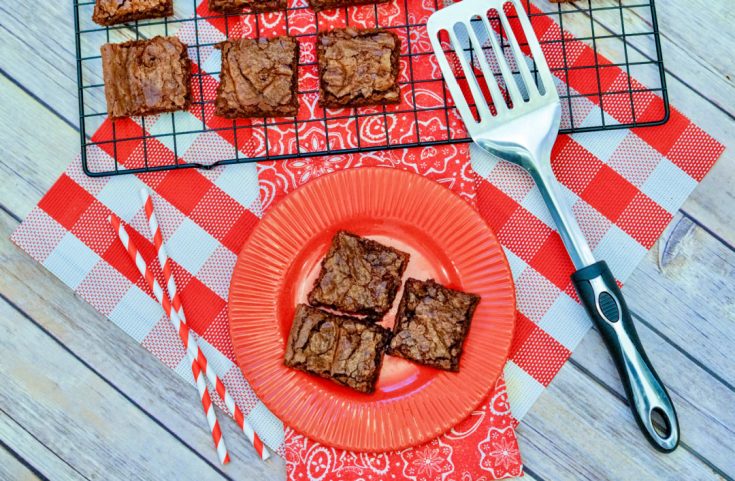
There’s something about a pan of fresh, homemade chewy chocolate brownies that makes any day better.
This is one of those easy dessert recipes that doesn’t take much effort but gives you big results—rich, fudgy flavor with just the right amount of chew.
Whether you’re baking for your family, a church gathering, or just wanting something sweet after supper, these brownies are the kind you’ll want to make again and again.
This recipe is perfect for busy parents, chocolate lovers, and anyone who wants a simple homemade dessert without a long list of ingredients.
If you’re new to baking, this is a beginner-friendly recipe that doesn’t require fancy tools or skills.
For those who usually grab a boxed mix, this is a great way to take that next step toward making brownies from scratch—you’ll taste the difference.
When to Make Homemade Chewy Chocolate Brownies
These brownies work for just about any occasion. Bake them on a quiet weeknight when you want a quick sweet treat.
Whip up a batch for potlucks, holidays, or birthday parties when you need a crowd-pleasing dessert.
They’re also a good choice for school lunches or after-school snacks since they cut easily into squares and pack well.
Why This Brownie Recipe Works
Unlike store-bought mixes, this recipe uses real butter, cocoa powder, and simple pantry staples.
That’s what gives them their rich chocolate flavor and chewy texture.
They’re not too cakey, not too fudgy—just the kind of brownies people search for when they want something that tastes homemade.
And because the ingredients are common, you can usually pull this recipe together without an extra trip to the store.
How to Serve Homemade Brownies
Sure, you can enjoy them straight from the pan, but there are plenty of ways to dress them up.
Serve them warm with a scoop of vanilla ice cream for an easy brownie sundae.
Add a drizzle of caramel or chocolate sauce and a few chopped nuts for extra flavor.
For holidays or gatherings, cut them into bite-sized squares and arrange them on a platter for an easy finger-food dessert.
You can even crumble brownies over yogurt or mix them into milkshakes for a fun twist.
Where to Enjoy These Brownies
These brownies fit just as well on a Sunday dinner table as they do at a neighborhood cookout.
They travel easily, so they’re perfect for bake sales, church events, or picnics.
If you want to send a little homemade love to a friend or neighbor, a plate of brownies wrapped in parchment and tied with string makes a thoughtful gift.
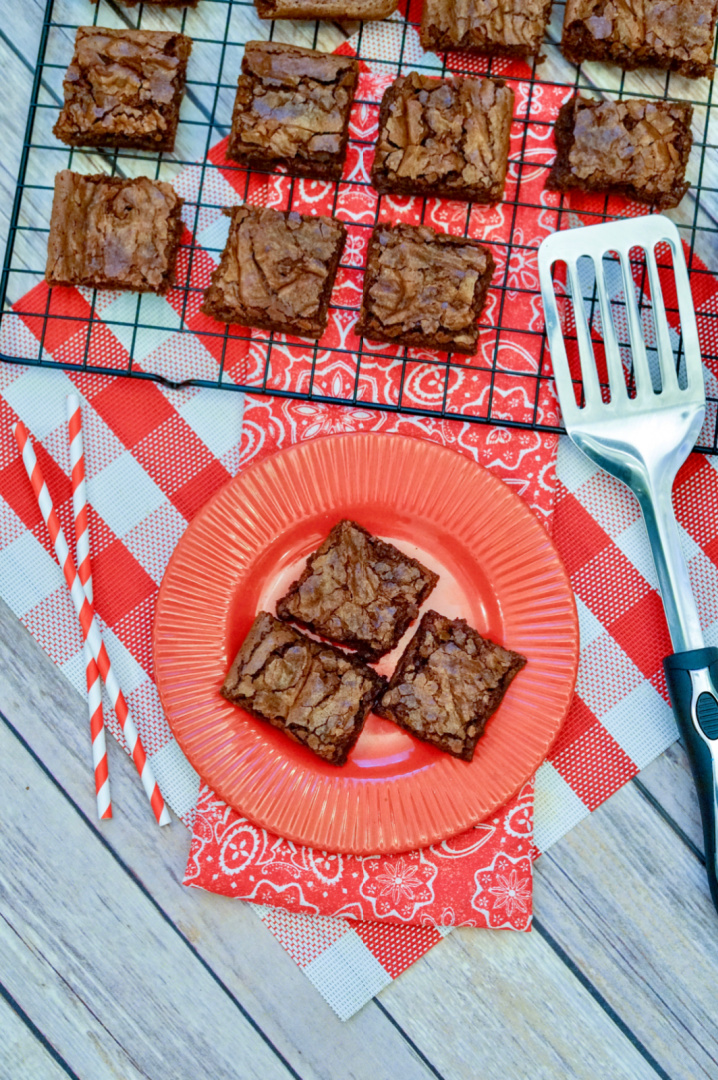
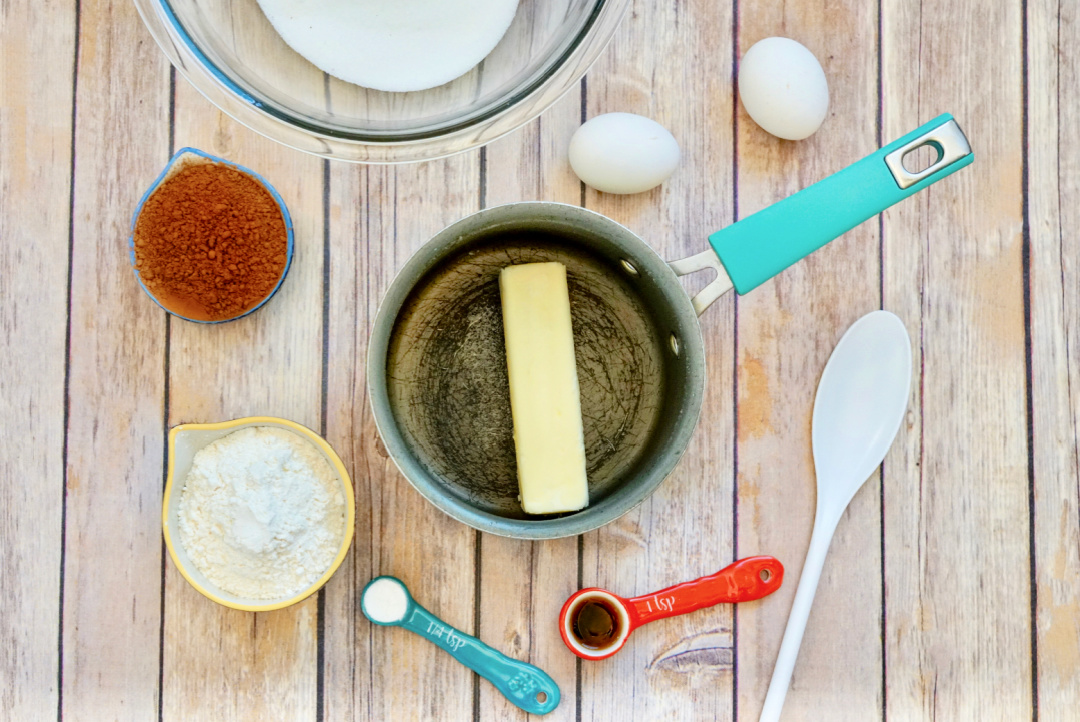
Homemade Chewy Chocolate Brownies
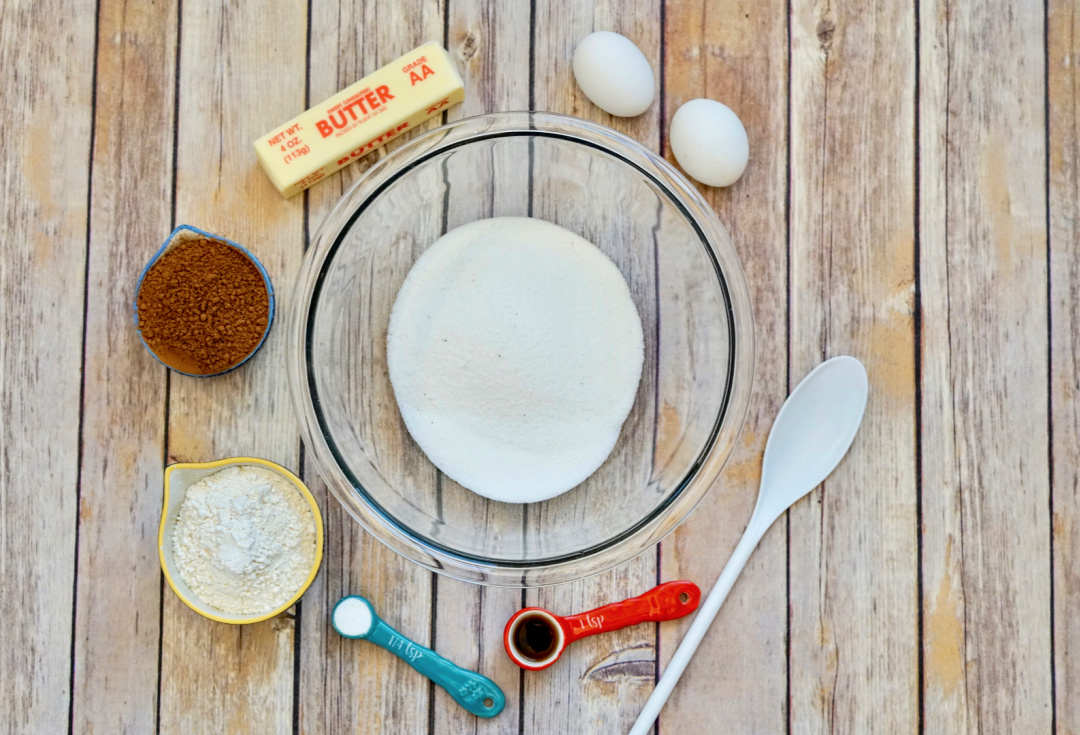
Ingredients:
• 8 tbsp. butter • 1 cup sugar • 1/3 cup cocoa powder (unsweetened) • 1 tbsp. vanilla extract • 2 large eggs • ½ cup all-purpose flour • ¼ tsp. baking powder
Directions:
Preheat the oven to 350°F.
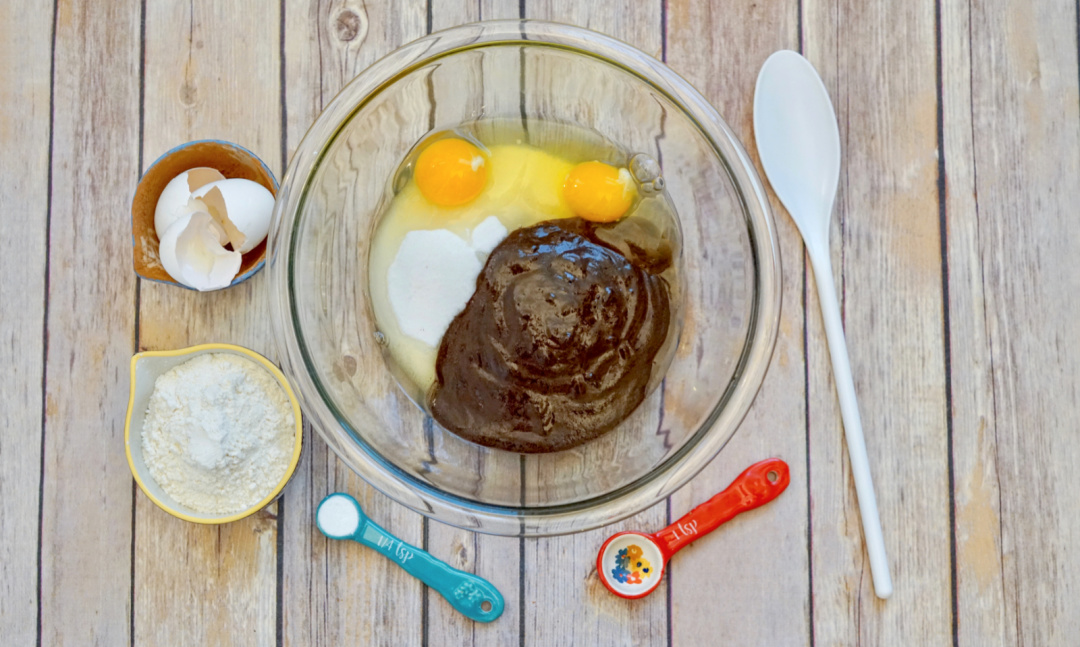
In a small saucepan, melt the butter over low heat.
Turn off the heat and add the cocoa powder. Stir until combined.
Pour butter/cocoa mixture into the sugar.
Add eggs and vanilla.
Mix well.
Add baking powder to the flour and slowly add it to the wet mixture. Stir until combined.
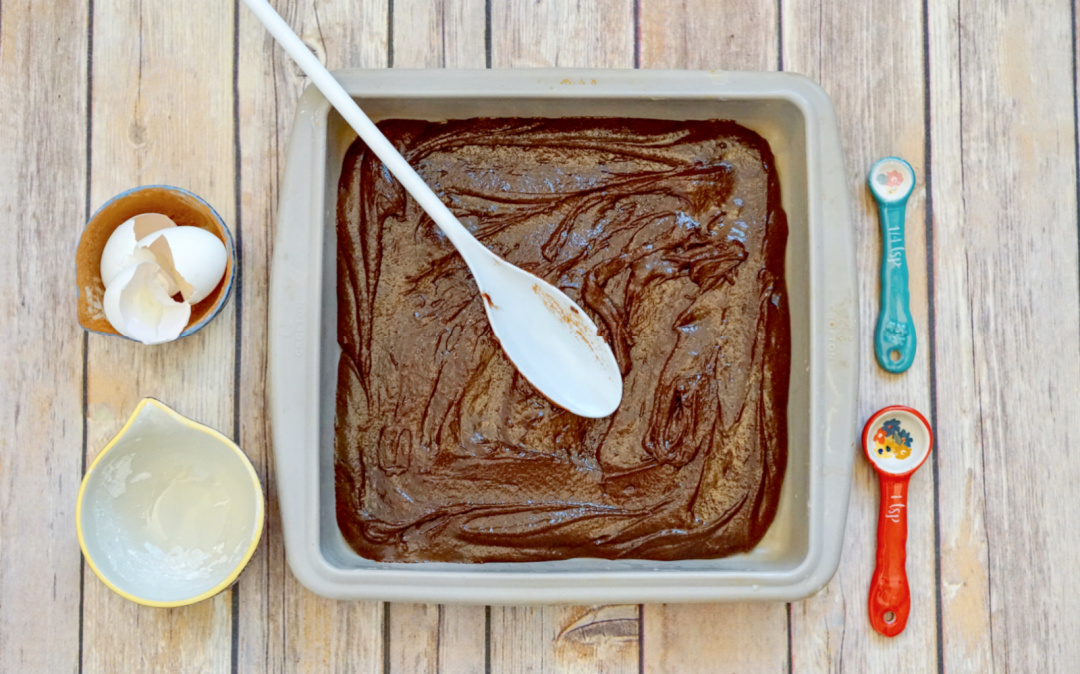
Pour the batter into the 8X8 non stick pan.
Bake for 15 minutes or until a toothpick inserted near the center comes out mostly clean.
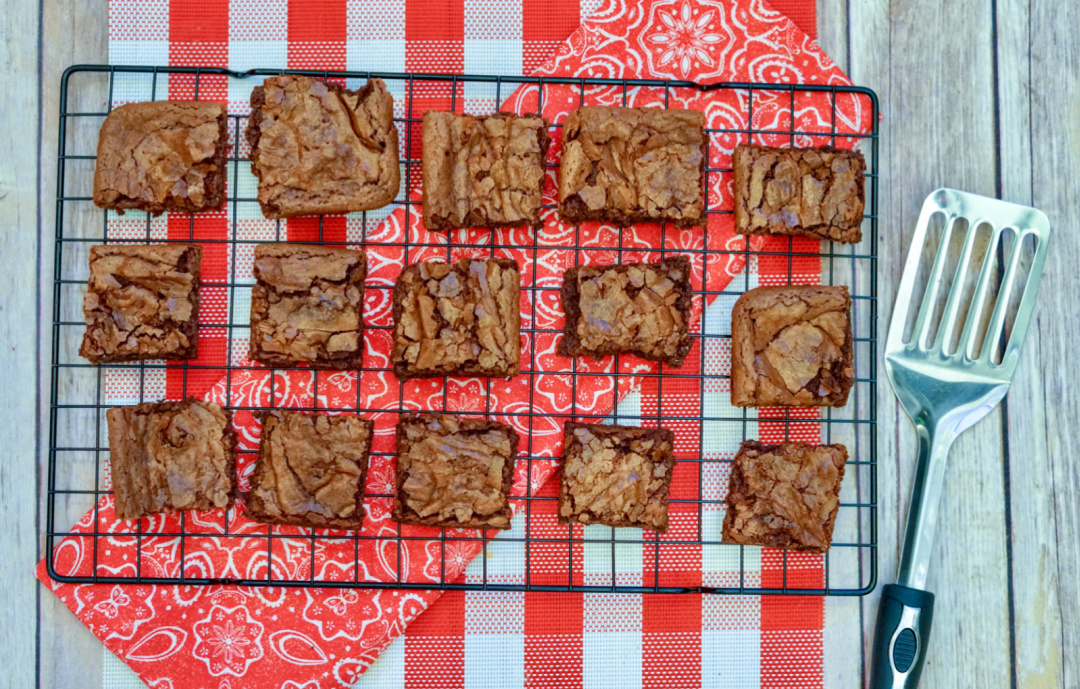
Allow brownies to be fully cooled before cutting into squares. Use a wire rack if desired.
Frequently Asked Questions
How do I make brownies chewy instead of cakey? Using the right balance of butter, sugar, and cocoa helps create that chewy texture. Avoid overbaking—pull them out when a toothpick comes out with just a few moist crumbs.
Can I double this brownie recipe? Yes, just double the ingredients and bake in a 9×13-inch pan. You may need to add a few extra minutes to the bake time, but keep checking with a toothpick.
What’s the best way to cut brownies cleanly? Let them cool completely before cutting. Use a sharp knife and wipe it off between slices for neat squares.
Can I freeze homemade brownies? Yes, these brownies freeze well. Wrap them tightly in plastic wrap or foil and store them in an airtight container for up to 3 months. Thaw at room temperature before serving.
How do I make brownies more chocolatey? If you want a richer chocolate flavor, add a handful of chocolate chips to the batter before baking.
Chewy Chocolate Brownies
Ingredients
8 tablespoons butter
1 cup sugar
1/3 cup cocoa powder (unsweetened)
1 tablespoon vanilla extract
2 large eggs
½ cup all-purpose flour
¼ teaspoon baking powder
Instructions
1. Preheat the oven to 350°F. 2. In a pan, melt the butter over low heat. 3. Turn off the heat and add the cocoa powder. Stir until combined. 4. Pour butter/cocoa mixture into the sugar. 5. Add eggs and vanilla. 6. Mix well. 7. Add baking powder to the flour and slowly add it to the wet mixture. Stir until combined. 8. Pour the batter into the silicone or non-stick pan. 9. Bake for 15 minutes or until a toothpick inserted near the center comes out mostly clean. 10. Let fully cooled before cutting into squares.