If you’re looking for a simple and delicious way to add some nutritious comfort food to your menu, give these Slow Cooker Sweet Potatoes a try.
When it comes to healthy and hearty winter comfort foods, sweet potatoes are tough to beat. And when you cook them in your slow cooker, they’re practically effortless too.
Sweet potatoes are a delicious and healthy food that can be enjoyed in many different ways.
One popular way to cook sweet potatoes is in a slow cooker. Slow cookers are a great way to cook sweet potatoes because they retain more of the nutrients than other methods of cooking.
Just peel and chop a few sweet potatoes, toss them in your slow cooker with some seasonings, and let them cook for a few hours.
You’ll end up with tender, delicious sweet potatoes that are perfect for satisfying your hunger.
You won’t be disappointed!
What can you serve Slow Cooker Sweet Potatoes with?
There are a few different ways that you can serve slow cooker sweet potatoes. One option is to serve them as a side dish. This is a great way to enjoy the sweet potato flavor without having to do too much work.
Another option is to use them in a soup or chili. This is a great way to add some extra flavor and nutrition to your meal.
Finally, you could also use them as an ingredient in a casserole or other dish.
Whichever way you choose to serve them, slow cooker sweet potatoes are sure to be a hit!
Slow Cooker Chicken and Rice Soup
Slow Cooker Chicken Chorizo Gumbo
How do you store leftover Slow Cooker Sweet Potatoes?
Leftover slow cooker sweet potatoes can be stored in the fridge for up to four days. Be sure to place them in an airtight container to keep them fresh.
When you’re ready to eat them again, simply reheat in the microwave or oven.
Can you freeze Slow Cooker Sweet Potatoes?
Many people wonder if sweet potatoes can be frozen after they have been cooked in a slow cooker.
The answer is yes!
Sweet potatoes can be frozen after they have been cooked in a slow cooker. However, there are some things to keep in mind when freezing sweet potatoes.
When freezing sweet potatoes, it is important to make sure that they are properly cooled before placing them in the freezer.
This will help to prevent them from becoming mushy when thawed. sweet potatoes can be frozen in either an airtight container or a freezer bag.
When thawing sweet potatoes, it is important to thaw them in the refrigerator.
Do not thaw sweet potatoes at room temperature as this can cause them to become mushy.
Once thawed, sweet potatoes can be reheated in the microwave or oven.
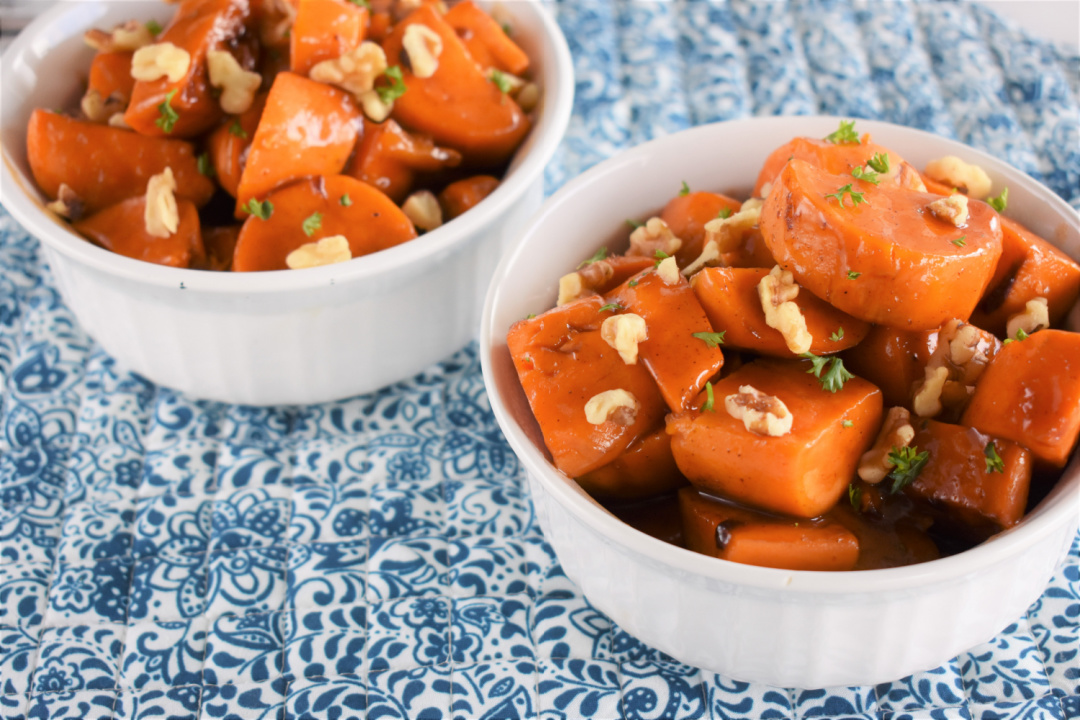
Slow Cooker Sweet Potatoes
Ingredients:
- 6 large sweet potatoes, peeled and cubed
- 1 ½ tbsp. cornstarch
- 4 tbsp. butter, salted
- 1 cup brown sugar, packed
- 1 tsp. pumpkin pie spice
- ¼ tsp. cayenne
- 1 tsp. vanilla extract
- ⅓ cup orange juice
- ¼ cup water
- Pinch of salt
- Chopped walnuts and parsley for garnish
Directions:
Place potatoes in a 6 quart slow cooker.
Sprinkle with cornstarch and toss until coated.
Cube butter and place around the potatoes.
Sprinkle it with brown sugar, pumpkin pie spice, and cayenne.
Pour in vanilla extract, orange juice, and water.
Sprinkle with salt and cover with the lid.
Cook on low for 3 hours, stirring once or twice during cook time.
Place in serving dishes and sprinkle with walnuts and parsley.

Slow Cooker Sweet Potatoes
Ingredients
- 6 to 7 sweet potatoes, peeled and cubed
- 1 ½ tbsp. cornstarch
- 4 tbsp. salted butter
- 1 cup packed brown sugar
- 1 tsp. pumpkin pie spice
- ¼ tsp. cayenne
- 1 tsp. vanilla extract
- ⅓ cup orange juice
- ¼ cup water
- Pinch of salt
- Chopped walnuts and parsley for garnish
Instructions
Place potatoes in a 6qt slow cooker.
Sprinkle with cornstarch and toss until coated.
Cube butter and place around the potatoes.
Sprinkle it with brown sugar, pumpkin pie spice, and cayenne.
Pour in vanilla extract, orange juice, and water.
Sprinkle with salt and cover with the lid.
Cook on low for 3 hours, stirring once or twice during cook time.
Place in serving dishes and sprinkle with walnuts and parsley.
Frequently Asked Questions (FAQs) for Slow Cooker Sweet Potatoes
What size should the sweet potato cubes be?
Aim for 1 to 1.5-inch cubes to ensure even cooking within the specified time.
Can I use unsalted butter instead of salted butter?
Yes, you can use unsalted butter. If you do, consider adding a little extra pinch of salt to balance the flavors.
Is there a substitute for pumpkin pie spice?
If you don’t have pumpkin pie spice, you can make your own by combining ½ tsp cinnamon, ¼ tsp ground ginger, ⅛ tsp ground cloves, and ⅛ tsp ground nutmeg.
Can I skip the cayenne?
The cayenne adds a subtle heat to the dish, but if you prefer no heat or don’t have it on hand, you can omit it.
What if I don’t have orange juice?
You can substitute apple juice or even cranberry juice. The main idea is to add some acidity and sweetness.
Is the cornstarch necessary?
The cornstarch helps to thicken the sauce, making it more of a glaze. If you skip it, the sauce may be runnier.
How do I know when the sweet potatoes are done?
The sweet potatoes should be tender and easily pierced with a fork when they’re done.
Can I cook this on the “High” setting of my slow cooker to save time?
Yes, but keep an eye on it. On the “High” setting, the sweet potatoes should be ready in about 1.5 to 2 hours.
How long can I store leftovers?
Leftovers can be stored in an airtight container in the refrigerator for up to 4 days. Reheat before serving.
Can I add other toppings besides walnuts and parsley?
Consider adding toasted pecans, dried cranberries, or even a sprinkle of feta cheese for different flavors and textures.
Remember, the beauty of cooking is the ability to adjust to your own preferences, so feel free to tweak the recipe as desired!